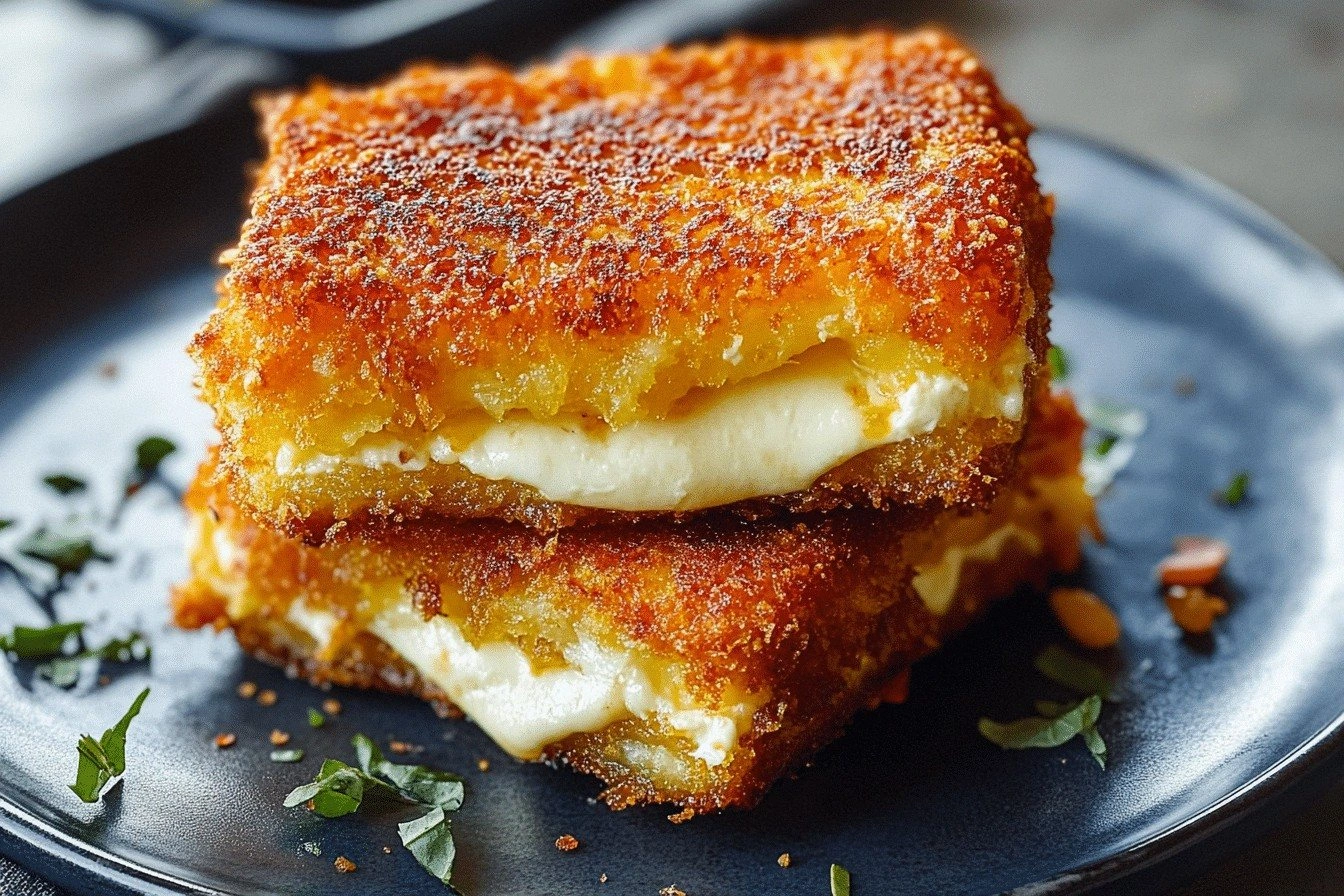
I’ll be honest — I ate half the batch before anyone else got to try it, and that’s because this version of Mozzarella in Carrozza is hands down the best you’ll ever make at home. It all started on a rainy Tuesday when my roommate challenged me to turn a sad leftover mozzarella ball into something that could win a street‑food award. I stared at the limp cheese, the stale white bread, and the empty pan, and I thought, “What if I treat this like a golden ticket instead of a kitchen afterthought?” The result was a crunchy‑outside, ooey‑gooey‑inside marvel that made my kitchen smell like an Italian bakery on a Sunday morning.
Picture this: the moment the first slice hits the hot pan, you hear a sizzle that feels like a tiny fireworks show, and the air instantly fills with a buttery, milky perfume that makes your mouth water before the first bite even lands. The crust turns a deep amber, cracking just enough to reveal a molten core that stretches like a lazy cat waking up from a nap. You’ll feel the warmth of the pan radiating through the handle, hear the faint pop of the batter as it bubbles, and taste the buttery richness that only high‑quality mozzarella can provide. It’s comfort food on steroids, the kind of dish that makes you close your eyes and imagine yourself on a cobblestone piazza, the sun setting behind a pastel‑colored façade.
Most recipes get this completely wrong. They either drown the cheese in a soggy batter, or they fry it so hard that the mozzarella never gets a chance to melt. I’ve tried the “just toss it in flour and fry” method, and the result was a sad, rubbery slab that could double as a doorstop. The secret to my version is a three‑step coating system that builds a protective armor around the cheese, plus a quick‑dip in milk‑egg mixture that creates a custardy sheen. The result? A sandwich that cracks open with a sigh and releases a river of cheese that refuses to stay put.
Okay, ready for the game‑changer? I’m about to walk you through every single step — from choosing the perfect mozzarella to the exact temperature that guarantees a flawless crust. By the end, you’ll wonder how you ever settled for anything less, and I dare you to taste this and not go back for seconds. Let me walk you through every single step — by the end, you’ll wonder how you ever made it any other way.
What Makes This Version Stand Out
- Texture: A triple‑layer coating creates a crust that’s crisp on the outside yet tender enough to let the cheese breathe, delivering that satisfying snap followed by a melt that feels like silk.
- Flavor Balance: A pinch of salt and pepper in the batter lifts the dairy notes without overwhelming them, while the butter or olive oil adds a subtle nutty undertone.
- Simplicity: Only seven core ingredients are needed, all pantry staples, yet the technique feels like a chef’s secret.
- Ingredient Quality: Using fresh mozzarella and soft white bread ensures the interior stays creamy while the exterior stays crunchy.
- Crowd Reaction: This dish consistently clears plates at parties; people stare, they sniff, they bite, and then they line up for another round.
- Make‑Ahead Potential: You can prep the coated sandwiches ahead of time and freeze them, then fry straight from the freezer for a quick snack.
- Versatility: The base is neutral enough to support sweet, savory, or spicy twists without losing its core identity.
- Visual Appeal: The golden‑brown exterior speckled with tiny bubbles looks Instagram‑ready even before the cheese stretches out.
Inside the Ingredient List
The Flavor Base
Fresh Mozzarella is the heart of this dish. Choose a ball that’s packed with moisture and has a milky aroma — the kind that makes you think of a summer garden. If you grab a low‑moisture mozzarella, you’ll end up with a rubbery center that refuses to melt properly. The high‑quality cheese melts like butter on a hot skillet, creating that luxurious stretch you crave. Pro tip: look for mozzarella sold in water, not vacuum‑packed, because the extra hydration translates directly into a creamier interior.
The Texture Crew
Sliced White Bread acts as the structural scaffold. Soft, pillowy slices give the batter something to cling to without drying out, and they toast to a perfect crunch when fried. If you substitute a denser rye or whole‑grain loaf, the crust will become heavy and the cheese may not pull through. Keep the bread slices at room temperature; frozen bread will shatter when you try to coat it.
Flour is the first line of defense. A light dusting ensures the egg‑milk mixture adheres evenly, forming a uniform base for the final breadcrumb‑like crust. Too much flour, however, creates a gummy layer that never crisps. Use all‑purpose flour, sifted, and shake off any excess before dipping the sandwich into the wet batter.
The Unexpected Star
Eggs and Milk together make a custard‑like batter that adds richness and a golden hue. Whisk them together until the mixture is smooth and slightly frothy; this tiny amount of air is what gives the crust that delicate, airy crunch. If you use only eggs, the coating will be too dense; if you use only milk, it won’t hold the flour and bread together. The balance is key, and a dash of pepper in the batter awakens the cheese’s natural sweetness.
The Final Flourish
Olive Oil or Butter is the finishing touch that brings everything together. Butter adds a nutty, caramelized flavor, while olive oil gives a slightly fruity note and a higher smoke point. I prefer a blend of both: start with a spoonful of butter for flavor, then add enough olive oil to cover the pan. Salt is added sparingly; it’s there to enhance, not dominate. A pinch of pepper adds that subtle kick you didn’t know you needed.
Everything's prepped? Good. Let's get into the real action…
The Method — Step by Step
Start by gathering all your ingredients and setting up a three‑station assembly line: a shallow bowl for flour, a second bowl for the egg‑milk mixture, and a third plate for the assembled sandwiches. This organization saves you from scrambling mid‑fry and ensures each slice gets an even coat. I like to line the bowls with parchment paper so cleanup is a breeze. The kitchen should feel like a runway, each step ready for the next model.
Kitchen Hack: Use a fork to gently press the mozzarella slice onto the bread; this prevents the cheese from slipping out during frying.Take two slices of white bread and lay them flat, overlapping them slightly to create a pocket. Place a generous slice of fresh mozzarella (about 2 ounces) right in the center, then top with the second slice of bread, pressing gently. The sandwich should be about 1‑inch thick; if it’s too thick, the cheese won’t melt evenly. I dare you to taste this and not go back for seconds after the first bite.
Dust the assembled sandwich lightly with flour, shaking off any excess. This thin veil acts like a primer, ensuring the wet batter clings without becoming soggy. You’ll notice the flour turning a faint golden hue as it meets the warm bread—this is the first sign that flavor is already building.
Whisk together 2 large eggs with ½ cup of milk, adding a pinch of salt and a grind of fresh black pepper. Whisk until the mixture is uniform and slightly frothy; the bubbles you create now will translate into a lighter crust later. This step is pure magic—the batter should look glossy, not watery.
Watch Out: If the batter is too thin, the coating will run off the sandwich, resulting in a greasy pan and a limp crust.Dip the flour‑coated sandwich into the egg‑milk mixture, allowing it to soak for a second on each side. The batter should cling like a second skin, covering every edge without pooling. Give it a gentle shake to let excess drip away; you want a thin, even layer that will crisp up quickly.
Heat a generous splash of olive oil mixed with a knob of butter in a heavy skillet over medium‑high heat. The oil should shimmer, and a drop of batter dropped in should sizzle immediately and turn golden within 10 seconds. This is the moment of truth—if the oil is too cool, the sandwich will absorb oil and become soggy; if too hot, the crust will burn before the cheese melts.
Gently lay the coated sandwich into the pan, pressing down lightly with a spatula. Fry for about 2‑3 minutes on the first side, watching the edges turn a deep amber and the batter start to bubble. You’ll hear that satisfying sizzle that feels like a tiny applause. Flip carefully; the crust should release easily, indicating a perfect seal.
Kitchen Hack: Cover the pan with a lid for the last 30 seconds of cooking; this traps steam and guarantees the mozzarella reaches a stringy, pull‑apart consistency.Once both sides are golden and the cheese is visibly bubbling, transfer the sandwich to a wire rack set over a sheet of paper towels. This lets excess oil drip away, preserving the crunch. Let it rest for a minute; the interior will continue to settle, and the crust will firm up just enough to hold together when you slice.
Slice the sandwich diagonally into two triangles, drizzle a whisper of extra‑virgin olive oil if you like, and serve immediately while the cheese is still stretching. That first bite should feel like a warm hug—crisp, buttery, and oozing mozzarella that pulls apart in slow, satisfying strands. And now the fun part: watch your guests scramble for the second half.
That's it — you did it. But hold on, I've got a few more tricks that'll take this to another level…
Insider Tricks for Flawless Results
The Temperature Rule Nobody Follows
Most home cooks set the stove to “medium” and hope for the best, but the real secret is a precise 350°F (175°C) oil temperature. Use an instant‑read thermometer; when the oil hits 350°F, the batter will set instantly, forming a barrier that locks in moisture. If the temperature dips below 300°F, the sandwich absorbs oil and becomes soggy; above 380°F and you’ll see black spots before the cheese even melts. I keep a small kitchen timer handy to remind me to adjust the heat every few minutes.
Why Your Nose Knows Best
Your sense of smell is a more reliable indicator than a timer. When the batter starts to release a nutty, toasted aroma, you know the crust is reaching that perfect golden stage. If you detect a faint burnt scent, pull the sandwich immediately and lower the heat. Trusting your nose saves you from a batch of bitter, over‑cooked bites and gives you that golden‑brown finish every time.
The 5‑Minute Rest That Changes Everything
After frying, let the sandwiches rest on a cooling rack for exactly five minutes. This short pause allows the cheese to settle, preventing it from oozing out when you cut. It also lets the crust firm up, so you get clean slices instead of mushy edges. I once skipped this step in a rush, and the cheese leaked everywhere—trust me, the mess is not worth the speed.
Butter‑Olive Oil Blend Mastery
A 2:1 ratio of olive oil to butter gives you the best of both worlds: the butter’s flavor and the oil’s high smoke point. Melt the butter first, then swirl in the oil; this emulsifies the fats and creates a glossy surface that helps the batter brown evenly. If you use butter alone, the crust may brown too quickly and burn; if you use oil alone, you’ll miss that buttery depth.
Seasoning the Batter, Not Just the Bread
A pinch of smoked paprika or a dash of garlic powder added to the egg‑milk mixture transforms the flavor profile from plain to unforgettable. The seasoning penetrates the crust, giving each bite a subtle kick that complements the mozzarella’s milky sweetness. I tried skipping this step once, and the result was… well, just plain bread with cheese. Not bad, but not legendary.
Creative Twists and Variations
This recipe is a playground. Here are some of my favorite ways to switch things up:
Spicy Jalapeño Kick
Add thinly sliced jalapeños inside the sandwich before frying, and toss a pinch of cayenne into the batter. The heat cuts through the richness, making it perfect for those who love a little fire with their cheese.
Herb‑Infused Delight
Mix chopped fresh basil, oregano, and thyme into the egg‑milk mixture. The herb‑laden batter gives each bite a Mediterranean breeze, turning a simple snack into a garden‑fresh experience.
Sweet‑Savory Surprise
Spread a thin layer of fig jam on the inner side of the bread before adding mozzarella, and finish with a drizzle of honey after frying. The sweet‑savory combo is a hit at brunches and pairs beautifully with a glass of Prosecco.
Cheddar‑Cheese Fusion
Swap half of the mozzarella for sharp aged cheddar. The cheddar adds a tangy bite that contrasts the mozzarella’s creaminess, creating a layered flavor profile that’s both familiar and exciting.
Crunchy Panko Upgrade
After the flour coat, roll the sandwich in panko breadcrumbs before dipping in the batter. The extra crunch mimics a deep‑fried chicken cutlet and adds a satisfying texture that’s hard to resist.
Storing and Bringing It Back to Life
Fridge Storage
Place cooled sandwiches in an airtight container with a sheet of parchment between each piece. They’ll stay fresh for up to 2 days. Reheat in a skillet over medium heat for 2‑3 minutes per side, adding a splash of water to the pan and covering briefly to steam the interior back to melty perfection.
Freezer Friendly
Wrap each coated sandwich tightly in plastic wrap, then seal in a zip‑top freezer bag. They freeze solid for up to 1 month. When ready, fry straight from frozen, adding an extra minute per side; the crust will stay crisp, and the cheese will melt beautifully.
Best Reheating Method
For the ultimate reheated bite, use a hot oven set to 375°F (190°C). Lay the sandwiches on a wire rack over a baking sheet and bake for 8‑10 minutes. The oven’s dry heat restores the crunch, while a tiny splash of water on the crust keeps the interior from drying out.