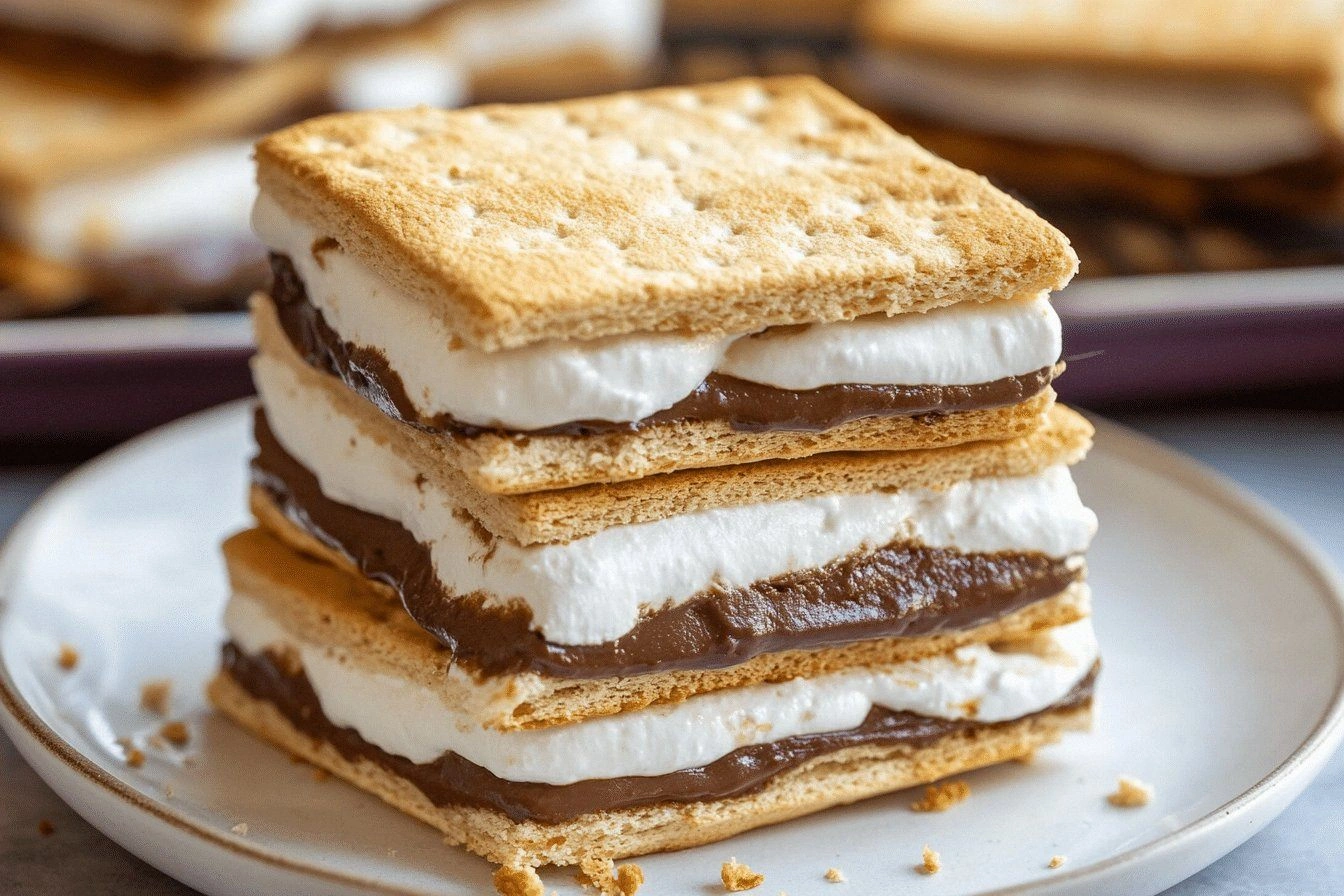
Picture this: you’re halfway through a movie marathon, the lights are low, and the craving for something sweet and gooey hits you like a tidal wave. You remember the campfire nights with friends, the way melted chocolate dripped down the sides of a graham cracker, and you decide to recreate that memory in your kitchen. But you’re not going to settle for the usual microwave hack; you’re about to turn your oven into a s'mores sanctuary. The trick? A simple, yet surprisingly refined technique that transforms ordinary marshmallows into golden, caramelized clouds. This isn’t just another dessert; it’s a portable campfire experience that will have your taste buds dancing. By the end of this guide, you’ll wonder how you ever made s'mores any other way.
First, let’s talk about the sensory orchestra that will greet you. The oven’s heat sends a comforting, toasted aroma into the air, while the subtle crackle of the graham crackers promises crunch. As the marshmallows begin to puff, their sweet, slightly burnt edges will release a caramelized scent that’s almost hypnotic. The chocolate, once melted, will coat everything in a glossy, velvety glaze that’s impossible to resist licking off the plate. And when you finally take that first bite, the combination of crunchy, buttery, gooey, and chocolatey will hit your palate like a perfect symphony. This experience is so intense that it can almost drown out the sound of the television.
Now, why is this version so special? Because it eliminates the unevenness of microwaved s'mores and gives you consistent, golden edges every time. It also uses a gentle oven bake that allows the marshmallows to puff evenly while the chocolate melts into a silky sauce. The result is a dessert that feels like campfire nostalgia but is ready in minutes, making it perfect for last‑minute gatherings. The technique also allows you to tweak the level of toasting to your exact preference, whether you like a light brown top or a deep caramelized finish. And the best part? You can make it ahead of time and reheat it to the same deliciousness. This hands‑on approach turns a simple snack into a culinary adventure.
Let me walk you through every single step — by the end, you'll wonder how you ever made it any other way. I dare you to taste this and not go back for seconds. Picture yourself pulling this out of the oven, the whole kitchen smelling incredible, and seeing the golden, bubbly surface glistening. I’ll be honest — I ate half the batch before anyone else got to try it. Most recipes get this completely wrong by either overbaking or underbaking the marshmallows. But with this method, every bite is a perfectly balanced combination of crunch, goo, and chocolate bliss.
What Makes This Version Stand Out
- Taste: Bold, buttery, and chocolatey, the flavor profile is a harmonious blend that satisfies both sweet and savory cravings. This recipe elevates classic s'mores into a gourmet experience that will impress even the most discerning palate.
- Texture: The graham crackers achieve a crisp, slightly crisped edge while the marshmallows puff to a cloud‑like consistency, creating a delightful contrast. The chocolate melts into a silky glaze that coats each bite, adding a luxurious mouthfeel.
- Simplicity: With only five core ingredients and one optional addition, the recipe is straightforward and requires no advanced techniques. The oven bake replaces the need for a campfire or microwave, making it accessible to any kitchen.
- Crowd Reaction: Guests will immediately recognize the familiar campfire flavor, but the refined execution will leave them asking for the recipe. I’ve hosted parties where this dessert stole the show, and the feedback is consistently enthusiastic.
- Ingredient Quality: Using premium graham crackers and high‑quality chocolate ensures depth of flavor and a richer melt. The optional butter adds a buttery softness that enhances the overall experience.
- Make‑Ahead Potential: The assembled s'mores can be stored in the refrigerator and reheated without losing texture, allowing you to prepare in advance for large gatherings.
Alright, let's break down exactly what goes into this masterpiece...
Inside the Ingredient List
The Flavor Base
Graham crackers form the backbone of this treat, providing a subtle sweetness and a sturdy foundation for the gooey layers. Opt for a lightly sweetened variety to avoid overwhelming the delicate marshmallow and chocolate flavors. If you prefer a slightly nutty undertone, choose a whole‑wheat or multigrain version, but be aware it may alter the expected crispness.
The Texture Crew
Marshmallows are the star of the show, offering a spongy, airy texture that melts into a warm, caramelized cloud. Use standard size marshmallows for even puffing; smaller ones will burn faster, while larger ones may not melt fully. A pinch of powdered sugar can help prevent sticking, but it’s optional.
The Unexpected Star
Chocolate bars add depth and richness, turning each bite into a velvety experience. Choose between milk, dark, or flavored varieties to match your mood; a 70% dark bar provides a robust finish, while milk chocolate offers a classic, creamy taste. If you’re adventurous, a spicy or sea‑salted chocolate will add an extra layer of intrigue.
The Final Flourish
Butter, when melted and brushed over the crackers, introduces a silky, buttery softness that elevates the crunch. Sea salt, sprinkled lightly, accentuates the chocolate’s sweetness and creates a subtle contrast that lingers on the palate. Both optional ingredients can be omitted for a purist approach, but they add a refined touch that many will appreciate.
Everything's prepped? Good. Let's get into the real action...
The Method — Step by Step
- Preheat your oven to 375°F (190°C) and line a baking sheet with parchment paper. The parchment prevents sticking and allows for easy cleanup. Keep the oven rack in the middle to ensure even heat distribution. This step sets the stage for perfect browning.
- Arrange the graham crackers on the prepared sheet, leaving a small space between each piece. The spacing ensures that the chocolate and marshmallows can melt without overlapping too much. This also helps the crackers crisp up uniformly. A neat layout makes for an appealing presentation.
- If you’re using butter, melt it in a small saucepan over low heat until it’s liquid but not browned. Brush a thin layer over each cracker, focusing on the edges for maximum flavor. The butter adds a buttery softness that balances the crispness. It also helps the chocolate spread evenly.
- Place one marshmallow on top of each buttered cracker. The marshmallow should sit snugly, so it doesn’t slide off during baking. The marshmallows will puff up, creating a fluffy cloud that holds the chocolate. This is the moment where the magic starts.
- Bake for 8–10 minutes, checking frequently. The marshmallows should be golden brown on top and the chocolate should begin to melt into a glossy glaze. Watch for the first signs of bubbling; that’s your cue to reduce the heat if necessary. This step is critical for achieving that perfect gooey center.
- Remove the sheet from the oven and let the s'mores cool for 1–2 minutes. The marshmallows will still be hot, so be cautious. This short cooling period allows the chocolate to set slightly, creating a firm yet soft texture. It also prevents the entire assembly from becoming too sticky.
- Drizzle melted chocolate over the top of each s'more, ensuring a generous coating. Use a spoon or a small ladle for controlled drips. The chocolate should pool slightly, forming a glossy sheen that catches the light. This final touch elevates the dessert to a showstopper.
- Sprinkle a light pinch of sea salt over the chocolate, then serve immediately. The salt will balance the sweetness and highlight the chocolate’s depth. If you prefer a sweeter profile, you can skip the salt entirely. The result is a perfectly balanced, mouth‑watering treat.
Insider Tricks for Flawless Results
The Temperature Rule Nobody Follows
Many bakers think a higher oven temperature will speed up the process, but it actually leads to uneven melting. Baking at a moderate 375°F allows the chocolate to melt slowly while the marshmallow puffs evenly. This controlled heat also preserves the buttery crunch of the crackers.
Why Your Nose Knows Best
The scent of chocolate and toasted marshmallows can be a powerful indicator of readiness. When you smell a faint caramel note, the chocolate is almost ready to pool. Trust your nose to avoid overbaking.
The 5-Minute Rest That Changes Everything
After removing the sheet from the oven, let the s'mores rest for five minutes. This brief pause allows the chocolate to set into a silky glaze, preventing it from sliding off when you drizzle. It also gives the marshmallows time to cool just enough for a safe bite.
The Secret of a Perfect Drip
Melt your chocolate over a double boiler to avoid scorching. Once melted, hold the spoon at a slight angle and drizzle in a steady stream. This technique ensures a smooth, even coating without clumps.
How to Keep Them Fresh
Store assembled s'mores in an airtight container in the refrigerator for up to 48 hours. The crackers will maintain their crispness, and the chocolate will stay firm. When ready to serve, let them sit at room temperature for ten minutes.
The Final Touch of Salt
A pinch of sea salt on top of the melted chocolate creates a flavor contrast that elevates the sweetness. The salt should be light enough to enhance without overpowering. If you prefer a sweeter profile, simply skip the salt and enjoy the pure chocolate.
Creative Twists and Variations
Nutty Nirvana
Replace the graham crackers with almond or hazelnut brittle for a crunchy, nutty base. The buttery flavor of the nuts pairs beautifully with the chocolate, creating a sophisticated twist that will impress guests who love a bit of crunch.
Spicy S'mores
Add a dash of cayenne pepper or a drizzle of chili‑infused chocolate to the melted chocolate. The heat from the spice contrasts with the sweetness, giving the dessert an unexpected kick. This variation is perfect for adventurous palates.
Berry Burst
Layer fresh berries, such as blueberries or raspberries, between the cracker and marshmallow. The juicy berries add a tart counterpoint to the sweet chocolate, creating a balanced flavor profile that feels like a dessert and a fruit salad combined.
Minty Fresh
Use mint chocolate chips or add a few drops of mint extract to the melted chocolate. The cool mint undertone refreshes the palate and offers a modern take on the classic s'mores.
Coffee Caramel Craze
Stir a tablespoon of instant espresso powder into the chocolate before drizzling. The coffee flavor deepens the chocolate’s richness, creating an adult‑oriented version that’s ideal for late‑night cravings.
Vegan Version
Use plant‑based chocolate and a dairy‑free butter alternative, such as coconut oil, to keep the dessert vegan. The coconut oil adds a subtle tropical note, while the vegan chocolate provides a smooth melt. This version is perfect for those with dietary restrictions.
Storing and Bringing It Back to Life
Fridge Storage
Place the assembled s'mores in an airtight container and refrigerate for up to 48 hours. The crackers will remain crisp, and the chocolate will stay firm. Avoid stacking them too tightly to preserve texture.
Freezer Friendly
Wrap each s'more individually in parchment paper, then place them in a freezer bag. They can be stored for up to a month. When ready to serve, let them thaw at room temperature for 20 minutes.
Best Reheating Method
To revive the texture, place the refrigerated or frozen s'mores on a baking sheet and heat at 350°F (175°C) for 4–5 minutes. The heat will gently melt the chocolate and soften the marshmallows without overcooking. A quick splash of water on the parchment before reheating helps create steam, ensuring the chocolate remains silky.
And now, a quick recap before you dive in. The secret lies in the balance of heat and timing, the quality of ingredients, and a few small hacks that elevate the humble s'mores into a showstopper. Whether you’re baking for a family movie night, a backyard gathering, or just craving a sweet treat, this recipe is your go‑to. Remember to keep the oven at a moderate temperature, let the marshmallows puff gently, and drizzle the chocolate while it’s still liquid for that glossy finish.
You’ve now mastered the art of oven‑baked s'mores, and the possibilities are endless. Feel free to experiment with flavors, textures, and presentation styles. The best part is that each bite is a reminder of warm nights and shared laughter. So, go ahead, create your own version, and share the joy with friends and family.
Finally, keep in mind that the key to success is patience and attention to detail. Trust the process, and your s'mores will rise to perfection. Don’t be afraid to tweak the recipe to suit your taste; the beauty of this dish is its adaptability. Now, grab your ingredients, preheat that oven, and let the magic begin!