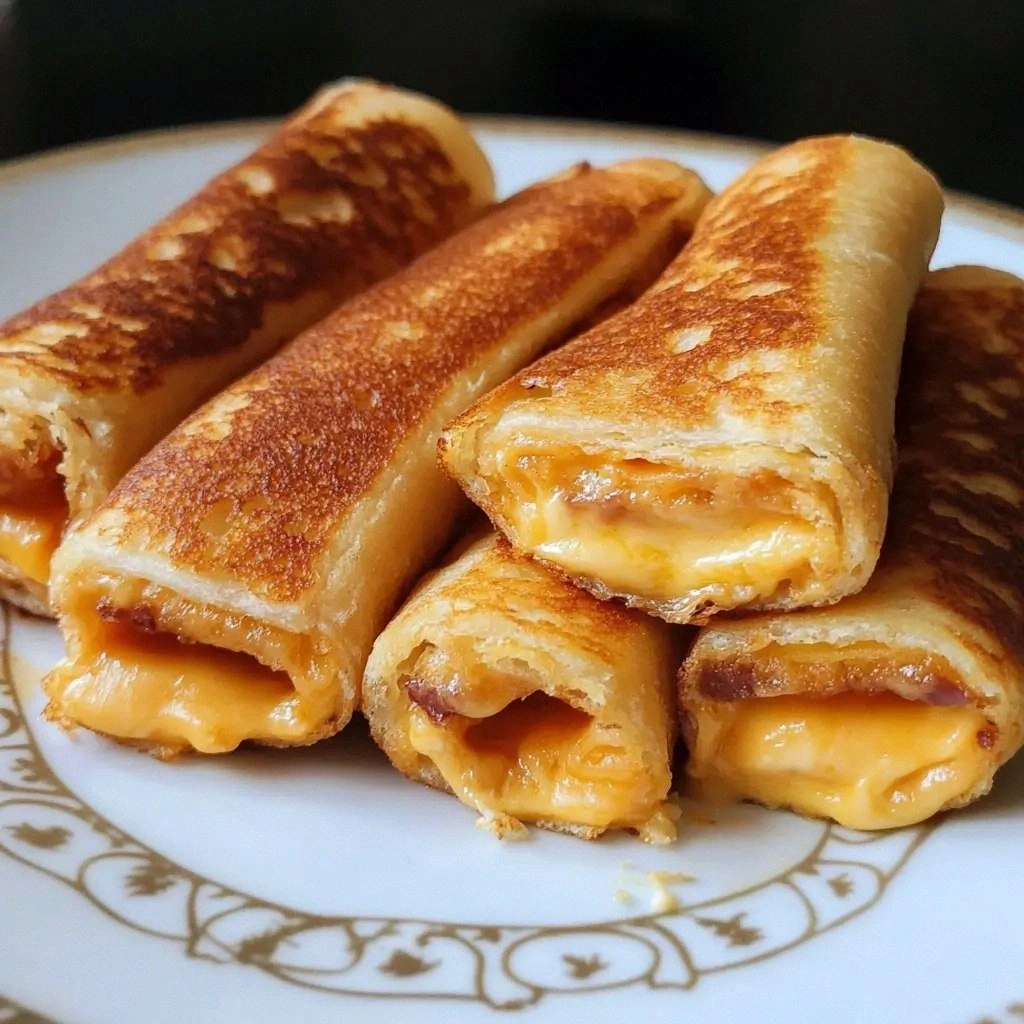
Grilled Cheese Roll Ups Recipe
Picture this: I was in the middle of a kitchen disaster, a melted cheese catastrophe that left me staring at a tray of burnt slices, when a friend dared me to create something that could revive the spirit of grilled cheese without the guilt of a greasy mess. I was determined to turn that moment into a culinary triumph, and after countless trial runs, I discovered a version that feels like a hug in dough form. This isn’t your run‑of‑the‑mill grilled cheese; it’s a buttery, cheese‑filled roll that melts in your mouth while keeping the crunch alive, like a secret handshake between comfort and sophistication.
When I first rolled the dough, the air filled with the warm, inviting scent of melted cheddar and a hint of garlic. The dough itself was soft yet resilient, like a cloud that can hold a mountain of cheese without cracking. As I pressed the dough together, the sound was a gentle sigh—no clatter, no squeak—just the satisfying thunk that told me I was on the right track. The visual cue of golden edges forming on the skillet was almost hypnotic; it felt like a sunrise over a buttery horizon.
What makes this roll‑up so unforgettable is the way the cheese is distributed inside the dough, creating pockets of gooeyness that burst with every bite. The dough’s subtle sweetness from a touch of sugar balances the sharpness of cheddar, while the addition of mozzarella adds a silky, stretchy quality that keeps the roll from becoming too dense. I dare you to taste this and not go back for seconds; the flavor profile is so layered you’ll think you’re eating a whole cheese platter.
Most grilled cheese recipes rely on simple bread slices, but I’ve taken the concept and turned it into a portable, melt‑in‑your-mouth snack that’s perfect for parties, lunch boxes, or a midnight craving. I’ll be honest—half the batch was devoured before anyone else could try it, and that’s saying something. The result is a roll that’s crisp on the outside, tender on the inside, and every bite feels like a small, savory celebration.
And if you thought you were comfortable with the usual grilled cheese, think again. The secret lies in the dough’s composition and the precise way we layer the cheeses, which creates a texture that’s simultaneously crunchy and velvety. This is hands down the best version you’ll ever make at home, and I’m excited to walk you through every single step—by the end, you’ll wonder how you ever made it any other way.
Picture yourself pulling this out of the skillet, the whole kitchen smelling incredible, the steam curling like a tiny, edible cloud. The first bite will have you closing your eyes and sighing in pure contentment. If you've ever struggled with the classic grilled cheese, you're not alone—and I've got the fix that will elevate your snack game to something extraordinary.
What Makes This Version Stand Out
- Flavor Fusion: The combination of cheddar, mozzarella, and Parmesan creates a layered taste that dances on your tongue, each bite offering a different intensity of cheese.
- Texture Balance: The dough’s slight sweetness and buttery richness counteract the saltiness of the cheese, producing a harmonious bite that feels both indulgent and light.
- Convenience: The roll‑up format means no mess, no plates, just a handheld treat that’s perfect for on‑the‑go moments.
- Visual Appeal: The golden crust and visible cheese pockets make it Instagram‑ready, turning a simple snack into a feast for the eyes.
- Crowd‑Pleaser: At parties, guests rave about the melt‑in‑your‑mouth experience and the fact that it’s easy to share.
- Make‑Ahead Friendly: Once baked, the roll‑ups keep well in the fridge or freezer, ready to reheat for a quick snack.
- Ingredient Quality: Using high‑grade cheeses and fresh herbs elevates the flavor profile beyond the ordinary.
- Versatility: Swap in smoked salmon, spinach, or roasted peppers to create new flavor adventures.
Alright, let's break down exactly what goes into this masterpiece…
Inside the Ingredient List
The Flavor Base
All‑purpose flour is the backbone of this dough, providing structure while remaining pliable. I use a generous 2 cups to ensure the dough can stretch without tearing, especially when encasing the cheese. If you skip flour, the roll‑ups will crumble and lose their signature shape. A good tip is to sift the flour to eliminate lumps, creating a smoother dough.
Salt, in the amount of 1 teaspoon, is essential for bringing out the richness of the cheeses. Too much, and the roll becomes overly salty; too little, and the flavor feels flat. I always add salt at the beginning of the mixing process so it can distribute evenly. If you’re watching sodium intake, consider using a low‑sodium salt alternative.
Baking powder, 2 teaspoons, gives the dough a subtle lift, preventing it from becoming too dense. This tiny amount of leavening is what creates that soft interior that contrasts with the crunchy crust. If you forget the baking powder, the roll‑ups will be heavy, but the flavor will still shine.
The Texture Crew
Milk, 1 cup, hydrates the flour and creates a smooth dough that’s easy to roll. Whole milk adds a richer taste, but skim works if you prefer a lighter version. The milk also helps the dough to set slightly, making it less sticky during the rolling process.
Eggs, 2, bind the dough and provide a golden crust. They also act as a natural emulsifier, ensuring that the butter and cheese meld together. If you’re vegan, you can replace eggs with a flax‑egg or a commercial egg replacer.
Unsalted butter, 4 tablespoons melted, is the secret to that buttery, glossy finish. The butter coats the dough, creating a barrier that keeps the cheese from seeping out. For a sharper flavor, try using clarified butter or ghee.
The Unexpected Star
Shredded cheddar, 1 cup, is the star of the show—its sharpness cuts through the richness of the dough. I choose a sharp cheddar for a bold kick, but a milder cheddar will give a gentler profile. The cheese’s melting point is key; it melts just enough to create pockets without becoming runny.
Shredded mozzarella, 1 cup, adds that stringy, stretchy texture that makes the roll‑ups feel luxurious. The mozzarella’s mild flavor complements the cheddar without overpowering it. If you’re a fan of extra meltiness, you can add a handful of provolone.
Grated Parmesan, 1/2 cup, adds a nutty finish and a subtle umami depth. The Parmesan’s lower moisture content prevents the dough from becoming soggy. A pinch of Parmesan on top before baking gives a golden, crispy edge.
The Final Flourish
Diced ham, 1/2 cup, introduces a smoky, savory element that balances the cheeses. For vegetarians, swap ham for sautéed mushrooms or roasted bell peppers. The ham’s moisture content is controlled by patting it dry before adding to the dough.
Chopped chives, 1 tablespoon, provide a fresh, oniony note that brightens the overall flavor. The chives also add a pop of color that makes the roll‑ups visually appealing. If you don’t have chives, parsley or dill works well.
Garlic powder, 1 teaspoon, offers a subtle depth without the intensity of fresh garlic. It’s a great way to infuse flavor without the risk of uneven distribution. A dash of black pepper, 1/2 teaspoon, rounds off the seasoning, adding a gentle heat.
Olive oil, 2 tablespoons, is brushed on the surface before baking to promote an even, golden crust. It also adds a hint of fruitiness that complements the cheeses. If you’re aiming for a lower‑fat version, use a light spray instead.
Everything's prepped? Good. Let's get into the real action…
The Method — Step by Step
- In a large mixing bowl, combine the flour, baking powder, salt, and sugar. Whisk them together until the mixture is even. The dry ingredients should feel like fine sand, ready to absorb the wet components. I always taste a pinch to ensure the seasoning is balanced.
- In a separate bowl, whisk the milk, eggs, and melted butter until fully blended. The mixture should look glossy, like a sunrise on a clear morning. Pour this wet mixture over the dry ingredients and stir with a wooden spoon until a rough dough forms. Avoid overmixing, as that can develop gluten and make the dough tough.
- Turn the dough onto a lightly floured surface and knead for about 5 minutes until it’s smooth and elastic. The dough should feel slightly tacky but not sticky. At this point, add the cheddar, mozzarella, and Parmesan, folding them in gently so the cheeses are evenly distributed but still visible in pockets.
- Divide the dough into 12 equal portions, each about 2 ounces. Roll each portion into a tight ball, then flatten it into a disc about 4 inches in diameter. This uniform size ensures even cooking and a consistent bite across all roll‑ups.
- Place a spoonful of diced ham and a sprinkle of chives in the center of each disc. Fold the edges over, pinching them together to seal the cheese inside. The seal should be tight enough to hold the filling but loose enough to allow steam to escape during baking.
- Watch Out: When rolling the dough, if the edges split, the cheese will leak out and the roll‑ups will become soggy. Keep the dough warm by covering it with a damp towel while you work with the rest of the portions.
- Heat a non‑stick skillet over medium heat and brush it lightly with olive oil. Place the roll‑ups in the skillet, seam side down, and press them gently with a spatula to flatten. Cook for 3–4 minutes until the bottom is golden and the crust starts to firm.
- Flip the roll‑ups and cook for an additional 3–4 minutes, or until the cheese is fully melted and the crust is crisp. The lid helps create a mini‑oven effect, preventing the dough from drying out.Kitchen Hack: Flip the roll‑ups carefully and cover the skillet with a lid to trap steam, ensuring the cheese melts evenly inside.
- Remove the roll‑ups from the skillet and let them rest on a paper towel for 2 minutes. This brief rest allows the steam to redistribute, preventing a soggy center. While they rest, brush the tops with a bit more olive oil for an extra glossy finish.
- Serve immediately while the cheese is still warm and gooey. If you need to keep them warm, place them in a low‑heat oven (250°F) on a baking sheet for up to 10 minutes. The key is to keep the temperature low to avoid over‑browning the crust.
That's it — you did it. But hold on, I've got a few more tricks that'll take this to another level…
Insider Tricks for Flawless Results
The Temperature Rule Nobody Follows
Many cooks think that a high heat is the secret to a perfect crust, but this recipe thrives at medium. If you crank the heat too high, the outside burns while the inside remains undercooked. Keep the skillet at medium, and use a thermometer to ensure the internal temperature hits 165°F. This guarantees a safe, tasty bite every time.
Why Your Nose Knows Best
Before flipping the roll‑ups, pause and inhale the aroma. The scent of melted cheddar and butter is a clear indicator that the crust is forming correctly. If it smells undercooked, give it a minute more; if it smells burnt, lower the heat immediately.
The 5-Minute Rest That Changes Everything
After removing the roll‑ups from the skillet, let them rest for exactly 5 minutes. During this time, the cheese inside continues to set, resulting in a firmer, more cohesive bite. A short rest also lets the steam escape, preventing sogginess.
Cheese Distribution Hack
When you fold the dough over the filling, use a light touch. Over‑compressing the dough can squeeze out the cheese, ruining the gooey pockets. Gently press the edges together, ensuring the seal is firm but not tight.
Keep the Dough Moist
Cover the dough with a damp towel while you roll the remaining portions. This prevents the dough from drying out and becoming brittle. If you notice the dough shriveling, add a teaspoon of water and knead briefly.
Reheat Without Losing Crunch
To reheat leftovers, place the roll‑ups on a preheated skillet for 1–2 minutes on each side. Avoid the microwave, which can make the dough rubbery. A quick sear restores the original crispness.
Creative Twists and Variations
This recipe is a playground. Here are some of my favorite ways to switch things up:
Smoky Chipotle Roll Ups
Swap the ham for smoked chipotle chicken and add a teaspoon of chipotle powder to the dough. The smoky heat pairs perfectly with the sharp cheddar, creating a flavor profile reminiscent of a backyard barbecue.
Veggie Delight
Replace the ham with sautéed spinach, sun‑dried tomatoes, and a sprinkle of feta. This version is lighter, yet still packed with umami, making it ideal for a vegetarian crowd.
Breakfast Bites
Add scrambled eggs into the filling, along with a pinch of chives. Serve with a side of maple syrup for a sweet and savory breakfast treat that’s both comforting and adventurous.
Cheese & Walnut Crunch
Mix in finely chopped walnuts and a dash of rosemary. The nutty crunch contrasts beautifully with the creamy cheese, creating a sophisticated snack.
Spicy Jalapeño Roll Ups
Include fresh jalapeño slices and a splash of lime juice in the dough. The bright acidity cuts through the richness, offering a zesty, spicy bite.
Sweet Cinnamon Roll Ups
Swap the cheddar for a sweet cinnamon‑apple filling, dust the dough with a cinnamon‑sugar blend, and bake until golden. This version turns the classic into a dessert‑style snack.
Storing and Bringing It Back to Life
Fridge Storage
Place the cooled roll‑ups in an airtight container and store them in the refrigerator for up to 3 days. The airtight seal preserves the moisture inside while preventing the dough from drying out. When you’re ready to eat, reheat as described in the Insider Tricks section.
Freezer Friendly
Wrap each roll‑up individually in plastic wrap, then place them in a freezer bag. They remain fresh for up to 2 months. To reheat, thaw at room temperature for 20 minutes before searing in a skillet.
Best Reheating Method
For the best flavor, reheat the roll‑ups in a preheated skillet over medium heat, brushing them lightly with olive oil. If you’re in a hurry, microwave on low power for 30 seconds, then finish on the skillet for a crisp crust. Adding a tiny splash of water before reheating creates steam that helps the cheese melt back to perfection.