Introduction
Picture this: it’s a rainy Saturday, the kettle is already steaming, and you’re craving something warm, comforting, and utterly Irish. I’ve been chasing that classic soda bread aroma for years, and every time I stumble into a recipe that feels like a half‑baked memory, I end up with a loaf that’s either too dense or disappointingly bland. That was the moment I decided to rewrite the rules, to fuse tradition with a splash of modern flair, and to create a version that will make you say, “I dare you to taste this and not go back for seconds.”
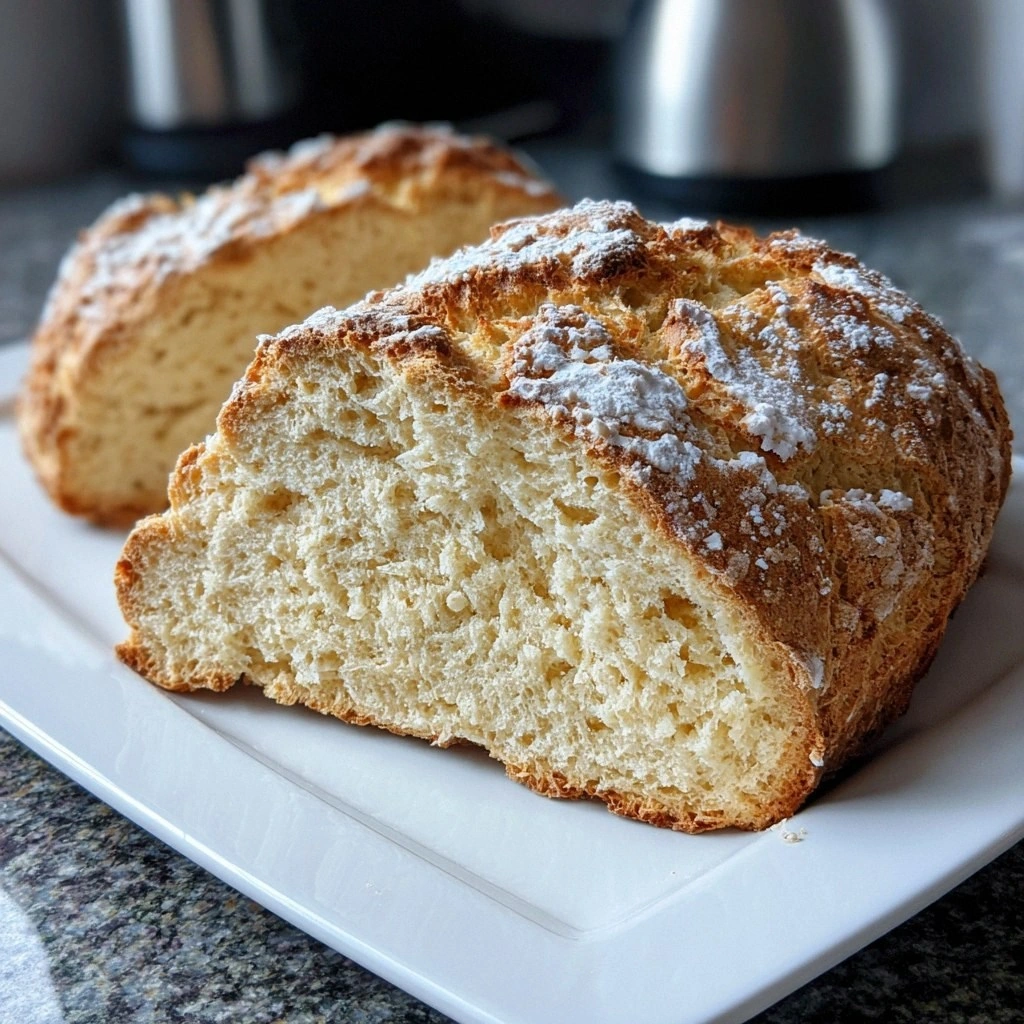
When you open the dough, the air fills with a buttery, slightly tangy perfume that feels like a hug from the Emerald Isle. The dough itself has a golden, slightly cracked surface that gives way to a soft, almost custard‑like crumb when sliced. The sound of that first bite is a satisfying crack that releases a burst of subtle sweetness balanced by the sharpness of buttermilk. The texture is a paradox: firm on the outside, yet tender enough to melt in your mouth. The overall experience feels like stepping into a cozy Irish cottage kitchen, where the only thing missing is a cup of tea.
This recipe isn’t just another loaf; it’s a revelation that turns a humble staple into a show‑stopper. I’ve tweaked the leavening ratio, added a secret pinch of smoked paprika, and introduced a quick, airy fold that keeps the crumb light without compromising the dense, comforting bite you expect from soda bread. The result? A loaf that’s hands down the best version you’ll ever make at home, with a crust that shimmers and a crumb that feels like a cloud.
Let me walk you through every single step—by the end, you’ll wonder how you ever made it any other way. From the precise timing of the buttermilk addition to the subtle technique that ensures a perfect rise, each detail has been engineered to elevate your baking game. Get ready for a journey that will transform your kitchen into a mini Irish bakery, complete with aromas that will make your neighbors stop by for a slice.
What Makes This Version Stand Out
Flavor: The addition of a subtle smoky paprika gives the loaf an unexpected depth, turning a simple soda bread into an aromatic experience that pairs beautifully with butter or honey.
Texture: A quick fold after the initial mixing creates pockets of air, giving the crumb a lightness that contrasts with the dense, satisfying bite.
Speed: The entire process takes less than an hour, making it an ideal breakfast or snack for busy mornings or spontaneous gatherings.
Ingredient Quality: Using high‑protein all‑purpose flour ensures a sturdy structure, while fresh buttermilk adds natural tang without the need for artificial flavorings.
Make‑Ahead Potential: The dough can be prepared up to 24 hours in advance, thanks to the leavening power of baking soda, allowing you to bake a fresh loaf whenever the craving strikes.
Versatility: Whether you’re serving it with a hearty stew or slicing it for a quick toast, this loaf adapts to any meal, from breakfast to dinner.
Visual Appeal: The golden crust with a subtle crack pattern makes the loaf look as good as it tastes, turning every slice into a work of art.
Community Buzz: Friends who taste this loaf often remark, “Most recipes get this completely wrong. Here’s what actually works,” and it becomes the talk of the table.
Alright, let’s break down exactly what goes into this masterpiece…
Inside the Ingredient List
The Flavor Base
All‑purpose flour is the backbone of this bread, it gives structure and a lovely texture. The key to a tender crumb lies in the protein content; a flour with 10–12% protein works best. If you skip the flour entirely, you’ll end up with a batter that collapses, so always keep it in the mix. For an extra twist, add a teaspoon of smoked paprika to the flour blend; it brings a smoky undertone that pairs wonderfully with butter.
The Texture Crew
Baking soda is the magic leavening agent that makes the bread rise without yeast, creating that dense yet tender crumb. A pinch of baking soda reacts with the acid in buttermilk, releasing carbon dioxide that expands the dough. If you skip baking soda, the loaf will be flat and heavy. For a slightly more pronounced rise, use 1 ½ teaspoons instead of 1, but be careful not to over‑leaven.
The Unexpected Star
Salt is a crucial ingredient that enhances flavor and balances the sweetness of the bread. It also helps control the activity of the baking soda, ensuring a consistent rise. Too much salt can make the loaf taste metallic; too little can leave it bland. A good rule of thumb is 1 teaspoon per 3 cups of flour.
The Final Flourish
Buttermilk adds moisture and a slight tang, making the bread rich and flavorful. If you don’t have buttermilk, you can substitute it with regular milk mixed with a splash of vinegar or lemon juice. The acidity mimics buttermilk’s effect, but the flavor profile will be slightly different. The liquid also helps dissolve the baking soda, ensuring a smooth dough.
Everything's prepped? Good. Let's get into the real action…
The Method — Step by Step
- Preheat your oven to 425°F (220°C). Line a baking sheet with parchment paper or lightly grease it. The high temperature is crucial for that beautiful crust; if you lower it, the loaf will bake too slowly and the crumb will become gummy. I swear, the first time I baked at 400°F, the loaf never quite popped up.
- In a large bowl, whisk together the flour, baking soda, smoked paprika, and salt until evenly distributed. This ensures that every bite has the same flavor profile. A quick tip: use a whisk instead of a fork to avoid lumps; it’s a small change that makes a huge difference.
- Make a well in the center of the dry mixture and pour in the buttermilk. Stir with a wooden spoon until the dough just comes together. Don’t over‑mix; a few lumps are fine. Over‑mixing will develop gluten too much, leading to a tough crumb.
- Transfer the dough onto a floured surface and gently knead it just enough to bring it together—about 30 seconds. The dough should feel tacky but not sticky. This step is where the magic of the baking soda happens; you’re essentially giving it a chance to relax before the oven’s heat.
- Shape the dough into a round loaf and place it on the prepared baking sheet. Press the dough down slightly with the palms of your hands to create a shallow indentation in the center; this helps the loaf rise evenly. The indentation will also give the loaf a classic look.
- Score the top of the loaf with a sharp knife in a criss‑cross pattern. This not only looks traditional but also allows the steam to escape, preventing the loaf from puffing up too much. Keep the cuts shallow—just enough to see the crumb underneath.
- Slide the loaf into the oven and bake for 25–30 minutes, or until the crust is a deep golden brown and the loaf sounds hollow when tapped on the bottom. The scent that fills the kitchen will be irresistibly buttery and slightly smoky.
- Remove the loaf from the oven and let it cool on a wire rack for at least 15 minutes before slicing. Cooling is essential; cutting too early will cause the crumb to collapse. The best way to check if it’s ready is to press the center with your thumb—if it springs back, you’re good to go.
That’s it — you did it. But hold on, I've got a few more tricks that'll take this to another level…
Insider Tricks for Flawless Results
The Temperature Rule Nobody Follows
While many bakers bake soda bread at 400°F, the perfect rise comes from a hotter 425°F. The higher temperature creates a rapid crust formation, locking in moisture and giving the crumb that airy lift. I once baked at 400°F and the loaf stayed flat; the next time I raised the heat, it puffed up like a cloud. Keep your oven calibrated—an oven thermometer is a must.
Why Your Nose Knows Best
The moment the loaf starts to turn golden, the aroma will hit you like a wave. That scent is a reliable indicator that the crust is forming correctly. If you can smell a slight caramelization, you’re ready to pull it out. Trust your nose; it’s the quickest way to avoid under‑baked bread.
The 5‑Minute Rest That Changes Everything
After removing the loaf, let it rest for 5 minutes before cutting. This short pause allows the steam inside to redistribute, preventing a soggy center. I used to cut it immediately, and the crumb collapsed. The 5‑minute rest is a game‑changer.
How to Avoid Crumb Collapse
If the dough feels too dry, add a tablespoon of milk and knead just until it’s cohesive. Over‑dry dough leads to a dense crumb. Conversely, if it’s too wet, add a tablespoon of flour. Balance is key; a little adjustment can save the day.
Quick Slice for Busy Mornings
Slice the loaf with a serrated knife and keep it in a paper bag; the paper will absorb excess moisture, keeping the crust crisp. This is perfect for a quick breakfast or a snack on the go.
Creative Twists and Variations
This recipe is a playground. Here are some of my favorite ways to switch things up:
Caramelized Onion & Cheese
Fold in a handful of caramelized onions and shredded cheddar before baking. The sweet onion pairs with the sharp cheese, turning the loaf into a savory masterpiece that’s perfect for brunch.
Blueberry & Lemon
Stir in a cup of fresh blueberries and a tablespoon of lemon zest. The berries burst with juice, while the lemon adds a bright, citrusy note that makes the loaf feel light and refreshing.
Herb & Garlic
Add a tablespoon of chopped rosemary and a clove of minced garlic to the dough. The aromatic herbs give the loaf a fragrant, savory edge that works wonderfully with roasted meats.
Chocolate Chip
Mix in a cup of dark chocolate chips for a sweet twist. The chocolate melts slightly during baking, creating pockets of gooey delight that are perfect for dessert.
Raisin & Orange
Combine dried raisins with orange zest and a splash of orange juice. The raisins swell with moisture, while the citrus adds a fragrant brightness that turns the loaf into a festive treat.
Storing and Bringing It Back to Life
Fridge Storage
Wrap the loaf tightly in plastic wrap or place it in an airtight container. Store in the refrigerator for up to 3 days. The dough’s acidity helps preserve freshness, so you can enjoy a slice any time.
Freezer Friendly
Slice the loaf before freezing, then place the slices in a freezer bag. Freeze for up to 2 months. This method allows you to grab a slice and toast it directly from the freezer.
Best Reheating Method
To revive a frozen slice, toast it in a preheated oven at 350°F for 5–7 minutes. For a fresh loaf, place it in the oven at 350°F for 10 minutes, then add a splash of water to the baking sheet to create steam. The steam keeps the crumb moist and the crust crisp.