I still remember the first time I attempted a chocolate mousse cake. It was supposed to be the pièce de résistance of a dinner party I was hosting, the kind of dessert that makes guests gasp when you set it on the table. Instead, it emerged from the fridge a sad, deflated mess — more chocolate puddle than cake. The raspberries had bled into the mousse, creating an unappetizing pink swirl that looked like something out of a horror movie rather than a French patisserie. My guests were polite, bless them, but I could see the disappointment in their eyes as they picked at the soggy base and grainy mousse.
Fast forward through three months of obsessive testing, countless failed attempts, and a kitchen that looked like a chocolate crime scene more often than not. I was determined to crack the code for the perfect raspberry chocolate mousse cake — one with distinct layers that didn't bleed into each other, a mousse so light it practically floated off the spoon, and a raspberry component that packed a punch without turning everything pink. I tested every technique I could find, from Italian meringue bases to gelatin-stabilized whipped cream, from mirror glazes to simple dustings of cocoa powder. Some nights, I'd wake up at 2 AM with a new idea, stumbling to the kitchen in my pajamas to whip egg whites or bloom gelatin.
The breakthrough came on a rainy Tuesday afternoon when I was this close to giving up entirely. I decided to throw out every traditional approach and start fresh, treating each component like it deserved its own spotlight rather than trying to force them all together. The result? A cake that made my notoriously dessert-skeptical father ask for seconds. A cake that had my neighbor knocking on my door at midnight, holding an empty plate and asking if there was any more. A cake that, I'm not exaggerating here, might just ruin all other desserts for you forever.
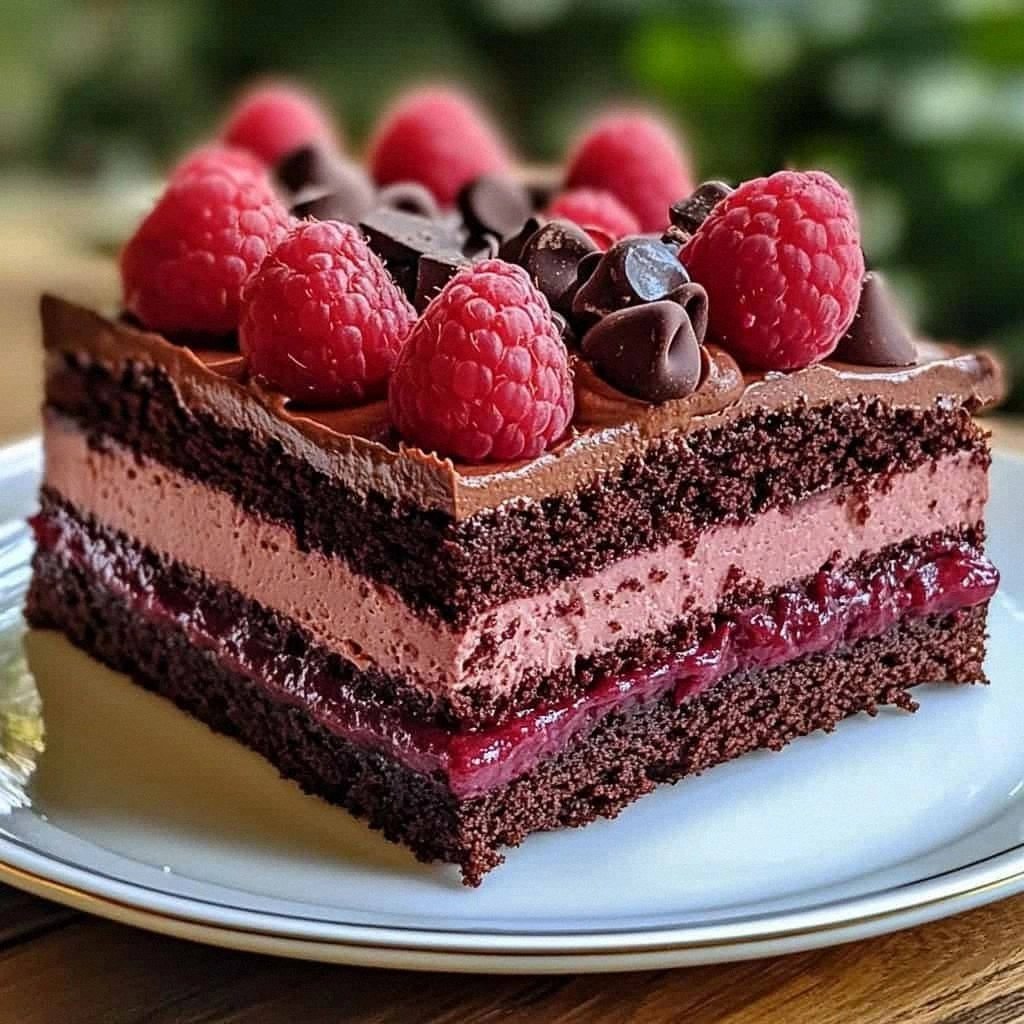
This isn't just another chocolate mousse cake recipe — this is the chocolate mousse cake that will make you famous among your friends and family. The kind of dessert that people talk about months later, the one that gets requested for every birthday, anniversary, and Tuesday that needs brightening. Picture yourself pulling this beauty out of the refrigerator, the glossy chocolate glaze catching the light like a mirror, fresh raspberries glistening like rubies on top. Your kitchen smells like a chocolate shop had a baby with a berry farm, and you haven't even cut into it yet. Let me walk you through every single step — by the end, you'll wonder how you ever made it any other way.
What Makes This Version Stand Out
Before we dive into the nitty-gritty, let me tell you why this raspberry chocolate mousse cake will become your new signature dessert. I've eaten my way through enough chocolate mousse cakes to know that most of them fall into two categories: boring or overly complicated. Mine strikes the perfect balance between impressive and achievable, with a few tricks that'll make you look like a professional pastry chef.
- Triple-Threat Chocolate: We're not just dumping cocoa powder into cake batter and calling it a day. This cake features three distinct chocolate experiences — a moist chocolate cake base that's more fudgy than fluffy, a dark chocolate mousse layer so silky it makes silk jealous, and a glossy chocolate glaze that shatters like thin ice when you tap it with your fork. Each layer brings something different to the party.
- Raspberry That Actually Tastes Like Raspberry: Most recipes either use artificial raspberry flavoring that tastes like cough syrup, or they dump in fresh raspberries that turn everything into a watery, seedy mess. My version creates a concentrated raspberry purée that gets folded into a separate layer, maintaining its vibrant flavor and color without bleeding into the chocolate. It's like having two desserts in one perfect slice.
- Texture That Makes People Close Their Eyes: The contrast between the tender cake base, the airy mousse, the slight chew of the raspberry layer, and that paper-thin crisp glaze creates a texture experience that makes people involuntarily close their eyes when they take a bite. I've watched it happen dozens of times — it's like a universal reflex.
- No Water Bath Required: Traditional mousse cakes often require fussy water baths and precise temperature control that most home ovens can't manage. This recipe uses a stabilized mousse that sets perfectly in any refrigerator, no culinary degree required. If you can operate a whisk and a microwave, you can make this cake.
- Make-Ahead Magic: Here's the real kicker — this cake actually improves if you make it a day ahead. The flavors have time to meld and marry, creating something greater than the sum of its parts. I always make mine on Friday for Saturday dinner parties, giving myself a buffer day in case anything goes wrong (though it won't, because you're following my instructions).
- Instagram-Worthy Without Being Pretentious: Let's be honest — we eat with our eyes first. This cake looks like it came from a boutique bakery in Paris, but it doesn't require any special molds or equipment beyond a springform pan. The natural beauty of the layers does all the work for you.
- Adaptable to Any Season: While fresh raspberries are stunning in summer, this recipe works beautifully with frozen berries in winter, or even with other fruits like strawberries, blackberries, or cherries. Once you master the technique, you can create seasonal variations that'll keep this recipe in rotation year-round.
- Feeds a Crowd Without Breaking the Bank: Despite looking like a million bucks, this cake uses everyday ingredients in clever ways. No expensive chocolate bars or specialty items — just good technique transforming simple components into something extraordinary. Your guests will assume you spent a fortune.
Alright, let's break down exactly what goes into this masterpiece...
Inside the Ingredient List
The Flavor Base
Let's start with the foundation of any great chocolate dessert: the cocoa powder. But not all cocoa powders are created equal, and choosing the wrong one can turn your cake from divine to disappointing faster than you can say "Dutch-processed." For this recipe, you want a high-quality Dutch-processed cocoa powder — the kind that's been alkalized to remove bitterness and deepen the chocolate flavor. It should smell like you're sticking your nose into a bag of chocolate truffles, rich and complex with hints of coffee and vanilla. If your cocoa powder smells like cardboard or tastes flat and dusty, toss it and buy fresh. This isn't the place to use that ancient tin that's been lurking in your pantry since 2019.
The sugar in this recipe does more than just sweeten — it's crucial for the structure and moisture retention of the cake base. I'm calling for regular granulated sugar here because it dissolves evenly and creates the tender crumb we're after. Brown sugar would add too much moisture and compete with the chocolate flavor, while superfine sugar would make the cake too delicate to support the mousse layer. Think of granulated sugar as the reliable friend who always shows up on time and never steals the spotlight.
Buttermilk might seem like an odd choice for a chocolate cake, but here's where the magic happens. The acidity in buttermilk reacts with the baking soda to create extra lift, while the tangy flavor balances the richness of all that chocolate. Plus, it keeps the cake incredibly moist — we're talking three-days-later-and-still-delicious moist. If you don't have buttermilk, you can make a substitute by adding a tablespoon of lemon juice or white vinegar to regular milk, but honestly, the real stuff is worth keeping around for this recipe alone.
The Texture Crew
Vegetable oil is my fat of choice for the cake base because it creates a more tender crumb than butter would. Butter contains water, which can make the cake slightly tougher, while oil coats the flour proteins and prevents them from developing too much gluten. The result is a cake that's almost fudgy in texture, creating the perfect foundation for our airy mousse. Use a neutral oil like canola or grapeseed — save your expensive olive oil for salads where its flavor can shine.
The eggs in this recipe are doing double duty. The yolks add richness and help emulsify the batter, while the whites provide structure. Make sure your eggs are at room temperature before you start — cold eggs don't incorporate as smoothly and can leave you with a lumpy batter. If you forgot to take them out ahead of time (we've all been there), pop them in a bowl of warm water for five minutes and you're good to go.
Vanilla extract might seem like a background player, but it's actually the ingredient that makes everything else taste more like itself. Use real vanilla extract, not the imitation stuff. Yes, it's more expensive, but you only need two teaspoons, and the difference is remarkable. The vanilla enhances the chocolate flavor while adding its own subtle floral notes that complement the raspberries beautifully.
The Unexpected Star
Now let's talk about the ingredient that makes most people scratch their heads: boiling water. I know, I know — adding water to a cake batter seems like a recipe for disaster. But here's the thing: the hot water blooms the cocoa powder, releasing its full flavor potential and creating a smoother batter. It also helps dissolve the sugar and creates steam in the oven, contributing to the cake's light texture. The key is to add it last, stirring just until everything comes together. Overmixing after adding the water can lead to a tough cake, and nobody wants that.
The gelatin in this recipe is what transforms ordinary whipped cream into a stable mousse that can hold its shape for days. I know some people get nervous about working with gelatin, but it's actually quite forgiving. The key is to bloom it properly — sprinkle it over cold water and let it sit until it looks like translucent jelly. Then melt it gently (I use the microwave in 5-second bursts) and let it cool slightly before folding it into your cream. Too hot and it'll deflate your beautiful whipped cream, too cool and it'll set in little gelatinous lumps.
The Final Flourish
Heavy cream is the foundation of our mousse, and this is not the place to skimp on fat content. You want cream with at least 35% fat — anything less won't whip properly or hold its shape. Keep it cold, cold, cold. I chill my mixing bowl and whisk attachment in the freezer for 15 minutes before I start. Warm cream is like trying to whip soup — technically possible, but why make life harder than it needs to be?
When it comes to the chocolate for the mousse and glaze, quality matters, but that doesn't mean you need to break the bank. Look for chocolate that's at least 60% cacao for the best balance of flavor and workability. Avoid chocolate chips — they're formulated to hold their shape and won't melt smoothly. Instead, buy a good baking chocolate bar and chop it yourself. The irregular pieces melt more evenly, and you get to snack on any extra. Win-win.
Fresh raspberries are the crown jewel of this dessert, and selecting them can make or break the final presentation. Look for berries that are plump, firm, and uniformly colored. Avoid any that show signs of mold or have started to weep — one bad berry can spoil the whole batch. If you're making this out of season, frozen raspberries actually work beautifully for the purée layer. Just thaw them completely and drain off any excess liquid before cooking.
Everything's prepped? Good. Let's get into the real action...
The Method — Step by Step
- Let's start with the chocolate cake base because it's the foundation everything else will build on. Preheat your oven to 350°F (175°C) and position the rack in the center. Grease a 9-inch springform pan with butter, then line the bottom with parchment paper. This extra step prevents any sticking disasters — trust me, there's nothing worse than a beautiful cake that refuses to release from the pan. In a large bowl, whisk together the flour, sugar, cocoa powder, baking powder, baking soda, and salt. Make sure everything is well combined and there are no lumps of cocoa hiding at the bottom. The mixture should look uniformly chocolatey and smell like you're about to make something amazing.
- In a separate bowl, whisk together the buttermilk, oil, eggs, and vanilla until smooth and well combined. The mixture should be pale yellow and slightly thickened. Now here's where things get interesting — create a well in the center of your dry ingredients and pour in the wet mixture. Use a spatula to fold everything together until just combined. The batter will be thick and slightly lumpy at this point, which is exactly what we want. Overmixing at this stage develops gluten and leads to a tough cake, so resist the urge to keep stirring until it's perfectly smooth.
- Now for the magic moment — pour in the boiling water and watch as the batter transforms before your eyes. It will thin out dramatically and become glossy and pourable. Stir just until everything comes together and no streaks of flour remain. The batter will be quite thin, almost like chocolate soup, but don't panic. This is what creates that incredibly moist, fudgy texture we're after. Pour the batter into your prepared pan and give it a gentle tap on the counter to release any large air bubbles.
- Bake for 30-35 minutes, or until a toothpick inserted into the center comes out with just a few moist crumbs attached. The top should spring back when lightly touched, and the edges should start pulling away from the sides of the pan. While the cake bakes, resist the urge to open the oven door — every peek releases heat and can cause the center to sink. When it's done, remove from the oven and let cool completely in the pan on a wire rack. This is crucial because if the cake is even slightly warm when we add the mousse, it will melt and create a marbled mess.
- While the cake cools, let's tackle the raspberry layer. In a small saucepan, combine 8 ounces of the fresh raspberries with the 1/2 cup sugar and lemon juice. Cook over medium heat, stirring frequently, until the raspberries break down and release their juice. This should take about 5-7 minutes and your kitchen will smell like a raspberry jam factory in the best possible way. Use the back of a spoon to mash the berries and help them release all their flavorful juices.
- Strain the raspberry mixture through a fine-mesh sieve into a bowl, pressing on the solids to extract as much liquid as possible. You should end up with about 3/4 cup of smooth, seedless raspberry purée. Discard the seeds (or save them for your morning yogurt if you're feeling thrifty). Let the purée cool to room temperature — this prevents any unwanted melting when we fold it into our mousse later. If you're impatient like me, you can speed this up by placing the bowl in a larger bowl filled with ice water.
- Now for the mousse — and this is where things get exciting. In a small bowl, sprinkle the gelatin over the cold water and let it stand for 5 minutes to bloom. It will absorb the water and transform into a translucent, jelly-like substance that looks a bit like something from a science experiment. Meanwhile, whip 1 cup of the heavy cream in a chilled bowl until soft peaks form. The cream should hold its shape but still be smooth and glossy, like thick yogurt. Be careful not to over-whip — we're going for soft peaks here, not butter.
- Melt the chopped chocolate in a heatproof bowl set over a pan of simmering water, stirring until smooth and glossy. Remove from heat and let cool slightly — it should be warm and pourable but not hot enough to burn your finger. Quickly stir the bloomed gelatin into the warm chocolate until completely dissolved. This is crucial for the mousse to set properly, so make sure there are no gelatin lumps hiding in the chocolate. Let this mixture cool to room temperature, stirring occasionally. If it starts to set up, give it a quick 5-second zap in the microwave.
- Fold about one-third of the whipped cream into the chocolate mixture to lighten it. This is your "sacrificial" cream — it's okay if it deflates a bit because we're using it to make the chocolate more manageable. Use a large rubber spatula and fold with slow, deliberate movements, turning the bowl as you go. Once incorporated, gently fold in the remaining cream until no streaks remain. The mixture should be light, airy, and the color of milk chocolate. If you see any white streaks, keep folding, but don't overdo it or you'll deflate all that beautiful air we just incorporated.
- Divide the mousse in half. To one half, gently fold in the cooled raspberry purée until evenly distributed but still maintaining streaks of raspberry throughout. This creates a marbled effect that's visually stunning and ensures each bite has both chocolate and raspberry flavor. The raspberry mousse should be a beautiful dusty rose color with ribbons of chocolate running through it. Take your time here — this is what separates amateur desserts from professional ones.
- Time to assemble! Place the cooled cake (still in the springform pan) on your work surface. If the top isn't level, use a long serrated knife to trim it flat — but save those trimmings for snacking. Spread the raspberry mousse evenly over the cake, smoothing the top with an offset spatula. Drop the pan gently on the counter a few times to release any air bubbles. Now carefully spoon the plain chocolate mousse over the raspberry layer, smoothing it into an even layer. Work gently to avoid mixing the two layers together. Cover with plastic wrap and refrigerate for at least 4 hours, or preferably overnight.
- For the glaze, combine the remaining chocolate and cream in a heatproof bowl and microwave in 30-second bursts, stirring between each, until smooth and glossy. Add the softened butter and stir until melted and incorporated. The glaze should be pourable but thick enough to coat the back of a spoon. If it's too thin, let it cool for a few minutes; too thick, warm it up for 5 seconds in the microwave. The ideal temperature is around 90°F — warm enough to pour but cool enough to set quickly.
- Remove the cake from the refrigerator and carefully release the springform ring. Place the cake on a wire rack set over a baking sheet (this catches the glaze drips). Starting in the center, pour the glaze over the cake, using an offset spatula to gently spread it to the edges and encourage it to drip down the sides. Work quickly but calmly — the glaze sets fast. Don't worry about complete coverage; the drips are part of the charm. Any excess glaze can be scraped up from the baking sheet and reheated for another use.
- While the glaze is still setting, decorate the top with fresh raspberries, chocolate shavings, and a dusting of powdered sugar. I like to cluster the berries in the center with a few stray ones around the edges for a natural, just-picked look. The chocolate shavings add texture and make it look professionally finished. Chill for another 30 minutes to set everything firmly before serving.
That's it — you did it. But hold on, I've got a few more tricks that'll take this to another level...
Insider Tricks for Flawless Results
The Temperature Rule Nobody Follows
Here's the thing that separates okay bakers from great ones: temperature awareness. Every component of this cake has an ideal temperature window, and respecting those boundaries is what prevents disasters. Your cream must be cold when whipping (ideally 35-40°F), your chocolate should be warm but not hot when mixing with gelatin (around 100-110°F), and your cake must be completely cool before adding any mousse layers. I use an instant-read thermometer like a kitchen security blanket — it's the difference between success and a sad, weeping mess.
But here's the insider tip that'll make you look like a pro: pay attention to your kitchen's ambient temperature too. If you're baking in the middle of summer without air conditioning, you'll need to work faster and possibly chill components between steps. In winter, you might need to let things sit out for a few extra minutes to come to the right temperature. Think of yourself as a temperature conductor, orchestrating all these elements to come together at exactly the right moment.
Why Your Nose Knows Best
Forget timers — your nose is the most reliable kitchen tool you own. When the chocolate cake is perfectly baked, your kitchen will smell like a chocolate shop had a baby with a bakery. If you start to smell something sharp or slightly burnt, you've gone too far. The same goes for toasting nuts or melting chocolate — your nose will tell you when things are perfectly done before your eyes can. I once saved a batch of expensive chocolate from seizing because I caught that telltale sour smell just in time.
This sensory awareness extends to texture too. When folding mousse, watch for the moment when the mixture goes from streaky to uniformly colored — it happens faster than you think. When whipping cream, listen for the change in sound your mixer makes as it approaches soft peaks. These subtle cues become second nature with practice, turning you from a recipe follower into an intuitive baker.
The 5-Minute Rest That Changes Everything
After you pour the glaze over your cake, resist every instinct to move it immediately. Give it five minutes to set undisturbed. This brief rest allows the glaze to firm up just enough that when you do move it, you won't leave fingerprint divots or smudges. But here's the real secret — during this time, the glaze develops that perfect mirror-like finish that makes people gasp. It's like magic, but it's actually just chocolate science.
This principle applies throughout the recipe. Let your gelatin bloom fully (don't rush it), allow your raspberry purée to cool completely, give your mousse time to set between layers. In our rush-rush world, these little pauses feel counterintuitive, but they're what separate amateur desserts from professional ones. Good things come to those who wait, and this cake is very, very good.
Creative Twists and Variations
This recipe is a playground. Here are some of my favorite ways to switch things up:
The White Chocolate Raspberry Dream
Swap out the dark chocolate for good quality white chocolate in the mousse layer, and add a teaspoon of rose water to the raspberry purée. The result is a dessert that tastes like summer in a garden party. The white chocolate makes the cake sweeter and more delicate, perfect for bridal showers or anyone who finds dark chocolate too intense. Just be extra careful with the gelatin — white chocolate is more sensitive to temperature changes.
The Black Forest Remix
Replace the raspberries with cherries (fresh or frozen), add a tablespoon of kirsch to the cherry purée, and fold some chopped cherries into the mousse. Top with chocolate curls and fresh cherries for a sophisticated take on the classic Black Forest cake. The slight bitterness of the cherries balances the chocolate beautifully, creating a more grown-up flavor profile that chocolate purists will adore.
The Tropical Escape
Use mango purée instead of raspberry, add the zest of one lime to the mousse, and swap the chocolate glaze for a passion fruit mirror glaze. The tropical fruit brings brightness and acidity that cuts through the richness of the chocolate, making this perfect for summer dinner parties. The colors are stunning too — imagine sunset-orange mango against rich chocolate, like a tropical sunset in dessert form.
The Espresso Indulgence
Dissolve 2 tablespoons of instant espresso powder in the boiling water before adding it to the cake batter, and add a shot of espresso to the chocolate mousse. The coffee enhances the chocolate flavor without making the dessert taste like coffee — it's like turning up the volume on the chocolate. This version is dangerously addictive and perfect for dinner parties that stretch late into the evening.
The Nutty Affair
Add 1/2 cup of finely ground hazelnuts to the cake batter, use Frangelico instead of vanilla in the mousse, and top with toasted hazelnuts. The nuts add texture and a toasty flavor that pairs beautifully with both the chocolate and fruit. It's like eating a sophisticated version of Nutella, but lighter and more elegant. Plus, the nuts help cut the richness, making it easier to justify that second slice.
The Mini Version
Instead of one large cake, make individual mini cakes using a muffin tin lined with plastic wrap. These are perfect for dinner parties where you want to impress without the stress of slicing and serving. The technique is the same, but everything happens faster — smaller cakes mean shorter chilling times. Plus, everyone gets their own perfect little dessert, which feels incredibly luxurious.
Storing and Bringing It Back to Life
Fridge Storage
This cake keeps beautifully in the refrigerator for up to 5 days, making it perfect for entertaining. Cover it loosely with plastic wrap, making sure the wrap doesn't touch the glazed surface (it'll stick and pull off chunks when you remove it). Store it on a flat shelf, not in the door where temperature fluctuations can cause condensation on the glaze. If you notice any condensation forming, gently blot it with a paper towel — don't rub or you'll smear the glaze.
The flavors actually improve over the first 24-48 hours as the raspberry and chocolate have time to meld. After day 3, the texture might start to deteriorate slightly — the mousse can become a bit denser and the cake might start to dry out around the edges. But honestly, I've never had one last that long in my house. If you need to make it further ahead, consider freezing individual slices.
Freezer Friendly
This cake freezes like a dream, which is dangerous knowledge for someone with late-night dessert cravings. Wrap individual slices tightly in plastic wrap, then in foil, and freeze for up to 2 months. To serve, transfer to the refrigerator overnight to thaw slowly. The glaze might lose some of its shine, but a quick blast with a hair dryer on low heat (held about 6 inches away) can restore some of the gloss. Or just dust with powdered sugar and call it rustic — still delicious.
For the best results, freeze the cake before adding the fresh berry garnish. Berries don't freeze and thaw well on top of the cake — they become mushy and release juice that can stain the glaze. Instead, add fresh berries when you're ready to serve. If you must freeze with berries, choose frozen berries and serve them semi-frozen for a nice textural contrast.
Best Serving Method
Remove the cake from the refrigerator 15-20 minutes before serving for the best texture and flavor. Cold mousse can taste flat, and the chocolate flavors won't be as pronounced. Use a sharp knife dipped in hot water and wiped clean between cuts for picture-perfect slices. A cake server or offset spatula helps lift out the first slice cleanly — after that, gravity does most of the work for you.
If you're serving this at a dinner party, I like to plate each slice with a few extra fresh berries and a drizzle of raspberry coulis for restaurant presentation. A small dollop of lightly sweetened whipped cream on the side never hurts either. And here's my favorite serving tip: cut smaller slices than you think people want. This cake is rich, and a little goes a long way. Plus, everyone always wants seconds, which feels more indulgent than one large slice.