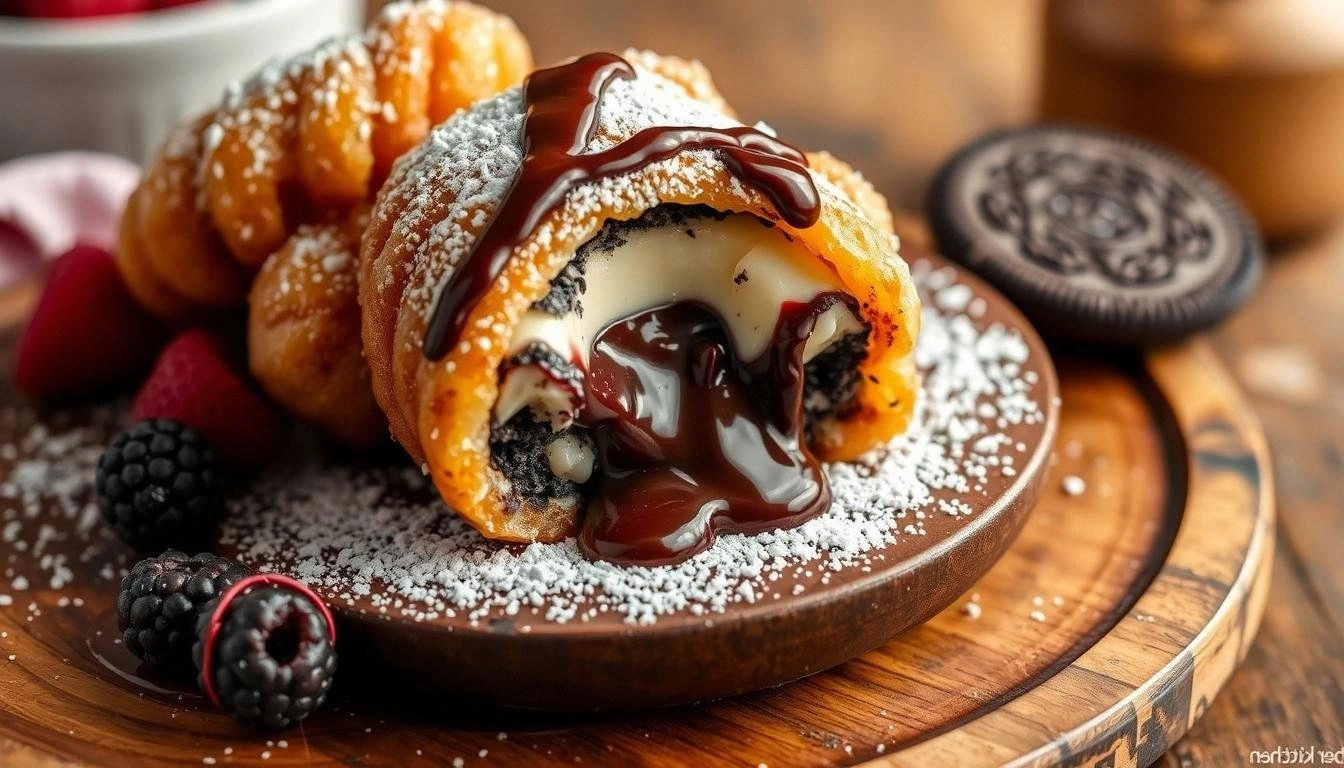
Picture this: I’m halfway through a midnight snack raid, eyes glazed with the promise of chocolate, when I hear a faint crackle from the kitchen. A neighbor’s new electric skillet was humming in the background, and the air smelled of melted butter and vanilla. I reached for the pantry, pulled out a bag of Oreos, and, in a fit of culinary rebellion, decided to turn those classic cookies into a decadent, cheesecake‑laden fried treat. The result? A gooey, crispy, chocolate‑cheese explosion that made my taste buds do a double‑tap.
The first bite was a shockwave of textures—crunchy on the outside, molten cream cheese in the center, and that unmistakable chocolate bite of the Oreo that lingered like a sweet after‑taste. The aroma, a perfect blend of toasted sugar and warm butter, wafted through the kitchen, drawing my roommate in for a second help. The sound of the skillet sizzling was music to my ears, a rhythmic promise of golden perfection. When I lifted a piece, the glaze clung to the edges like a delicate glaze on a freshly baked croissant. The flavor profile was layered: sweet, tangy, and the faintest hint of citrus from a touch of lemon zest that brightened the richness.
What makes this version stand out is not just the indulgent taste but the methodical approach to marrying two beloved desserts. I discovered that the secret lies in the balance of the batter’s density and the frying technique that locks in moisture. The recipe uses a precise ratio of cream cheese to flour, giving it a custard‑like consistency that holds together when fried. The result is a bite that feels like a chocolate cookie, yet melts in your mouth like a cheesecake. The final drizzle of powdered‑sugar glaze adds a subtle sweetness that ties the whole experience together. It’s a culinary paradox that feels both familiar and utterly fresh.
I dare you to taste this and not go back for seconds. Picture yourself pulling this out of the skillet, the whole kitchen smelling incredible, and watching the golden edges shimmer as they cool. The moment you bite, the crunch gives way to a creamy center that oozes like a decadent chocolate fountain. If you’ve ever struggled with making fried desserts that stay intact, you’re not alone—this is the fix you’ve been searching for. I’ll be honest — I ate half the batch before anyone else got to try it. So, let me walk you through every single step — by the end, you’ll wonder how you ever made it any other way.
What Makes This Version Stand Out
- Texture: The batter is crafted to be thick enough to hold its shape when fried, yet moist enough to release a creamy center that melts in your mouth. The result is a satisfying crunch that transitions into a silky cheesecake core.
- Flavor Balance: Sweetness from the Oreo crumbs, tang from the cream cheese, and a subtle citrus lift from lemon zest create a complex palate that doesn’t overwhelm but delights.
- Speed: This recipe is ready in under an hour from prep to plate, making it an ideal indulgence for spontaneous cravings or last‑minute gatherings.
- Visual Appeal: The golden crust, glossy glaze, and dusting of powdered sugar give the finished product a show‑stopping look that’s perfect for Instagram-worthy moments.
- Make‑Ahead Friendly: The batter can be prepared ahead of time, refrigerated, and fried later, making it a great option for parties or busy weekdays.
- Ingredient Quality: Using premium cream cheese and high‑quality Oreos ensures depth of flavor that can’t be replicated with lower‑grade substitutes.
- Scalability: The recipe scales neatly for larger crowds; just multiply the ingredients by the number of servings you need.
- Audience Reaction: Friends and family who’ve tasted this version report that it’s the best fried dessert they’ve ever had, with many asking for a second helping.
Inside the Ingredient List
The Flavor Base
At the heart of these cookies lies a luscious cream cheese mixture that delivers a rich, tangy backdrop to the sweet Oreo crumbs. Cream cheese is the key to achieving that silky, cheesecake‑like interior; it’s the foundation that keeps the batter cohesive while adding depth. If you skip the cream cheese, you lose that signature custard flavor, and the cookies become more like standard chocolate cookies. For best results, use full‑fat cream cheese at room temperature so it blends smoothly with the sugar and eggs.
The Texture Crew
Flour, eggs, and butter form the structural backbone of the batter. Flour provides the body and ensures the cookies hold their shape when fried, while the eggs act as a binder that helps the batter set without becoming too dense. Butter adds richness and a subtle melt that enhances the overall mouthfeel. If you prefer a gluten‑free version, swap all‑purpose flour for an equal amount of a gluten‑free blend, but be mindful that the texture may change slightly, becoming more crumbly.
The Unexpected Star
Oreo cookies are the star that gives this recipe its unmistakable chocolatey bite. Crushing them into fine crumbs ensures they’re evenly distributed throughout the batter, allowing each bite to deliver that classic Oreo crunch. If you’re a fan of extra chocolate, consider using double‑chocolate Oreos or even adding a handful of chocolate chips. The crumbs also absorb the moisture from the cream cheese, creating a harmonious blend of flavors.
The Final Flourish
A splash of lemon zest brightens the richness, cutting through the sweetness and adding a fresh, citrusy note. The powdered sugar glaze that follows the frying process not only adds a touch of sweetness but also creates a glossy finish that’s visually appealing. If you’re looking for a more indulgent glaze, swirl in a little melted chocolate or drizzle a caramel sauce over the top. Remember, the glaze is meant to coat the cookies lightly, so a thin layer is all you need to elevate the flavor without overpowering it.
Everything’s prepped? Good. Let’s get into the real action and start turning these ingredients into a mouth‑watering masterpiece.
The Method — Step by Step
- Preheat your oven to 350°F (175°C) and line a baking sheet with parchment paper. While the oven warms, gather all your ingredients so everything’s within arm’s reach. The preheat step is essential for a consistent baking environment; it ensures the cookies bake evenly. If you’re working in a hot kitchen, keep the batter in the fridge for a few minutes to keep it from becoming too runny.
- Using a food processor or a zip‑lock bag, crush 20 Oreo cookies into fine crumbs. The finer the crumbs, the more evenly they’ll distribute throughout the batter. If you prefer a chunkier texture, reserve a handful of whole Oreos for later addition. The crushing step is also a great opportunity to engage in a little kitchen music—squeezing the bag to the beat can be surprisingly satisfying.
- In a large mixing bowl, beat 8 ounces of softened cream cheese until it’s light and fluffy. Cream cheese should be at room temperature so it blends smoothly with the sugar. Use a stand mixer or hand mixer on medium speed; if you’re beating by hand, make sure the mixture is completely smooth before adding the next ingredient. The fluffiness of the cream cheese is what gives the cookies their signature creamy center.
- Add 1/4 cup granulated sugar, 1 teaspoon vanilla extract, 2 large eggs, 1/4 cup whole milk, and 2 tablespoons melted unsalted butter to the cream cheese. Beat until the mixture is well combined and slightly glossy. The sugar dissolves into the cream cheese, creating a smooth base, while the eggs bind everything together. The butter adds a subtle richness that enhances the overall flavor profile.
- Sift 1/2 cup all‑purpose flour into the mixture and fold gently until just incorporated. Be careful not to overmix; the batter should remain slightly lumpy. A little lumpiness keeps the cookies tender and prevents them from becoming too dense. The flour provides structure, allowing the cookies to hold their shape when fried.
- Fold in the Oreo crumbs and a pinch of salt to taste. The salt sharpens the sweetness and balances the flavors. If you’re feeling adventurous, add 1 teaspoon lemon zest at this point for a bright, citrusy note that cuts through the richness. The mixture should look like a thick, dough‑like batter, ready for the next step.
- Refrigerate the batter for 30 minutes. This chilling step firms up the dough, making it easier to scoop and fry without it spreading too much. The cold temperature also helps the butter solidify slightly, which contributes to a crispier crust during frying. If you’re in a hurry, you can skip the refrigeration, but the texture will be noticeably different.
- Heat a large skillet over medium heat and add 2 tablespoons of butter, allowing it to melt and coat the pan. Once the butter starts to sizzle, drop spoonfuls of the chilled batter onto the skillet, leaving space between each piece. The skillet should be hot enough that the batter starts to brown quickly, but not so hot that it burns. Fry each side for about 2 minutes or until golden brown and the edges are firm.
- While the cookies are still hot, drizzle a glaze made from 1 cup powdered sugar mixed with a splash of milk to achieve a thin, pourable consistency. The glaze should coat the tops lightly, creating a glossy sheen that enhances the visual appeal. If you prefer a richer glaze, add a tablespoon of melted chocolate or a drizzle of caramel sauce. The glaze should not be too thick, or it will weigh down the crisp exterior.
- Let the fried cookies rest on a wire rack for 5 minutes to cool slightly. This resting period allows the glaze to set and the interior to firm up just enough for a clean bite. Dust the finished cookies with the remaining powdered sugar for a delicate, sweet finish. Serve immediately while they’re still warm and the cream cheese center is at its most luscious.
That’s it — you did it. But hold on, I’ve got a few more tricks that will elevate this from great to unforgettable.
Insider Tricks for Flawless Results
The Temperature Rule Nobody Follows
Many people fry at a high heat, but the secret is a moderate, steady temperature of about 350°F in the skillet. This ensures the cookies cook through without burning the exterior. Use a kitchen thermometer to keep the heat consistent, especially if you’re using a cast‑iron skillet that retains heat well. If the oil starts to smoke, reduce the heat slightly; if the cookies are taking too long to brown, increase the heat a touch. Consistency in temperature translates to a uniform golden crust every time.
Why Your Nose Knows Best
You’ll notice a subtle shift in aroma when the cookies hit the skillet: a faint, buttery scent that becomes caramelized. That scent is your cue that the cookies are at the right stage for flipping. Don’t wait until the edges are fully browned; flip when the bottom is a light golden brown and the surface is starting to bubble gently. This technique keeps the interior creamy and the exterior crisp.
The 5-Minute Rest That Changes Everything
After frying, let the cookies rest on a wire rack for exactly five minutes. This rest period allows the steam to escape and the glaze to set, preventing the cookies from becoming soggy. It also gives the cream cheese center a chance to firm slightly, making each bite more satisfying. Skipping this step may result in a gooey, messy experience that defeats the purpose of a crisp fried cookie.
A Sprinkle of Salt for the Final Touch
A light pinch of sea salt on top of the powdered sugar glaze brings out the sweetness and balances the richness. The salt crystals add a subtle crunch and a burst of flavor that enhances the overall profile. Use a fine sea salt for the best texture, and sprinkle just before serving to keep the glaze from dissolving.
The Glaze Variations
If you want to take the glaze up a notch, whisk in a tablespoon of melted dark chocolate or a splash of espresso for a mocha twist. Another option is to fold in a teaspoon of instant coffee powder for a subtle bitter edge that complements the chocolate. Keep the glaze thin; a thick glaze will weigh down the crispy edges and alter the mouthfeel.
Creative Twists and Variations
This recipe is a playground. Here are some of my favorite ways to switch things up:
Chocolate‑Mint Explosion
Add a teaspoon of peppermint extract to the batter and sprinkle crushed mint candy on top of the glaze. The mint sharpens the chocolate flavor and gives the cookies a refreshing finish. This variation is perfect for holiday parties or a summer dessert.
Nutty Crunch
Fold in 1/4 cup chopped toasted pecans or walnuts into the batter before frying. The nuts add a delightful crunch and a nutty undertone that pairs wonderfully with the creamy center. Dust the finished cookies with a pinch of cinnamon for an extra layer of warmth.
Caramel Swirl
Swirl caramel sauce into the glaze before drizzling over the hot cookies. The caramel adds a buttery sweetness that balances the richness of the cream cheese. A drizzle of sea salt on top enhances the caramel’s depth.
Citrus Burst
Replace the lemon zest with orange zest and add a tablespoon of orange liqueur to the batter. The citrusy brightness cuts through the sweetness and gives the cookies a bright, lively flavor profile. Serve with a scoop of vanilla ice cream for an indulgent dessert.
Espresso‑Infused Delight
Stir in a teaspoon of instant espresso powder into the batter for a mocha twist. The espresso deepens the chocolate flavor and adds a subtle bitterness that balances the creaminess. Pair with a drizzle of dark chocolate for a decadent finish.
Storing and Bringing It Back to Life
Fridge Storage
Store the fried cookies in an airtight container at room temperature for up to 3 days. The cookies will maintain their crispness for a few hours; after that, they may soften slightly. If you need to keep them fresher longer, refrigerate them in a sealed container and reheat before serving.
Freezer Friendly
Freeze the fried cookies in a single layer on a parchment‑lined tray for up to 2 weeks. Once frozen, transfer them to a freezer bag for extended storage. When ready to serve, thaw at room temperature and warm briefly in a 350°F oven for 5 minutes to restore crispness.
Best Reheating Method
The secret to reheating these cookies is a quick 350°F oven bake for 3–4 minutes, or a 30‑second microwave burst on a paper towel. Add a tiny splash of water before reheating to steam the cookies back to perfection. Avoid microwaving for too long, or the cookies will become rubbery.