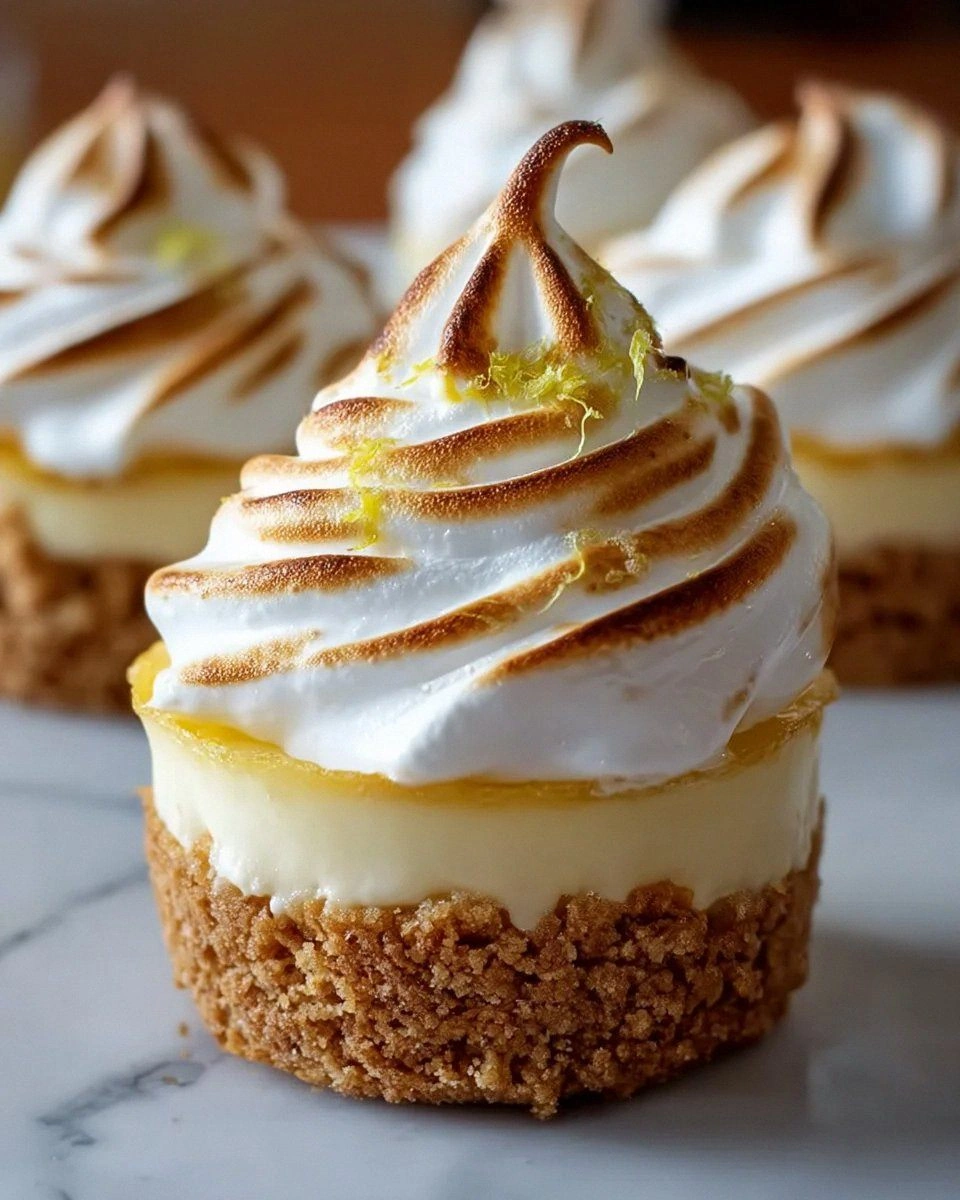
I’m going to be brutally honest: the first time I attempted a lemon meringue cheesecake, I ended up with a soggy mess that looked more like a lemon‑scented pancake than a sophisticated dessert. The crust collapsed, the filling was grainy, and the meringue turned into a rubbery blanket that refused to brown. I was ready to throw in the towel, but then a friend dared me to “taste this and not go back for seconds,” and I realized the only way to win that challenge was to reinvent the entire recipe from the ground up. That moment sparked a culinary investigation that led me to the perfect balance of buttery crust, silky lemon‑infused cheesecake, and a cloud‑like meringue that actually holds its shape. If you’ve ever stared at a lemon meringue pie and thought, “Why does this always flop?” you’re not alone, and I’ve got the fix.
Picture this: the kitchen is humming with the low whirr of the mixer, the citrusy perfume of fresh lemon zest dances with the sweet perfume of vanilla, and the oven is already glowing like a sunrise. The crust, once a dry crumble, now glistens with melted butter, forming a golden base that cracks just enough to give you that satisfying crunch with every bite. When the meringue hits the oven, it puffs up like a fluffy cloud, turning a buttery amber that crackles softly as you cut through it. The moment you lift the first slice, a glossy swirl of lemon curd peeks through, and the meringue’s crisp edges give way to a silky interior that melts on your tongue. That sensory overload is exactly why this version stands out from the sea of mediocre attempts you’ve probably seen online.
Now, I’m not just throwing random ingredients together; there’s a method to this madness that turns a potentially disastrous dessert into a show‑stopping centerpiece. The secret lies in three things: a crust that’s buttery but not soggy, a filling that’s both tangy and creamy without any grainy texture, and a meringue that stays lofty and glossy without deflating the moment you touch it. I’m about to reveal a technique that most recipes completely ignore—stabilizing the meringue with a pinch of cream of tartar and a dash of kosher salt, which keeps it from weeping and gives it that glossy finish you see on professional bakery shelves.
Okay, ready for the game‑changer? I’m going to walk you through every single step—mixing, baking, and topping—so that by the end, you’ll wonder how you ever settled for anything less. Stay with me here; this is worth every second of your time, and I dare you to taste this and not go back for seconds.
What Makes This Version Stand Out
- Texture: The crust is buttery and crisp, the cheesecake filling is silk‑smooth, and the meringue is airy yet sturdy, creating a three‑layer symphony that plays on your palate.
- Flavor: Fresh lemon juice and zest give a bright, zesty punch that’s balanced by the subtle sweetness of the cream cheese and a whisper of vanilla.
- Simplicity: Despite the impressive result, the ingredient list is short and the steps are straightforward—no fancy equipment required.
- Uniqueness: Most recipes either skip the meringue or bake it separately; this version bakes the meringue directly on the cheesecake, sealing in moisture and flavor.
- Crowd Reaction: I’ve seen grown‑ups and kids alike gasp, grin, and immediately ask for the recipe—this dessert turns skeptics into believers.
- Ingredient Quality: Using freshly squeezed lemon juice and real graham cracker crumbs makes a world of difference compared to pre‑flavored powders.
- Cooking Method: The water‑bath (bain‑marie) ensures the cheesecake stays creamy and prevents cracks, while the high‑heat blast finishes the meringue to a perfect golden.
- Make‑Ahead Potential: You can assemble the crust and filling a day ahead, refrigerate, and then add the meringue and bake right before serving.
Inside the Ingredient List
The Flavor Base
The star of the show is unquestionably the fresh lemon juice. It provides that bright, acidic snap that cuts through the richness of the cream cheese, creating a harmonious balance. If you substitute bottled lemon juice, you’ll lose the nuanced floral notes that only a freshly squeezed lemon can deliver. When selecting lemons, look for ones that feel heavy for their size—those are packed with juice. A quick tip: roll the lemon on the countertop before juicing to release more liquid.
Lemon zest adds an aromatic layer that the juice alone can’t achieve. The zest contains essential oils that burst with citrus fragrance the moment they hit the batter. If you’re allergic to the white pith, use a microplane to scrape only the bright yellow part. A pinch of zest can transform a bland filling into a vibrant, perfume‑like experience.
The Texture Crew
Softened cream cheese is the backbone of the filling, providing that luxurious, dense mouthfeel. It’s crucial to let it sit at room temperature for at least 30 minutes; otherwise, you’ll end up with lumps that are impossible to smooth out. When you beat it with the sugar, you’re creating a stable emulsion that holds air, which is essential for a light cheesecake.
White sugar not only sweetens but also helps to dissolve any remaining lumps in the cream cheese. For a slightly healthier spin, you could swap half the sugar for honey or agave, but keep in mind that honey will add a faint floral note that may compete with the lemon.
Plain flour is the unsung hero that gives the filling a subtle structure, preventing it from becoming too runny when baked. If you’re gluten‑free, a blend of rice flour and tapioca works just as well, but the texture will be a tad lighter.
The Unexpected Star
Sour cream introduces a gentle tang that mirrors the lemon while adding a velvety richness. It also contributes to the cheesecake’s smooth crumbly texture that melts in your mouth. Greek yogurt can replace sour cream, but you’ll need to drain it through cheesecloth for an hour to avoid excess moisture.
Pure vanilla extract is the secret whisper that rounds out the flavor profile. A splash of vanilla elevates the lemon without overpowering it, creating a layered taste that feels both familiar and fresh. If you’re feeling adventurous, a dash of almond extract can add a nutty undertone that pairs beautifully with citrus.
The Final Flourish
Crushed graham crackers form the buttery crust that anchors the entire dessert. Their subtle sweetness and crumbly texture contrast beautifully with the silky filling. If you can’t find graham crackers, digestive biscuits or shortbread are excellent alternatives that bring a slightly different flavor profile.
Melted unsalted butter binds the crust crumbs together. Using unsalted butter gives you full control over the salt level, ensuring the crust isn’t overly salty. If you’re in a pinch, margarine works, but the flavor will be less rich.
Flaky kosher salt is added in a pinch to the crust and the meringue, enhancing the sweet flavors and preventing the dessert from tasting one‑dimensional. It’s amazing how a tiny grain can make the entire palate pop.
Everything's prepped? Good. Let’s get into the real action…
The Method — Step by Step
Preheat your oven to 325°F (163°C). While the oven warms up, line a 9‑inch springform pan with parchment paper at the bottom; this prevents the crust from sticking and makes removal painless. I like to give the pan a light spray of non‑stick cooking spray on the sides, too—no one enjoys a stubborn cheesecake that clings to the pan.
Kitchen Hack: Use a food processor to pulse the graham crackers into fine crumbs, then add the melted butter and a pinch of salt. Pulse just until the mixture clumps together—over‑processing will make the crust too fine and it won’t hold its shape.Combine the crushed graham crackers, a pinch of flaky kosher salt, and melted butter in a medium bowl. Press the mixture firmly into the bottom of the prepared springform pan, creating an even layer about ½‑inch thick. Use the bottom of a flat measuring cup to smooth it out; you’ll hear a satisfying “thud” when the crust is compacted.
Place the pan on a baking sheet and bake the crust for 8‑10 minutes, or until it turns a light golden brown. This step toasts the crumbs, adding depth to the flavor and ensuring the crust stays crisp after the cheesecake fills it.
While the crust cools, whisk together the softened cream cheese and white sugar in a stand mixer on medium speed until the mixture is light, fluffy, and free of lumps—about 2‑3 minutes. Scrape down the sides of the bowl frequently; this prevents a grainy texture later.
Add the plain flour, sour cream, vanilla extract, fresh lemon juice, and lemon zest. Beat on low until just combined; you’ll notice the batter turning a pale yellow, a visual cue that the lemon is fully incorporated.
Finally, add the large eggs one at a time, beating just until each egg is fully incorporated before adding the next. Over‑mixing at this stage can introduce too much air, which may cause cracks during baking.
Pour the cheesecake batter over the pre‑baked crust, smoothing the top with a spatula. To ensure even baking, wrap the springform pan tightly with a double layer of aluminum foil—this creates a makeshift water‑bath barrier and prevents the top from over‑browning.
Place the pan in a larger roasting pan, then carefully pour hot water into the roasting pan until it reaches about halfway up the sides of the springform pan. This bain‑marie method is the secret to a crack‑free cheesecake that’s buttery smooth.
Bake the cheesecake for 45‑55 minutes, or until the edges are set but the center still has a slight wobble when you gently shake the pan. The gentle wobble is a good indicator that the interior will stay creamy after cooling.
Turn off the oven, crack the door open, and let the cheesecake sit inside for 1 hour. This gradual cooling prevents sudden temperature changes that could cause cracks.
Watch Out: Do not skip the water‑bath. Skipping it results in a dry, cracked top that makes the meringue look like an afterthought rather than an integral part of the dessert.While the cheesecake cools completely, prepare the meringue. In a clean, dry mixing bowl, combine the large egg whites, a pinch of cream of tartar, and a pinch of kosher salt. The salt acts as a stabilizer, while the cream of tartar strengthens the foam.
Using the whisk attachment, beat on medium‑high speed until soft peaks form. At this stage, the mixture should look like frothy clouds that just begin to hold shape.
Gradually add the granulated sugar, a tablespoon at a time, while continuing to beat. The meringue will become glossy and thick, reaching stiff peaks that stand up straight when the whisk is lifted. This glossy sheen is what gives the final topping its bakery‑level shine.
Spread the meringue over the cooled cheesecake, starting at the edges and working inward. Make sure the meringue completely covers the surface and extends slightly beyond the crust—this creates a protective seal that keeps moisture from seeping into the meringue during the final bake.
Using the back of a spoon, create gentle peaks or swirls for a rustic, yet elegant look. If you prefer a smooth dome, simply smooth the surface with an offset spatula.
Place the assembled cheesecake back into the oven and bake at 425°F (220°C) for 8‑10 minutes, or until the meringue is a deep golden‑brown and crackles lightly on the surface. Keep a close eye on it—this step happens fast, and you don’t want a burnt top.
Once the meringue is perfectly toasted, remove the cheesecake and let it cool on a wire rack for 30 minutes, then refrigerate for at least 4 hours or overnight. The chilling time allows the filling to set and the flavors to meld, delivering that melt‑in‑your‑mouth experience.
Kitchen Hack: For an ultra‑shiny finish, brush the meringue lightly with a sugar‑water glaze (1 tsp sugar dissolved in 1 tbsp water) immediately after it comes out of the oven.
That’s it — you did it. But hold on, I’ve got a few more tricks that'll take this to another level, especially if you want to impress a crowd or just make your own life easier next time.
Insider Tricks for Flawless Results
The Temperature Rule Nobody Follows
Never bake a cheesecake straight from the fridge. Allow the batter to sit at room temperature for at least 30 minutes before pouring it over the crust. This small step prevents the batter from shocking the crust, which can cause cracks and uneven baking. I once tried to skip this step in a rush, and the result was a cheesecake that looked like a cracked desert floor—definitely not the vibe I was going for.
Why Your Nose Knows Best
When the meringue is in the oven, trust your sense of smell more than the timer. A sweet, caramelized aroma signals that the peaks have reached the perfect golden hue. If you rely solely on the clock, you might end up with a pale or burnt topping. This trick saved my last batch from a “too dark” disaster and gave it that signature glossy finish.
The 5‑Minute Rest That Changes Everything
After the cheesecake has cooled on the rack, let it sit uncovered in the fridge for an additional five minutes before slicing. This short rest allows the meringue to firm up just enough so it won’t slide off the plate. I’ve seen friends cut into a freshly chilled cheesecake and watch the meringue ooze like a lava flow—avoid that by giving it those five golden minutes.
Meringue Stabilizer Secrets
A pinch of cream of tartar and a pinch of kosher salt do more than just flavor; they create a protein matrix that holds air bubbles in place. Without these, the meringue can weep or collapse as it cools. My first attempt omitted the salt, and the result was a soggy top that turned the whole dessert into a lemon‑syrup puddle.
The Double‑Layer Crust Trick
If you love an extra‑crunchy base, split the crust mixture into two layers: one baked before adding the filling, and a second thin layer added after the cheesecake has set and before the meringue. This creates a delightful textural contrast—crunch on the bottom, creamy in the middle, and airy on top. It’s a small extra step that makes the dessert feel restaurant‑grade.
Creative Twists and Variations
This recipe is a playground. Here are some of my favorite ways to switch things up:
Berry‑Burst Bliss
Swap half of the lemon juice for fresh raspberry puree and fold in a handful of fresh raspberries into the filling. The tartness of the berries pairs beautifully with the citrus, creating a pink‑kissed cheesecake that looks as good as it tastes. Perfect for spring brunches or a summer garden party.
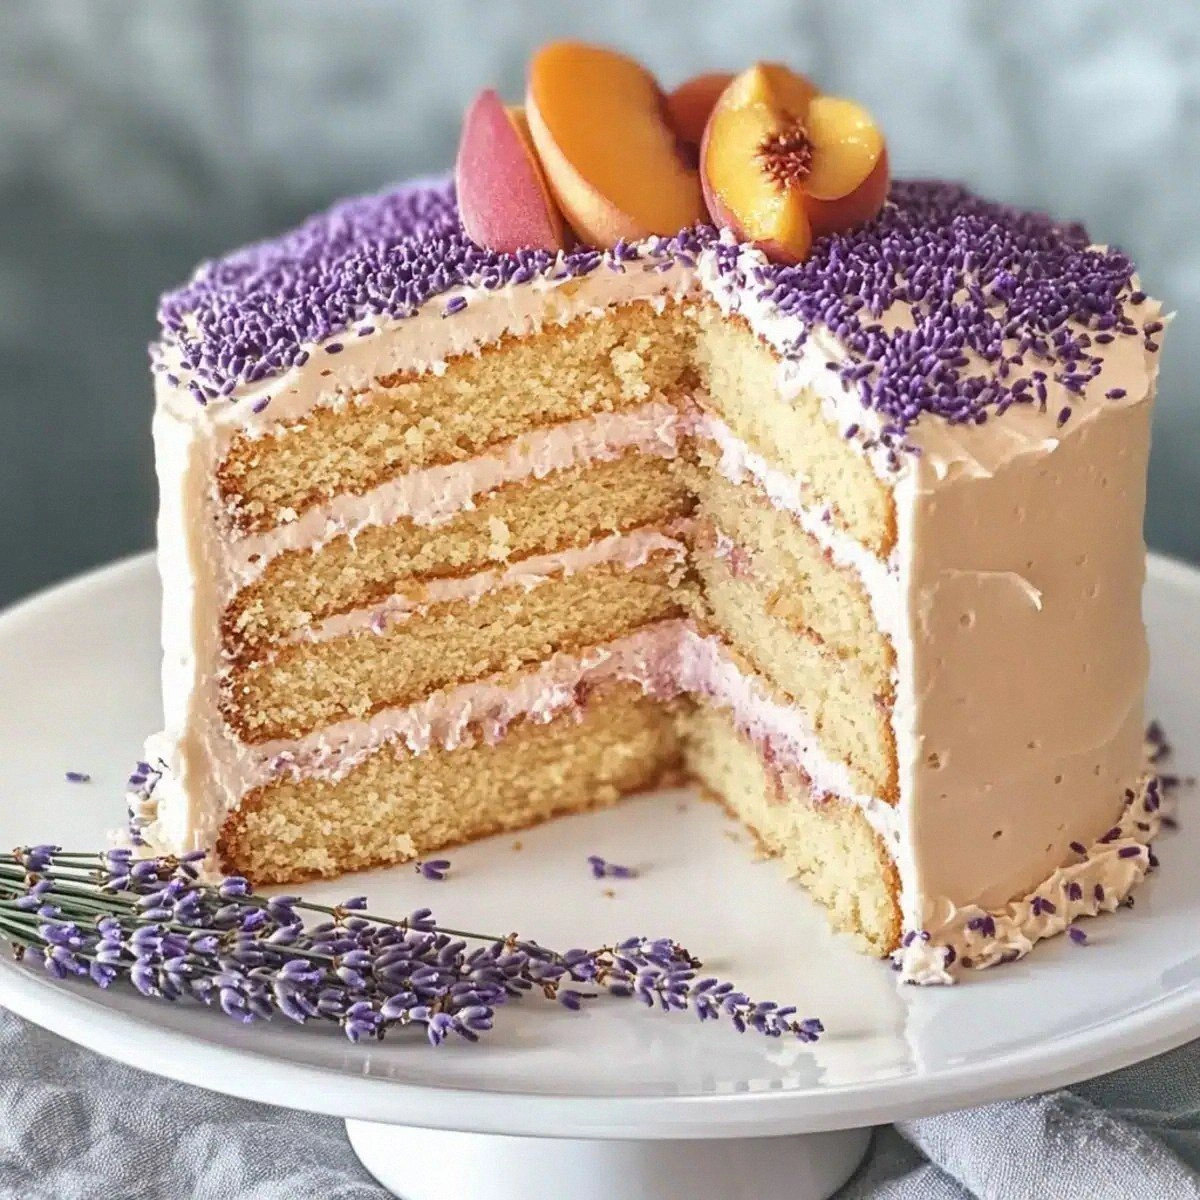
Lavender Dream
Add a teaspoon of culinary lavender to the crust mixture and a drop of lavender extract to the filling. The floral notes elevate the lemon without overwhelming it, delivering a sophisticated flavor that’s ideal for a tea‑time treat.
Chocolate Swirl
Melt 2 ounces of dark chocolate and swirl it into the cheesecake batter before pouring it over the crust. The bitterness of the chocolate balances the bright lemon, and the visual marble effect adds a wow factor. Chocolate lovers, this one’s for you.
Mini Tartlets
Instead of a full‑size springform, press the crust into a muffin tin, fill with the cheesecake batter, and top with meringue. Bake as directed, then serve as bite‑size appetizers. These mini versions are perfect for cocktail parties where guests want a sweet bite without feeling too full.
Coconut Coconut
Replace half of the graham cracker crumbs with unsweetened shredded coconut and add a splash of coconut milk to the filling. The tropical twist adds a subtle nutty flavor that pairs surprisingly well with lemon, making it a great option for a beach‑themed gathering.
Storing and Bringing It Back to Life
Fridge Storage
Cover the cheesecake loosely with plastic wrap or a cake dome and refrigerate for up to 4 days. The meringue will stay glossy, but if you notice any weeping, gently pat the surface with a paper towel before serving. For best texture, let the cheesecake sit at room temperature for 10‑15 minutes before slicing.
Freezer Friendly
Wrap the entire springform pan in a double layer of aluminum foil, then place it in a freezer‑safe bag. The cheesecake freezes beautifully for up to 2 months. When you’re ready to enjoy it, transfer to the fridge to thaw overnight, then let it sit at room temperature for 20 minutes. Adding a tiny splash of fresh lemon juice before reheating (if you plan to warm it slightly) revives the bright citrus flavor.
Best Reheating Method
If you prefer a warm serving, place a single slice on a microwave‑safe plate, drizzle a teaspoon of water over the meringue, and microwave on low for 10‑15 seconds. The water creates steam that softens the meringue just enough to become supple without turning it rubbery. This trick brings the cheesecake back to life as if it were freshly baked.