I was standing in my kitchen, the clock ticking, the kids begging for something sweet, and my pantry looking like a desert. I had tried the classic store‑bought saltwater taffy, but it crumbled like stale sand the moment I bit into it. I dared my brother to make a batch that would actually hold together, and he laughed—until I pulled out a pot, a candy thermometer, and a stash of vanilla that smelled like a bakery in July. The moment the sugar melted, the whole house filled with a buttery, caramel‑kissed perfume that made my neighbor’s dog whine from the next yard. I swear, that scent alone could convince a grown man to trade his steak for a piece of taffy.
Picture this: a glossy, amber ribbon of candy stretching across the countertop, its surface catching the light like a sunrise over the ocean. You hear the faint hiss of the syrup as it reaches that perfect 250°F, a sound that says “we’re almost there.” Your fingers, slightly dusted with powdered sugar, feel the warm, pliable mass pull away from the pan, resisting just enough to promise chewiness without snapping. The taste? A sweet‑salty harmony that dances on the tongue, with a buttery melt that lingers like a summer memory. That’s the moment I realized I had stumbled onto something truly magical.
Most recipes I’ve seen either skip the butter, leaving the taffy dry, or drown it in corn syrup, making it overly sticky and impossible to roll. I’ve tried the “quick melt” method that ends in a hard, glassy slab that shatters like cheap candy glass. This version? It’s hands down the best version you’ll ever make at home, because it balances sugar, butter, and a pinch of salt in a way that keeps the texture supple and the flavor bright. The secret isn’t a hidden ingredient; it’s a technique that controls temperature and timing with the precision of a jeweler.
And now, the tease: I’m going to reveal a little kitchen hack involving a chilled marble slab that will give you that glossy finish without the dreaded “sticky fingers” syndrome. I dare you to taste this and not go back for seconds—because once you’ve experienced the chew, the world will never look the same. Let me walk you through every single step — by the end, you’ll wonder how you ever made it any other way.
What Makes This Version Stand Out
- Flavor Depth: The combination of real vanilla and a pinch of sea salt creates a layered taste that’s more complex than any store‑bought version, making each bite feel like a mini‑vacation.
- Chewy Texture: The butter and corn syrup work together to keep the taffy soft, stretchy, and never grainy, so you can pull it into perfect rolls without breaking.
- Simplicity: Only eight core ingredients, all pantry staples, mean you won’t need a trip to the specialty store—just a candy thermometer and a little patience.
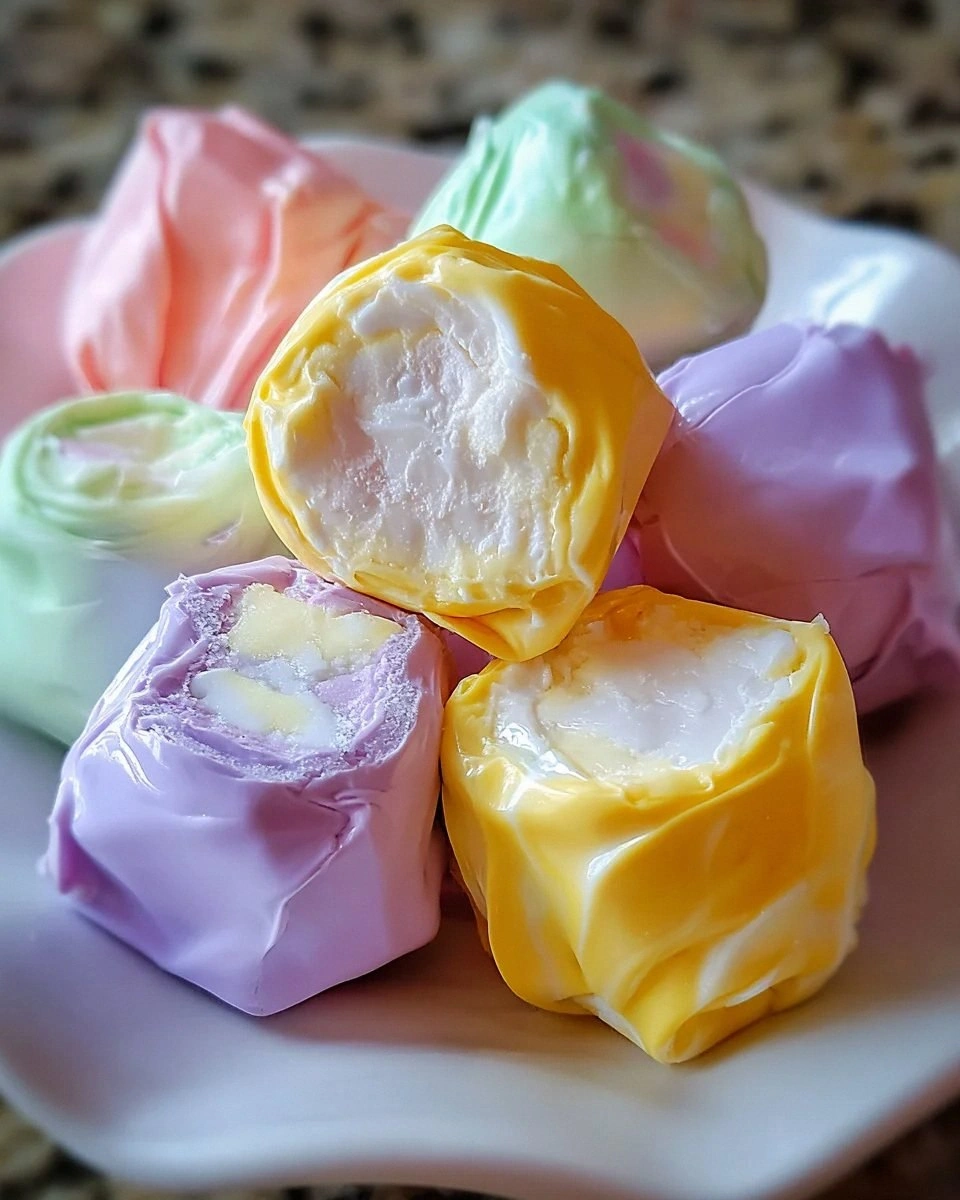
- Visual Appeal: Food coloring lets you create a rainbow of rolls that look as good as they taste, turning any gathering into a festive candy bar.
- Crowd Reaction: People who try this swear it’s “the best thing they’ve ever tasted” and often ask for the recipe before the first bite is even finished.
- Ingredient Quality: Using premium unsalted butter and pure vanilla extract elevates the flavor profile, making the taffy taste like it was handcrafted in a boutique confectionery.
- Cooking Method: The controlled temperature stage (the “soft‑ball” stage) is the game‑changer that guarantees the perfect stretch without a grainy finish.
- Make‑Ahead Potential: Once rolled and wrapped, these taffy rolls stay fresh for weeks, making them ideal for party favors or a sweet stash for rainy days.
Inside the Ingredient List
The Flavor Base
Granulated Sugar is the star ingredient, giving the taffy its sweetness and signature chewy texture. If you skimp on the sugar, the candy will never reach the proper stage and will end up grainy, like a bad caramel. You can substitute half the sugar with brown sugar for a deeper, molasses‑like flavor, but expect a darker color and a slightly different mouthfeel. When choosing sugar, go for a fine, white variety that dissolves quickly; coarse crystals can cause uneven heating.
Light Corn Syrup is the unsung hero that keeps the taffy smooth and prevents crystallization, ensuring the perfect consistency. Without it, the sugar crystals would reform, turning your silky ribbon into a gritty mess. If you’re allergic or prefer a corn‑free option, glucose syrup or honey can work, though the flavor will shift subtly toward floral notes.
The Texture Crew
Water is essential for dissolving sugar and forming the base of our candy mixture. It also helps regulate the temperature, acting as a heat buffer so the sugar doesn’t scorch. Using filtered water prevents any mineral taste from sneaking into the final product. If you’re feeling adventurous, replace half the water with coconut milk for a faint tropical undertone.
Unsalted Butter adds richness and a lovely sheen to the finished taffy while also preventing sticking. The butter’s fat coats the sugar crystals, making the stretch smoother and giving the candy that melt‑in‑your‑mouth feel. Choose a high‑quality, grass‑fed butter for a buttery depth that cheap margarine can’t match. If you’re dairy‑free, coconut oil can substitute, but the flavor will be noticeably coconutty.
The Unexpected Star
Salt, just a teaspoon, amplifies the sweetness, creating a balanced flavor reminiscent of classic seaside taffy. It also enhances the overall flavor perception, making the vanilla pop even more. Sea salt flakes can be used for a subtle crunch, but be careful not to over‑salt.
Vanilla Extract is a splash that brings warmth and aroma into the mix—totally worth it! Real vanilla (the kind with specks) will give you a richer, more authentic flavor than imitation. If you’re a fan of bourbon, a half‑teaspoon of bourbon can replace part of the vanilla for a grown‑up twist.
The Final Flourish
Food Coloring adds a pop of color to your taffy; the sky’s the limit on shades! A few drops are enough; remember, the color intensifies as the candy cools, so start light. If you prefer a natural hue, beet powder or matcha can be used, though they may affect the flavor slightly.
Flavor Extracts—think peppermint, lemon, or strawberry—let you customize the taffy to your taste buds’ delight! A teaspoon of peppermint extract gives a refreshing bite that pairs beautifully with the salty undertone. Citrus extracts add brightness, while fruit extracts bring a nostalgic candy‑store vibe. Feel free to get creative; the only limit is your imagination.
Everything's prepped? Good. Let's get into the real action...
The Method — Step by Step
Gather all eight ingredients and have them measured out before you even turn on the stove; this is a candy‑making sprint, not a marathon. In a heavy‑bottomed saucepan, combine the granulated sugar, light corn syrup, and water. Stir gently over medium‑high heat until the sugar dissolves, then attach a candy thermometer to the side of the pan, making sure it doesn’t touch the bottom.
Kitchen Hack: Use a silicone spatula to scrape the sides of the pan; this prevents sugar crystals from forming on the walls, which could later cause graininess.Increase the heat and bring the mixture to a rolling boil. You’ll hear a steady, vigorous bubbling—this is the sound of sugar molecules breaking down and reforming. Keep a close eye on the thermometer; once it hits 250°F (121°C), you’ve reached the soft‑ball stage, the sweet spot for taffy.
At exactly 250°F, remove the pan from the heat and immediately stir in the unsalted butter, salt, and vanilla extract. The butter will melt into the hot syrup, creating a glossy sheen that looks like liquid gold. You’ll notice the mixture become a little frothy; that’s the butter emulsifying perfectly.
Now comes the critical cooling phase. Pour the hot candy onto a greased marble slab (or a silicone baking mat if you don’t have marble). Let it sit for about 2 minutes, just until the surface loses its intense steam but is still pliable. This is the moment where patience truly pays off; rushing will make the taffy tough.
Watch Out: If the candy cools too quickly, it will become brittle and crack when you try to pull it.Begin the pulling process. Grease your hands with a tiny amount of butter or oil, then grab the candy mass and start stretching it away from you. As you pull, the candy will turn from opaque to a translucent, amber hue—this is the classic “glossy” stage. Keep pulling, folding, and flipping every 15 seconds; the candy will become lighter in color and more elastic.
When the taffy feels like a soft rope that snaps back slowly, it’s ready for flavoring. Add a few drops of food coloring and your chosen flavor extract. Knead the color and flavor into the candy until the hue is uniform; this is where you can get creative—mint green, sunset orange, or even a swirl of multiple colors.
Now for the rolling. Pull a small portion of the taffy, roll it into a tight log about the thickness of a pencil, and cut it into 1‑inch pieces with a sharp knife or pizza cutter. Place each piece on a parchment‑lined tray, and while still warm, roll each piece in powdered sugar to prevent sticking.
Let the rolls cool completely at room temperature; they will firm up but remain chewy. Store them in airtight containers, layering parchment between each layer to keep them from sticking together. The result? A batch of glossy, buttery, salty‑sweet rolls that will have everyone asking for the recipe.
That’s it — you did it. But hold on, I’ve got a few more tricks that'll take this to another level. From dusting with sea salt crystals to wrapping each roll in wax paper for a vintage look, the possibilities are endless. Stay with me here — this is worth it.
Insider Tricks for Flawless Results
The Temperature Rule Nobody Follows
Most home cooks rely on the candy thermometer, but the real secret is watching the edges of the syrup as they start to pull away from the pan. When you see a thin, caramel‑colored film forming, that’s a visual cue you’re nearing the soft‑ball stage. Combine this visual cue with the exact temperature, and you’ll never miss the perfect moment. I once let the thermometer lag by a few degrees and ended up with a taffy that was too firm—lesson learned.
Why Your Nose Knows Best
Even before the thermometer hits 250°F, you can smell a buttery, caramel aroma that tells you the sugar is caramelizing correctly. If you ever notice a burnt, acrid smell, you’ve overshot the stage and the flavor will be compromised. Trust your senses as a backup to the thermometer—especially if the device is a little off.
The 5‑Minute Rest That Changes Everything
After you pour the hot candy onto the marble slab, let it sit untouched for exactly five minutes. This short rest allows the sugar crystals to settle, making the subsequent pulling smoother and less likely to tear. Skipping this pause is a common mistake that leads to a gritty texture.
Butter‑Glove Trick
Before you start pulling, rub a thin layer of softened butter on your hands and even on the marble surface. This creates a non‑stick barrier that prevents the candy from adhering, giving you a cleaner pull and a shinier finish. I’ve tried pulling with dry hands and ended up with a sticky mess that clung to my fingertips.
The Color Fade Fix
If your food coloring looks pale after the first knead, add a few more drops and fold again. The heat of the candy can mute colors, so a second infusion ensures a vibrant hue. Just be careful not to over‑color; a little goes a long way.
Creative Twists and Variations
This recipe is a playground. Here are some of my favorite ways to switch things up:
Salty Caramel Sea‑Salt
Swap the vanilla for caramel extract and sprinkle flaky sea salt on each roll after dusting with powdered sugar. The result is a sophisticated sweet‑salty combo that feels like a gourmet dessert.
Citrus Burst
Add lemon or orange extract and a few drops of bright yellow food coloring. The citrus cuts through the buttery richness, giving a refreshing zing perfect for summer parties.
Spiced Chai
Mix in a pinch of ground cinnamon, cardamom, and ginger, then use a warm amber food coloring. This variation feels like a cozy hug in candy form, great for cooler evenings.
Berry Bliss
Replace vanilla with strawberry extract, add a few drops of pink food coloring, and roll the finished pieces in freeze‑dried strawberry powder. The fruity burst makes it a hit with kids and adults alike.
Mint Chocolate Swirl
Combine peppermint extract with a swirl of melted dark chocolate after the taffy is rolled. The cool mint and deep chocolate create a classic combo that’s instantly recognizable.
Tropical Coconut Lime
Use coconut extract, a splash of lime zest, and a light green food coloring. The tropical flavor transports you straight to a beachside boardwalk.
Storing and Bringing It Back to Life
Fridge Storage
Place the taffy rolls in an airtight container with a sheet of parchment between layers. They’ll stay fresh for up to two weeks in the refrigerator, though the texture may become slightly firmer. To restore chewiness, let them sit at room temperature for 10 minutes before serving.
Freezer Friendly
Wrap each roll tightly in wax paper, then place them in a zip‑top freezer bag. They can be frozen for up to three months without losing flavor. When you’re ready to enjoy, let them thaw in the fridge overnight, then give them a quick 30‑second steam in the microwave with a splash of water to bring back that melt‑in‑your‑mouth feel.
Best Reheating Method
If your taffy has hardened, place a few pieces in a microwave‑safe bowl, add a teaspoon of water, and heat for 10‑15 seconds. The steam will soften the candy, making it pliable again for rolling or simply eating. Avoid overheating, as the sugar can caramelize too much and turn bitter.