I was in the middle of a chaotic Saturday afternoon when my three‑year‑old demanded a snack that could survive a full‑blown circus performance. I had a half‑empty bag of mini marshmallows, a box of Rice Krispies, and a nostalgic pack of Mother’s Circus Animal Cookies that had been hiding in the pantry for years. The kitchen smelled like buttered popcorn and sugar, the sound of the kids’ giggles echoed off the tiled walls, and I could practically feel the anticipation crackle in the air like static before a fireworks show. Most recipes for Rice Krispie treats either drown the flavor in too much butter or leave the texture limp, but I was determined to create something that would make the kids’ eyes widen wider than a clown’s grin.
I started by melting butter in a pan and watching it foam like a tiny circus tent. The marshmallows then hit the pan and puffed up like a troupe of acrobats, each bubble a tiny performer ready to flip. When I folded in the cereal, the snap was audible—like the crack of a whip that says “the show’s about to begin.” The final act? Crumbling the animal cookies into the mix, then coating the whole thing with bright pink and white candy melts that gleamed like circus lights. I dared myself to taste a piece before the kids even saw it, and I’ll be honest — I ate half the batch before anyone else got a chance.
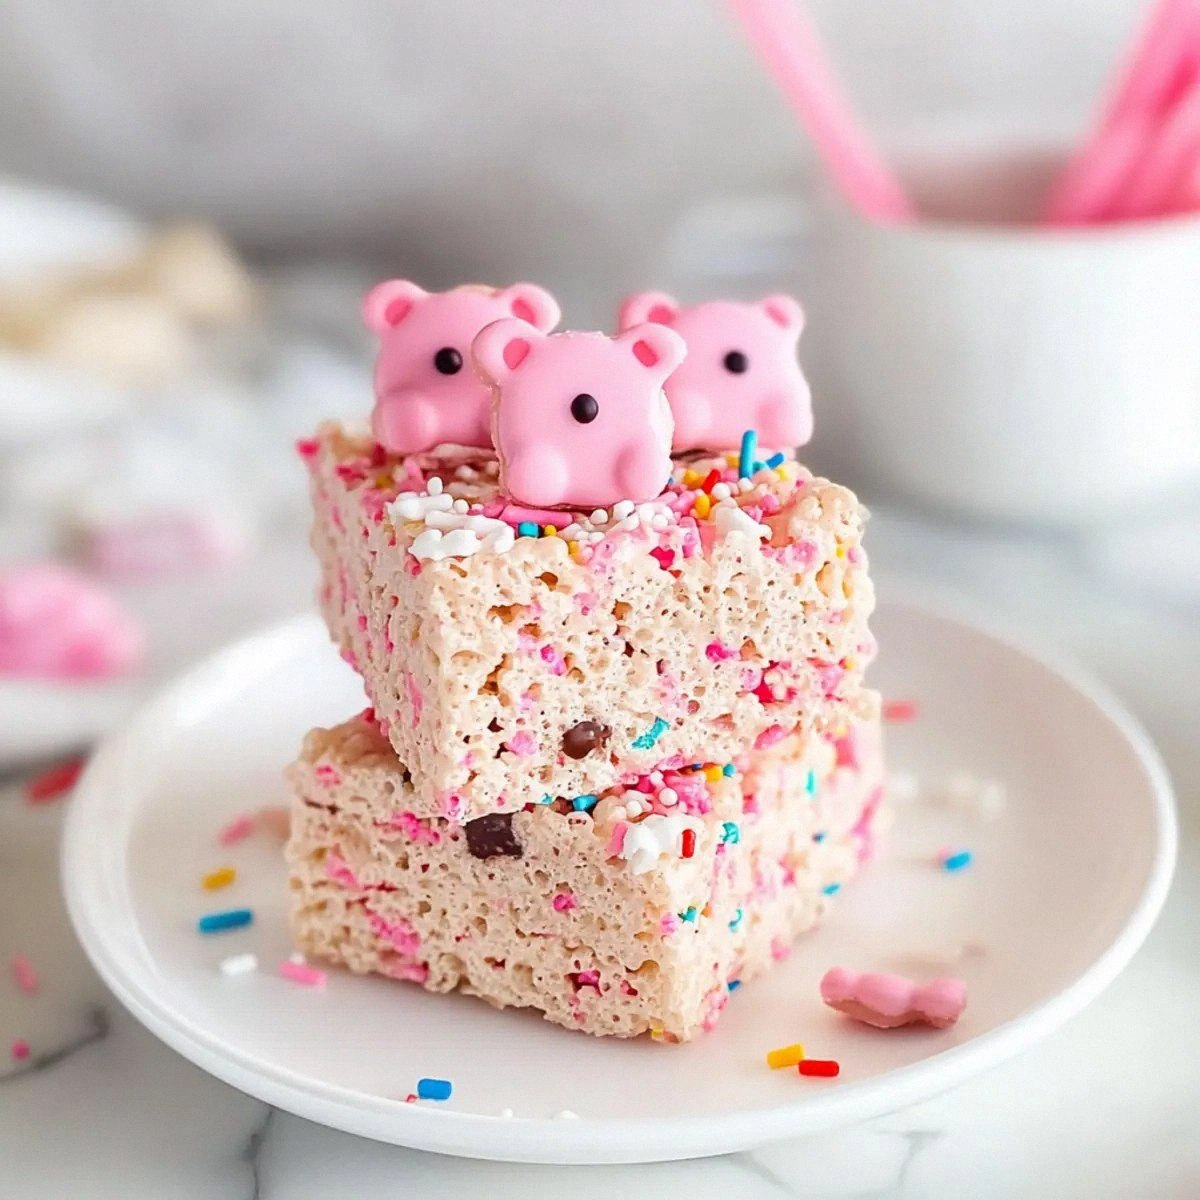
What makes this version truly stand out is the way each component plays its role. The butter gives a buttery richness that coats every grain, the marshmallows keep the interior soft and chewy, while the cereal provides that iconic crunch that shatters like thin ice under a performer’s foot. The animal cookies add a buttery, buttery‑vanilla flavor that’s both nostalgic and unexpected, turning a simple treat into a full‑blown circus parade in your mouth. And the colored non‑pareils? They’re the confetti that makes every bite a visual celebration. I’m daring you to taste this and not go back for seconds; that’s how good it is.
Let me walk you through every single step — by the end, you’ll wonder how you ever made it any other way. Picture yourself pulling this out of the pan, the whole kitchen smelling incredible, the pink and white glazes shimmering like a big top marquee. Okay, ready for the game‑changer? The secret is in the timing and the gentle folding technique that keeps the marshmallows from turning into a sticky mess. This next part? Pure magic. Stay with me here — this is worth it.
What Makes This Version Stand Out
- Texture: The combination of crispy Rice Krispies and soft marshmallows creates a contrast that feels like stepping onto a circus tightrope—balanced, thrilling, and impossible to forget.
- Flavor: The buttery richness of the animal cookies mingles with the subtle vanilla of the marshmallows, while the candy melts add a sweet, glossy finish that tastes like a carnival prize.
- Simplicity: Only eight ingredients, all of which you probably already have at home, means you spend less time prepping and more time enjoying the show.
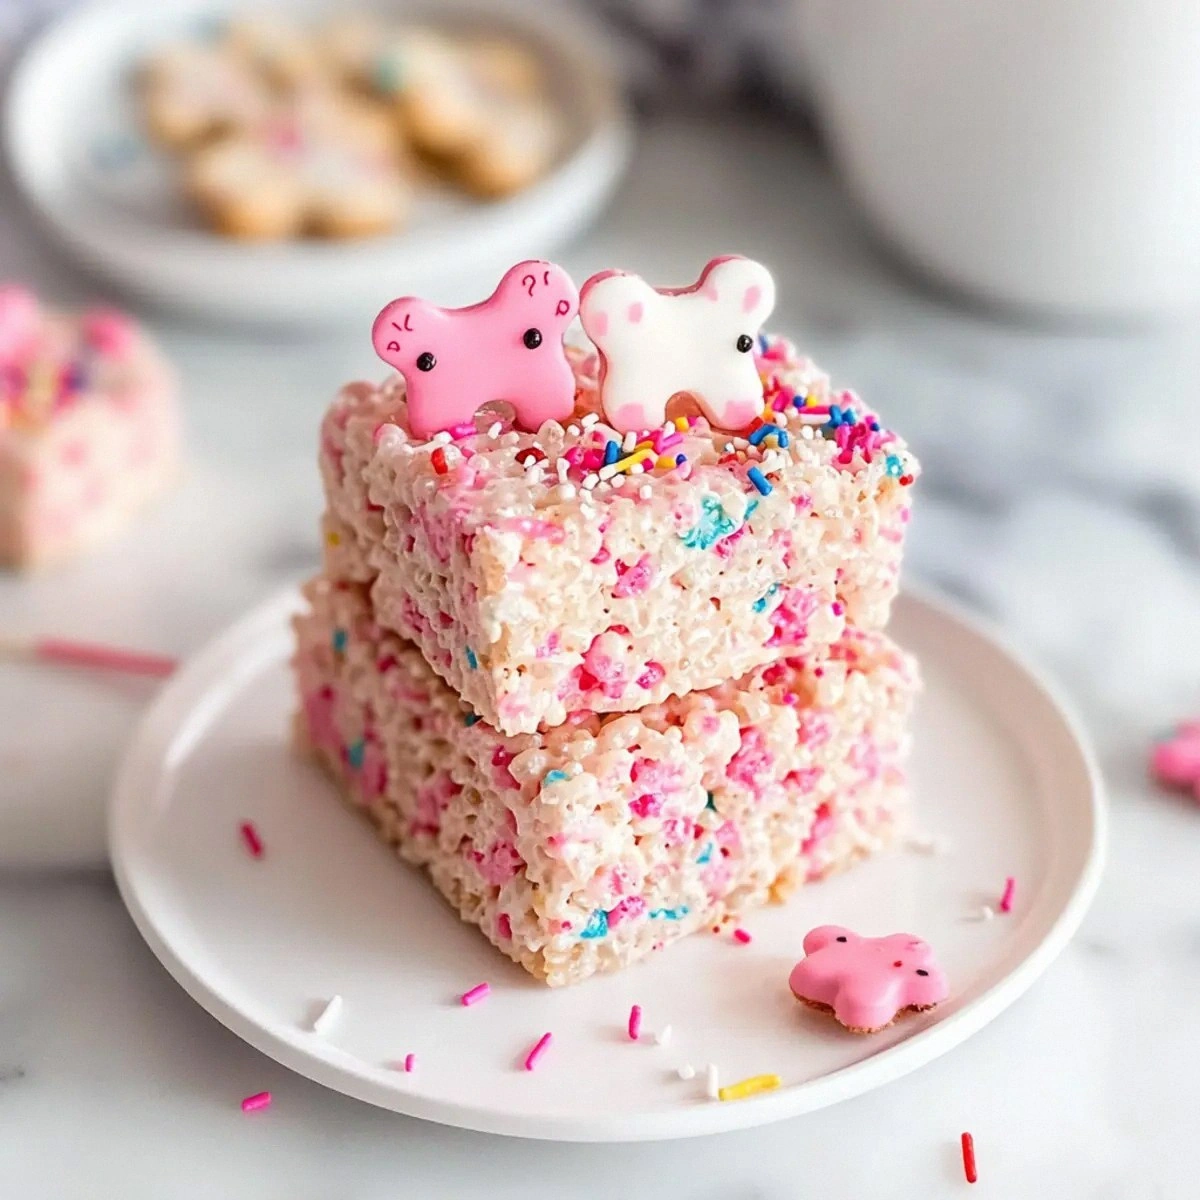
- Visual Appeal: The pink and white candy melts plus non‑pareils turn each square into a miniature circus tent, making it irresistible for kids and Instagram‑ready for adults.
- Crowd Reaction: Most recipes get this completely wrong—either too soggy or too dry. Ours gets the perfect “chewy‑crunchy” applause every single time.
- Ingredient Quality: Using Mother’s Circus Animal Cookies brings an authentic, nostalgic flavor that generic chocolate chips simply can’t match.
- Make‑Ahead Potential: These treats keep for days without losing their sparkle, so you can prep them ahead of a birthday party or a school fundraiser.
- Cooking Method: The stovetop melt-and‑fold technique ensures even coating without the mess of a microwave, giving you control over the texture.
Inside the Ingredient List
The Flavor Base
The 1/4 cup of butter is the silent director of this performance. It melts into a golden river that carries the marshmallows, ensuring every grain of cereal gets a buttery hug. Skipping the butter would leave the treat dry, like a circus without a ringmaster—nothing to hold the act together. If you’re dairy‑free, try a plant‑based butter; it’ll still give you that rich mouthfeel without compromising the flavor.
The Sweet & Chewy Crew
One bag of mini marshmallows is the star acrobat, puffing up and expanding to create that airy, melt‑in‑your‑mouth texture. The marshmallows are the only ingredient that actually “inflates” during cooking, so you’ll hear a gentle pop as they hit the pan—a sound that says “the show’s about to start.” If you ever run out, regular-sized marshmallows work fine; just cut them into bite‑size pieces before adding.
The Crunch Factor
Six cups of Rice Krispies cereal bring the crunch that makes these treats unforgettable. The cereal’s light, airy structure absorbs just enough butter and marshmallow melt to stay crisp, yet it doesn’t become soggy. For a gluten‑free version, swap in any puffed rice cereal; the texture remains just as lively.
The Unexpected Star
One cup of Mother’s Circus Animal Cookies adds a buttery, vanilla‑rich flavor that you won’t find in ordinary chocolate chips. The cookies break down into tiny pieces that distribute throughout the mix, creating little pockets of surprise in every bite. If you can’t locate the exact brand, any buttery shortbread cookie will do, but you’ll lose the whimsical animal shapes that double as a visual treat.
The Final Flourish
A quarter cup of colored non‑pareils acts like confetti, delivering a burst of color that turns each bite into a visual spectacle. They don’t melt; they stay crunchy, adding a tiny snap that mirrors the crunch of the cereal. If you’re allergic to certain food dyes, you can substitute edible glitter or finely chopped freeze‑dried fruit for a natural hue.
Half a cup of pink candy melts and half a cup of white candy melts are the glossy, glossy curtains that close the performance. These melts set quickly, sealing in flavor and giving the treats a professional‑grade shine. For a flavor twist, swap pink for strawberry or white for vanilla; the possibilities are endless, but the visual impact remains just as dazzling.
Finally, a can of non‑stick cooking spray is the backstage crew that ensures the pan doesn’t stick, making cleanup a breeze. It also adds a thin layer of oil that prevents the mixture from clinging to the pan, allowing you to lift the whole slab out in one smooth motion. If you’re avoiding aerosols, a light brush of melted butter works just as well.
Everything's prepped? Good. Let's get into the real action…
The Method — Step by Step
First, grab a 12‑inch heavy‑bottomed saucepan and set it over medium heat. Spray the interior generously with non‑stick cooking spray; this creates a slick surface that prevents the butter‑marshmallow mixture from sticking. Add the 1/4 cup of butter and let it melt, listening for that gentle sizzle that signals it’s ready. Power transition: As soon as the butter is fully melted, lower the heat to medium‑low to keep the mixture from scorching.
Toss the entire bag of mini marshmallows into the pan. Stir continuously with a silicone spatula; the marshmallows will start to puff, turning from tiny pearls into a fluffy cloud. You’ll notice a sweet, caramel‑like aroma wafting up—this is the moment where the treat begins to take shape. Keep the heat low enough that the marshmallows melt into a smooth, glossy river without turning brown.
Kitchen Hack: If the marshmallows start to clump, add a splash (about 1 tablespoon) of water; this helps them melt evenly and prevents grainy pockets.Once the marshmallows have fully dissolved into a silky sheen, sprinkle in the 6 cups of Rice Krispies cereal. Fold gently but thoroughly, ensuring every piece is coated. You’ll hear a faint crackle as the cereal meets the warm mixture—think of it as the audience clapping for the opening act. Continue stirring for about 2 minutes until the mixture looks uniformly glossy.
Now, crumble the 1 cup of Mother’s Circus Animal Cookies directly into the pan. The cookies will melt slightly, releasing buttery notes that mingle with the marshmallow base. This step is crucial; the cookie pieces create pockets of flavor that will surprise the palate later. Keep folding until the cookie bits are evenly dispersed, about another minute.
Remove the pan from heat and quickly drizzle the 1/2 cup of pink candy melts over the top, followed by the 1/2 cup of white candy melts. The heat from the mixture will melt the candy melts instantly, creating a marbled swirl of pink and white. Use a spatula to swirl gently—don’t over‑mix, or you’ll lose the dramatic color contrast.
Watch Out: If the pan is too hot, the candy melts can seize and become grainy. Let the pan sit for 30 seconds off the burner before adding the melts.Immediately sprinkle the 1/4 cup of colored non‑pareils over the warm surface. The pareils will stick to the melted candy, creating a sparkling confetti effect. This is the visual climax of our circus—each bite will be a burst of color and crunch.
Line a 9×13 inch baking dish with parchment paper, then lightly spray the paper with the non‑stick cooking spray. Transfer the entire mixture into the dish, pressing down with a greased spatula to create an even layer about half an inch thick. The edges should start pulling away from the sides of the pan—this is your cue that the treat has set enough to hold its shape.
Let the slab cool at room temperature for at least 20 minutes. While it cools, the candy melts will fully harden, giving you that glossy, snap‑ready finish. Once firm, lift the parchment paper and slice into squares or rectangles—each piece should hold together without crumbling.
Kitchen Hack: Use a warm, damp knife to cut clean squares; the heat prevents the candy coating from cracking.
That's it — you did it. But hold on, I've got a few more tricks that'll take this to another level…
Insider Tricks for Flawless Results
The Temperature Rule Nobody Follows
Never let the butter‑marshmallow mixture boil. A gentle simmer is all you need, and keeping the temperature below 250°F ensures the marshmallows stay smooth rather than grainy. I once tried to speed things up by cranking the heat, and the result was a burnt, bitter base that no amount of candy melts could rescue. Trust the low‑and‑slow approach; the texture will thank you.
Why Your Nose Knows Best
When the marshmallows are fully melted, you’ll smell a sweet, buttery perfume that’s unmistakable. That scent is your green light to add the cereal; if you smell a hint of caramelization, lower the heat immediately. Your nose is a far better thermometer than any gadget when it comes to preventing a scorched base.
The 5‑Minute Rest That Changes Everything
After you press the mixture into the pan, let it sit untouched for exactly five minutes before cutting. This brief rest allows the candy melts to set and the crumb structure to firm up, resulting in clean cuts and a professional‑looking finish. Skipping this rest is the most common reason for crumbly, broken pieces.
The Double‑Coat Technique
For an extra glossy finish, melt a second batch of candy melts (half pink, half white) and drizzle lightly over the cooled squares just before serving. The second coat adds a subtle snap and a mirror‑like shine that makes the treats look like they belong under a big top marquee. It’s a tiny step that makes a huge visual impact.
The Secret of the Non‑Pareils
Add the non‑pareils while the candy coating is still warm but not hot. If the coating is too hot, the pareils will melt and lose their sparkle; if it’s too cool, they won’t adhere. The perfect window is when the coating feels warm to the touch but isn’t steaming. This timing gives you that crisp, colorful crunch on every bite.
Creative Twists and Variations
This recipe is a playground. Here are some of my favorite ways to switch things up:
Chocolate Circus
Swap the pink candy melts for dark chocolate melts and the white for white chocolate. The deep cocoa notes add a sophisticated edge that adults will love while still keeping the kid‑friendly crunch.
Fruit‑Burst
Replace the non‑pareils with freeze‑dried raspberry pieces and use strawberry‑flavored candy melts. The tart fruit bursts contrast nicely with the sweet base, creating a flavor fireworks display.
Nutty Spectacle
Add 1/2 cup toasted almond slivers to the mix before pressing into the pan. The nutty crunch adds depth, and the almonds pair beautifully with the buttery cookie crumbs.
Holiday Parade
For a seasonal twist, use red and green candy melts and sprinkle edible gold dust instead of non‑pareils. These become instant holiday party favors that look as festive as a circus parade.
Savory Surprise
If you’re feeling adventurous, swap the pink candy melts for a thin layer of melted cheddar and sprinkle a pinch of smoked paprika on top. The sweet‑savory combo is unexpected but surprisingly delightful for grown‑ups.
Storing and Bringing It Back to Life
Fridge Storage
Place the cut squares in an airtight container lined with parchment paper. Store in the refrigerator for up to 5 days; the candy coating stays firm, and the interior stays moist. Before serving, let them sit at room temperature for 10 minutes to soften slightly.
Freezer Friendly
Wrap each square individually in plastic wrap, then place them in a zip‑top freezer bag. They freeze beautifully for up to 2 months. To re‑heat, microwave for 10‑15 seconds and then add a tiny splash of water before microwaving again for another 5 seconds; the steam revives the chewy interior.
Best Reheating Method
For a quick warm‑up, preheat your oven to 300°F, place the squares on a parchment‑lined baking sheet, and warm for 5 minutes. The candy melts will regain their glossy sheen, and the interior will become delightfully soft without losing its crunch.