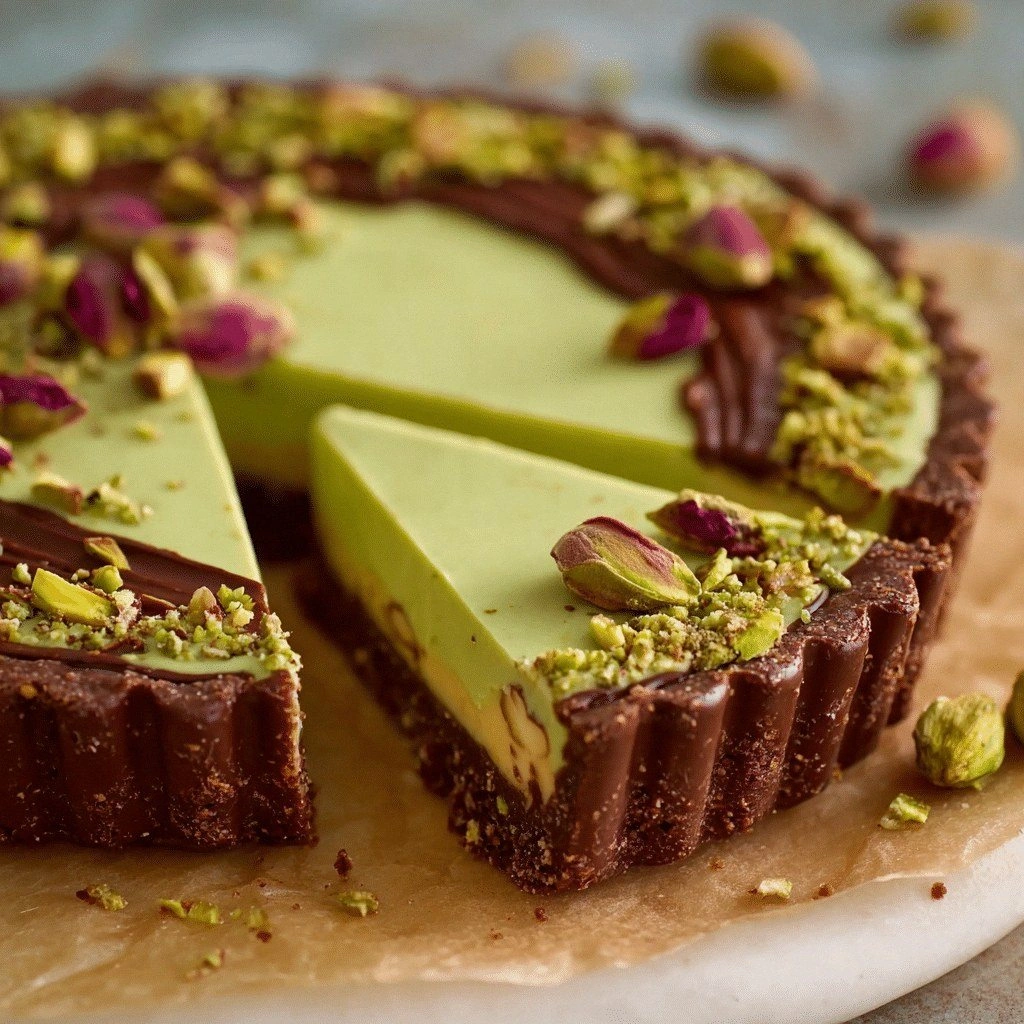
The night I tried to impress my roommate with a chocolate dessert turned into a kitchen catastrophe when the chocolate melted into a sticky, inedible mess. I stared at the pan, the melted chocolate dripped like a slow, glossy river, and I thought, “I could do better.” That moment sparked a mission: to create a chocolate pistachio tart that would not only taste divine but also look like a showstopper. I’m about to reveal the exact steps that turned my disaster into a masterpiece.
Picture this: a golden, flaky crust that snaps like a brittle wafer when you press it, a silky chocolate ganache that glistens with a hint of pistachio, and a sprinkle of toasted pistachios that crackle with each bite. The aroma is a deep, roasted chocolate that mingles with nutty, buttery undertones, and the first bite delivers a perfect balance of sweet, salty, and earthy flavors. The texture is a contrast of buttery crunch and creamy melt, while the pistachios add a satisfying snap that keeps you coming back for more.
What makes this version stand out is that it’s built on a foundation of precision and high-quality ingredients. I’ve fine-tuned the crust to be airy yet sturdy, the ganache to be silky yet rich, and the pistachios to be toasted to the right level of crunch. I’ve also introduced a subtle vanilla whisper that lifts the chocolate, and a pinch of sea salt that accentuates every bite. This recipe is hands down the best version you’ll ever make at home, and I dare you to taste this and not go back for seconds.
I’ve also discovered a technique that most people overlook: adding a splash of espresso to the chocolate ganache. This not only deepens the chocolate flavor but also gives the tart a subtle, coffee‑kissed aroma that makes it feel indulgent. Picture yourself pulling this out of the oven, the whole kitchen smelling incredible, and the tart resting on a plate like a glossy, nutty jewel. Let me walk you through every single step — by the end, you’ll wonder how you ever made it any other way.
What Makes This Version Stand Out
- Taste: The ganache is a symphony of deep chocolate and nutty pistachio, with a hint of vanilla that lifts the palate.
- Texture: A buttery, flaky crust that cracks like thin ice, paired with a silky ganache that melts in your mouth.
- Simplicity: Only 12 ingredients, but each one is essential and chosen for maximum flavor impact.
- Uniqueness: The espresso infusion gives a coffee kick that’s rarely found in chocolate tarts.
- Crowd Reaction: At parties, this tart becomes the centerpiece; guests ask for the recipe before you even finish serving.
- Ingredient Quality: Using 70% dark chocolate and high‑grade pistachios ensures depth and authenticity.
- Cooking Method: The crust is baked twice for maximum crispness, while the ganache is tempered for silky perfection.
- Make‑Ahead Potential: The tart can be assembled a day early and chilled, making it a stress‑free dessert option.
Alright, let's break down exactly what goes into this masterpiece...
Inside the Ingredient List
The Flavor Base
The foundation of any great dessert is its base, and for this tart, that means a buttery, flaky crust that holds the ganache without becoming soggy. The flour provides structure, while the powdered sugar adds a touch of sweetness that balances the bitterness of dark chocolate. Cold, cubed butter is the secret to a tender crumb; it creates steam pockets that lift the dough into a light, airy shell. A pinch of salt is crucial—it amplifies the chocolate’s depth and counters the sweetness of the pistachios.
Skipping the flour or reducing the butter will result in a dense, heavy crust that clings to the ganache instead of supporting it. If you’re craving a gluten‑free version, swap the all‑purpose flour for a 1:1 blend of almond flour and rice flour, but keep the butter the same to preserve texture.
The Texture Crew
The texture of the tart comes from three key players: the ganache, the pistachios, and the crust. The ganache is made by combining dark chocolate chips with heavy cream and a splash of espresso. The espresso not only deepens the chocolate flavor but also gives the ganache a glossy sheen that looks as good as it tastes. When tempered properly, the ganache will set to a silky, firm finish that resists melting.
Chopped pistachios add a satisfying crunch that contrasts the ganache’s smoothness. Toast them lightly in a dry pan until they’re fragrant; this step brings out their nutty aroma and prevents them from becoming soggy when the tart cools. If you prefer a smoother texture, you can use pistachio paste instead of whole nuts, but the crunchy bits are essential for that “snap” that makes the tart memorable.
The Unexpected Star
The espresso is the star that sets this recipe apart. Most chocolate tarts rely solely on cocoa for depth, but a dash of espresso unlocks hidden chocolate notes and gives a subtle coffee finish. Espresso also helps to stabilize the ganache, allowing it to set at room temperature without the need for refrigeration. If you’re a coffee aficionado, feel free to increase the espresso to 2 tablespoons for an even bolder flavor.
If espresso is off the table, you can substitute with a small amount of strong brewed coffee or even a shot of cold brew. The key is to keep the liquid to a minimum—too much liquid will dilute the chocolate’s intensity and make the ganache runny.
The Final Flourish
The final flourish is the sea salt flakes that crown the tart, adding a burst of savory contrast that makes every bite feel complete. A light dusting of powdered sugar gives a sweet finish that balances the saltiness. For a more dramatic presentation, drizzle a thin line of dark chocolate ganache along the edge of the crust before adding the pistachios. This not only looks stunning but also creates a subtle flavor layer that delights the palate.
If you’re looking for a vegan version, replace the butter with coconut oil and use dairy‑free chocolate chips. The ganache will still set properly, though it may have a slightly different mouthfeel. Remember to use a plant‑based heavy cream substitute like full‑fat coconut milk for the best texture.
Everything's prepped? Good. Let's get into the real action...
The Method — Step by Step
- Preheat your oven to 375°F (190°C). In a large bowl, whisk together the flour, powdered sugar, and salt. The dry mix should look like fine sand; this ensures a light crust. If you’re using a gluten‑free blend, add a tablespoon of xanthan gum to bind the dough.
- Add the cold, cubed butter to the flour mixture. Using a pastry cutter or your fingertips, cut the butter into the dry ingredients until the mixture resembles coarse crumbs. The butter should still have pea‑size pieces; this will create steam pockets during baking.
- Add the egg and mix until the dough comes together. It should feel slightly sticky but not wet. If it’s too dry, add a tablespoon of cold water to bring it together. Form the dough into a disk, wrap it in plastic, and refrigerate for 30 minutes. This chilling step is essential for a flaky crust.
- Roll out the chilled dough on a lightly floured surface to fit a 9‑inch tart pan with a removable bottom. Gently press the dough into the pan, ensuring it reaches the edges. Trim any excess dough with a knife and crimp the edges for a polished look.
- Poke holes in the bottom with a fork to prevent bubbling. Bake the crust for 15 minutes, then remove from the oven and let cool on a wire rack. This first bake sets the structure, preventing the crust from becoming soggy.
- While the crust cools, prepare the ganache. In a heat‑proof bowl, combine the dark chocolate chips and espresso. Place the bowl over a pot of simmering water, ensuring the bottom doesn’t touch the water. Stir until the chocolate is fully melted and the mixture is smooth.
- Remove the bowl from the heat and whisk in the heavy cream, vanilla extract, and a pinch of salt. The ganache should be glossy and thick enough to coat the back of a spoon. Let it cool to room temperature; this will allow it to thicken without becoming too hard.
- Spread the ganache evenly over the cooled crust. Use a spatula to level the surface. If the ganache is too thick, add a tablespoon of cream to thin it out. Let the ganache set for 10 minutes before adding the pistachios.
- Toast the chopped pistachios in a dry skillet over medium heat until fragrant, about 2 minutes. Toss them in a pinch of sea salt. Sprinkle the pistachios evenly over the ganache, pressing gently to ensure they stick.
- Refrigerate the tart for at least 30 minutes to allow the ganache to set fully. Once set, dust with powdered sugar and sprinkle sea salt flakes on top. Serve chilled or at room temperature; the flavor peaks when the ganache is slightly softened.
That’s it — you did it. But hold on, I've got a few more tricks that'll take this to another level. These insider tips will help you perfect the tart and avoid common pitfalls.
Insider Tricks for Flawless Results
The Temperature Rule Nobody Follows
Many bakers bake the crust at a lower temperature, which can result in a soggy bottom. The secret is to bake at 375°F (190°C) for the first 15 minutes, then lower the oven to 350°F (175°C) for the final 5 minutes if you’re using a thicker crust. This ensures a crisp edge while keeping the center light. If you’re in a hot climate, keep the dough chilled longer; the butter must stay cold to create steam pockets.
Why Your Nose Knows Best
When you’re about to add the pistachios, give the ganache a quick sniff. A faint nutty aroma indicates the pistachios have been toasted properly. If the scent is flat, re‑toast the nuts for another minute. The aroma is your best indicator that the flavors are balanced.
The 5-Minute Rest That Changes Everything
After the ganache sets for 10 minutes, let the tart rest for 5 minutes before refrigerating. This short rest allows the chocolate to firm up slightly, preventing it from sliding off the crust when you slice. It also gives the pistachios a chance to settle into the ganache, creating a cohesive texture.
The Secret to a Gleaming Finish
If you want a glossy finish, lightly brush the ganache with a thin layer of milk or cream before the final chill. This creates a subtle sheen that looks like a polished jewel. Be sure to wipe off any excess with a paper towel to avoid a greasy appearance.
The Final Touch of Salt
Adding sea salt flakes after the tart has cooled is the trick that makes the flavors pop. The salt crystals dissolve slowly, giving each bite a burst of savory contrast. If you’re serving the tart to a crowd, offer a small dish of extra sea salt on the side for guests who want a stronger finish.
With these tricks, you’ll consistently produce a tart that looks professional and tastes unforgettable. No more second‑guessing or last‑minute fixes.
Creative Twists and Variations
This recipe is a playground. Here are some of my favorite ways to switch things up:
Coconut Crunch Variation
Swap the pistachios for toasted shredded coconut. The coconut adds a tropical sweetness and a chewy texture that pairs wonderfully with the chocolate. Use a light coconut oil in the crust for an extra tropical flair.
Red Velvet Twist
Add a tablespoon of red food coloring to the ganache for a dramatic color shift. This creates a visual contrast that’s Instagram‑worthy, while the flavor remains classic. Serve with a dollop of whipped cream for a festive touch.
Almond Amaretto Edition
Replace pistachios with almond slivers and add a splash of amaretto liqueur to the ganache. The almond brings a sweet, buttery note, and the liqueur adds depth. This version is perfect for an adult gathering.
Matcha Marvel
Incorporate matcha powder into the ganache for a green tea twist. The earthy matcha balances the chocolate’s richness and gives a subtle bitterness that’s refreshing. Sprinkle a few matcha leaves on top for an elegant finish.
Vegan Velvet
Use coconut oil for the crust, dairy‑free chocolate chips, and full‑fat coconut milk for the ganache. The result is a creamy, chocolatey tart that’s entirely plant‑based. Add a pinch of sea salt and you’ve got a vegan dessert that satisfies everyone.
Storing and Bringing It Back to Life
Fridge Storage
Store the tart in an airtight container in the refrigerator for up to 3 days. Keep the crust sealed to prevent it from drying out. When you’re ready to serve, let it sit at room temperature for 15 minutes to soften the ganache slightly.
Freezer Friendly
For longer storage, wrap the tart tightly in plastic wrap and then place it in a freezer bag. Freeze for up to 2 weeks. When you’re ready to eat, thaw in the refrigerator overnight. After thawing, let it sit at room temperature for 20 minutes before serving.
Best Reheating Method
To revive a frozen tart, preheat your oven to 300°F (150°C). Place the tart on a baking sheet and bake for 10 minutes, or until the ganache is soft and glossy. If the crust feels dry, lightly brush it with a splash of milk or cream before baking.
Add a tiny splash of water before reheating — it steams back to perfection, keeping the ganache silky and the crust tender.