I still remember the night I tried to bake a pie for my roommate’s birthday and ended up with a sticky, peanut‑butter‑laden disaster. The crust was a soggy mess, the filling was too runny, and the whole thing smelled like a melted peanut butter factory. I stared at the oven, thinking, “I could’ve sworn this would be a simple, sweet treat.” But that night, I discovered the secret sauce that turns a flop into a show‑stopper.
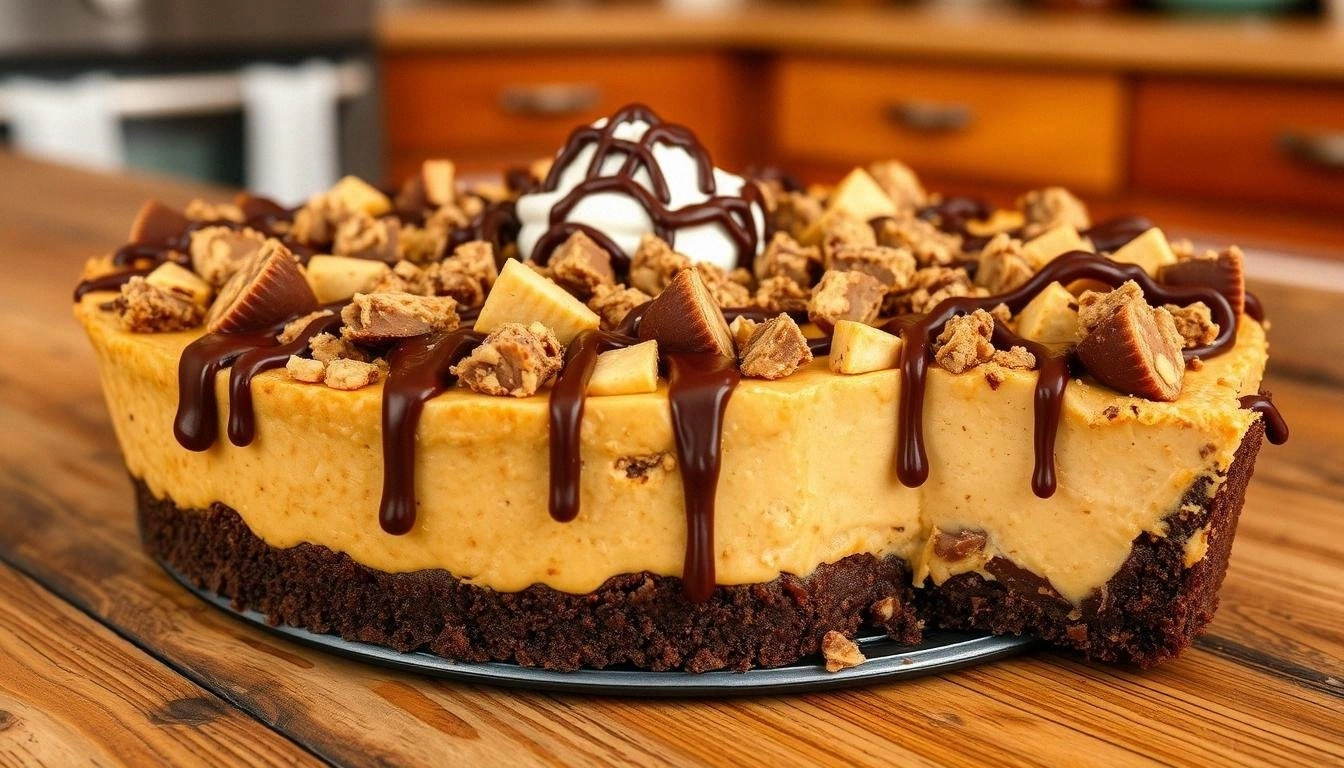
Picture this: a golden graham cracker crust that crackles like fresh‑baked cookies, a velvety peanut butter filling that clings to your spoon, and generous shards of Reese’s Peanut Butter Cups that burst with chocolatey crunch. The aroma of toasted graham and roasted peanuts fills the kitchen, and the first bite is a symphony of creamy, sweet, and salty. The texture is a delightful contrast between the buttery, crumbly base and the smooth, silky filling, all crowned with a glossy glaze that glistens under the oven light. You can almost hear the subtle “snap” of a Reese’s piece as you bite into it.
What sets this recipe apart is the meticulous balance of flavors and textures that makes every bite feel like a mini celebration. I’ve tweaked the original formula until it became a flawless harmony of peanut butter, chocolate, and graham, with just the right amount of sweetness to keep it from being cloying. The result is a pie that is both indulgent and satisfying, with a finish that lingers on the palate. If you’ve ever tried a peanut butter cup pie before, you’ll find that this version is hands down the best you’ll ever make at home.
The twist? I added a splash of heavy cream to the filling, which gives it a silkier mouthfeel and a richer, more decadent flavor profile. I also folded in a small pinch of sea salt to heighten the chocolate and peanut butter notes. These simple tweaks elevate the pie from good to unforgettable. I dare you to taste this and not go back for seconds.
Picture yourself pulling this out of the oven, the whole kitchen smelling incredible, and the pie glistening with a glossy finish that makes everyone’s eyes widen. The moment you slice it, the filling oozes like warm caramel, and the crust crackles under your knife. If you’re ready to turn your kitchen into a dessert haven, let me walk you through every single step — by the end, you’ll wonder how you ever made it any other way.
I’ve spent countless evenings experimenting with different crusts, fillings, and chocolate combinations. Each time I thought I had it perfect, another tweak would bring the flavor to a whole new level. After months of trial and error, I finally landed on a recipe that’s simple, scalable, and absolutely drool-worthy. Whether you’re a seasoned baker or a kitchen newbie, this pie will make you feel like a dessert superstar.
If you’ve ever struggled with a pie that turns out too dry or too sweet, you’re not alone — and I’ve got the fix. The secret lies in balancing the fat, sugar, and liquid ratios, and in using real Reese’s Peanut Butter Cups instead of the generic chocolate. The result is a pie that’s moist, flavorful, and full of chocolatey surprises. This is the kind of dessert that will have your friends begging for the recipe.
Most recipes get this completely wrong by using too much condensed milk or too little crust, leading to a soggy center or a crumbly base. Here’s what actually works: a buttery graham crust that’s crisp, a filling that’s silky but thick enough to hold shape, and generous chunks of real Reese’s that melt just enough to release their chocolate. By following the steps below, you’ll avoid the pitfalls that plague many pie makers.
What Makes This Version Stand Out
- Texture: The crust is buttery and crisp, while the filling is silky yet firm enough to slice cleanly. The Reese’s pieces provide a satisfying crunch that contrasts with the smoothness of the filling. This combination creates a multi-sensory experience that’s hard to beat.
- Flavor: The blend of creamy peanut butter, sweetened condensed milk, and vanilla extract results in a rich, indulgent taste that’s balanced by a touch of sea salt. The chocolate from the Reese’s pieces adds a deep, bittersweet finish that lingers. The overall flavor profile is both comforting and exciting.
- Simplicity: With only eight ingredients, this pie is easy to assemble and requires minimal prep time. The recipe’s straightforward steps make it approachable for bakers of all skill levels. You’ll have a show‑stopping dessert in under an hour.
- Make‑Ahead: The pie can be assembled a day ahead and chilled, allowing the flavors to meld beautifully. When you’re ready to serve, a quick oven finish restores the crust’s crispness. This flexibility is perfect for busy schedules.
- Ingredient Quality: Using real Reese’s Peanut Butter Cups gives the pie authentic chocolate and peanut butter flavors that store‑bought chocolate chips simply can’t match. The fresh peanut butter and heavy cream add depth and richness. Quality ingredients elevate the entire dessert.
- Visual Appeal: The glossy glaze and the visible chunks of Reese’s make the pie look as good as it tastes. The golden crust provides a beautiful contrast against the creamy filling. It’s a dessert that’s as Instagram‑ready as it is delicious.
- Audience Reaction: Friends and family often remark that this pie is “the best you’ll ever taste.” It’s a crowd‑pleaser that works for parties, game nights, or a cozy Sunday treat. The pie’s universal appeal makes it a staple for any occasion.
- Versatility: The recipe can be adapted for dietary preferences by swapping ingredients or adding flavor variations. Whether you’re craving a vegan version or a low‑sugar option, the base can accommodate adjustments without sacrificing taste.
Inside the Ingredient List
The Flavor Base
The creamy peanut butter and sweetened condensed milk form the heart of this pie. The peanut butter provides a nutty richness that pairs perfectly with the sweet milk. If you skip the condensed milk, the filling will be too thick and lack the silky texture that makes each bite melt in your mouth.
The vanilla extract is the subtle secret that lifts the entire flavor profile. It balances the sweetness and brings out the depth of the chocolate. A poor substitute like almond extract will alter the taste, but still keep the pie enjoyable.
The Texture Crew
The graham cracker crumbs give the crust its signature crunch. They also absorb some of the filling’s moisture, preventing sogginess. If you use a different cracker, like digestive biscuits, the texture will change, but the pie will still be delicious.
The melted butter is essential for binding the crumbs together. It creates a cohesive structure that holds up to the filling. Skipping the butter will result in a crumbly, loose crust that crumbles when you cut into it.
The Unexpected Star
Chopped Reese’s Peanut Butter Cups are the pièce de résistance. They add a burst of chocolate and peanut butter with every bite. Using whole cups instead of chopped pieces will create a different mouthfeel; the whole cups will melt into the filling, reducing the crunchy element.
The heavy cream thickens the filling without adding too much liquid. It gives the pie a luxurious, custard-like consistency. If you prefer a thicker pie, use a little less cream; for a lighter texture, increase the cream slightly.
The Final Flourish
The powdered sugar is the sweetener that balances the richness of the filling. It also helps the glaze set into a glossy finish. If you want a lower sugar version, reduce the powdered sugar by half and add a pinch of sea salt to compensate.
The sea salt is the finishing touch that enhances every flavor. It brings out the chocolate and peanut butter notes and prevents the pie from feeling overly sweet. A pinch of salt is all you need; too much will ruin the delicate balance.
Everything’s prepped? Good. Let’s get into the real action.
The Method — Step by Step
- Prep the crust. Combine 1 ½ cups graham cracker crumbs with ¼ cup melted butter and ¼ cup powdered sugar. Press the mixture into the bottom of a 9‑inch pie dish, creating an even layer. Chill the crust in the refrigerator for 15 minutes to firm up. When you bake it, the crust should turn a golden brown. This step is crucial for a sturdy base.
- Chop the Reese’s. Break the Reese’s Peanut Butter Cups into bite‑size pieces using a pizza cutter or a sharp knife. The pieces should be large enough to stay intact but small enough to melt slightly into the filling. This will give you that perfect crunchy‑to‑melting contrast. The texture is a signature element of the pie. Keep them ready for the next step.
- Blend the filling. In a medium bowl, whisk together 2 cups creamy peanut butter, 1 cup sweetened condensed milk, 1 cup heavy cream, and 1 teaspoon vanilla extract. Stir until the mixture is smooth and glossy. If it’s too thick, add a tablespoon of milk at a time. This creates the silky base that clings to the crust. The filling should be pourable but not runny.
- Assemble the pie. Pour the filling into the chilled crust, spreading it evenly with a spatula. Sprinkle the chopped Reese’s pieces over the top, pressing them lightly into the filling. The pieces should be distributed evenly for a balanced bite. This step is where the magic begins to unfold. Watch the filling settle as you arrange the Reese’s.
- Bake to perfection. Place the pie in a preheated oven at 325°F (160°C). Bake for 25–30 minutes, or until the edges are set and the center is slightly jiggly. The pie should smell like warm chocolate and peanut butter. If the top browns too quickly, tent it with foil. This is the moment of truth.
- Cool and chill. Remove the pie from the oven and let it cool on a wire rack for 15 minutes. Then cover it with plastic wrap and refrigerate for at least 4 hours, preferably overnight. The chilling step allows the flavors to meld and the filling to set. This step is essential for a sliceable pie.
- Finish with a glaze. In a small saucepan, melt ½ cup of dark chocolate chips with 2 tablespoons of heavy cream over low heat, stirring until smooth. Brush the glaze over the top of the chilled pie, letting it set into a glossy sheen. The glaze adds a final layer of richness. It also protects the filling from drying out. This is pure magic.
- Slice and serve. Use a sharp knife dipped in hot water for clean slices. Serve the pie at room temperature for the best flavor. Garnish with extra Reese’s pieces or a dusting of powdered sugar if desired. The pie will look as impressive as it tastes. Enjoy!
- Store leftovers. Wrap any unused slices tightly in plastic wrap and refrigerate for up to 3 days. For longer storage, freeze the slices for up to 2 months. Thaw in the refrigerator overnight before serving. This keeps the pie fresh and flavorful. Keep the crust crisp by placing a paper towel over the top during storage.
Insider Tricks for Flawless Results
The Temperature Rule Nobody Follows
Many bakers bake their crust at a high temperature to get a crisp edge, but that can cause the filling to crack. Instead, bake the pie at a moderate 325°F (160°C) to allow the crust to brown evenly while keeping the filling silky. The lower temperature also prevents the chocolate pieces from melting too quickly. Keep an eye on the oven thermometer to maintain consistency. This trick ensures a flawless crust every time.
Why Your Nose Knows Best
The aroma of a pie is a powerful indicator of its readiness. As soon as the filling starts to emit a warm, chocolatey scent, you know it’s close to done. If the pie smells too sweet or like raw milk, it needs more time. Trust your nose over the timer, especially if your oven runs hot. This sensory check will save you from undercooked or overcooked pies.
The 5‑Minute Rest That Changes Everything
After removing the pie from the oven, let it rest for 5 minutes before cooling. This brief pause allows the filling to set and the chocolate pieces to settle, preventing them from sliding off. The rest also lets the crust finish its final caramelization. Skipping this step can result in a messy filling that’s hard to slice. Give your pie that short, sweet break.
Keep the Crust Crispy
If you notice the crust getting soggy after baking, chill the pie for at least 4 hours. The cold temperature helps the crumbs firm up and absorb any excess moisture from the filling. You can also place a paper towel over the top of the pie while it cools to keep the surface dry. This simple trick keeps the crust crisp for longer.
Avoid the “Melted Chocolate” Problem
Some bakers add melted chocolate to the filling, which can cause the pie to become too soft. Stick to the original recipe’s dark chocolate glaze instead, which adds richness without compromising the filling’s structure. If you’re adventurous, try a light chocolate glaze for a sweeter finish. Just remember that too much chocolate can drown the peanut butter flavor.
The Perfect Chill Time
Chilling the pie for at least 4 hours, but preferably overnight, ensures the filling is firm enough to slice cleanly. The cold also helps the chocolate pieces set in place. If you’re in a hurry, a 2‑hour chill will still give you a decent result, but the pie will be slightly softer. Timing is everything when it comes to a perfect slice.
Creative Twists and Variations
Chocolate‑Infused Delight
Swap the dark chocolate glaze for a ganache made with milk chocolate and a splash of espresso. The espresso adds depth, while the milk chocolate keeps the glaze creamy. This variation is perfect for coffee lovers who want a bittersweet twist. The espresso also enhances the chocolate’s aroma. It’s a deliciously sophisticated take on the classic.
Nutty Extra Crunch
Add chopped almonds or pecans to the crust for an extra layer of crunch. The nuts add a subtle buttery flavor that complements the peanut butter filling. Use toasted nuts for a deeper flavor profile. This variation is great for those who love a nutty bite. The crunch stays even after chilling.
Low‑Sugar Version
Replace the sweetened condensed milk with unsweetened almond milk and add a natural sweetener like maple syrup. Reduce the powdered sugar by half to cut down on sugar. The result is a lighter, but still indulgent, pie that satisfies sweet cravings without the excess. The almond milk adds a subtle nutty note. This version is ideal for health‑conscious bakers.
Vegan Take‑Off
Use vegan peanut butter, coconut milk instead of heavy cream, and a dairy‑free chocolate glaze. This creates a completely plant‑based dessert that still delivers on flavor. The coconut milk adds a hint of tropical sweetness. The vegan chocolate glaze gives a glossy finish. This variation is perfect for vegan guests.
Spiced Surprise
Add a pinch of cayenne pepper or smoked paprika to the filling for a subtle heat that contrasts with the sweetness. The spice adds a layer of complexity that excites the palate. Use only a small amount to avoid overwhelming the flavor. This twist is ideal for adventurous bakers. The heat lingers pleasantly after each bite.
Minty Fresh
Stir in a teaspoon of mint extract into the filling and top the pie with fresh mint leaves. The mint provides a refreshing contrast to the rich peanut butter and chocolate. It also adds a visual pop of green. The mint pairs wonderfully with the chocolate glaze. This variation is perfect for summer gatherings.
Holiday Edition
Add a handful of dried cranberries and a dash of orange zest to the filling for a festive twist. The cranberries add tartness, while the orange zest brightens the flavor. This variation works well for Thanksgiving or holiday parties. The colors also look festive on a plate. It’s a holiday‑ready version of a classic.
Breakfast Boost
Serve a slice of the pie with a side of fresh fruit or a dollop of whipped cream for a decadent breakfast. The pie’s richness pairs well with a light fruit topping. It’s a luxurious way to start the day. The flavors balance the sweetness with a burst of freshness. This twist turns dessert into a breakfast treat.
Storing and Bringing It Back to Life
Fridge Storage
Cover the chilled pie with plastic wrap and store it in the refrigerator for up to 3 days. Keep the plastic wrap snug to prevent the crust from drying out. If you notice the crust becoming soggy, place a paper towel over the top before re‑cooking. The pie will stay firm and flavorful. This method keeps the pie fresh for a short period.
Freezer Friendly
Wrap each slice tightly in plastic wrap and then place them in a freezer bag. Freeze for up to 2 months for best quality. When you’re ready to serve, let the slices thaw at room temperature for 30 minutes. The texture remains creamy, and the chocolate stays intact. Freezing is a great way to stockpile desserts.
Best Reheating Method
Reheat slices in the oven at 300°F (150°C) for 5–7 minutes, or until warmed through. Alternatively, microwave on low power for 20–30 seconds, checking frequently. Adding a tiny splash of water before reheating helps steam the filling back to perfection. This trick restores the silky texture without drying it out. The pie will taste as fresh as when it first came out of the oven.