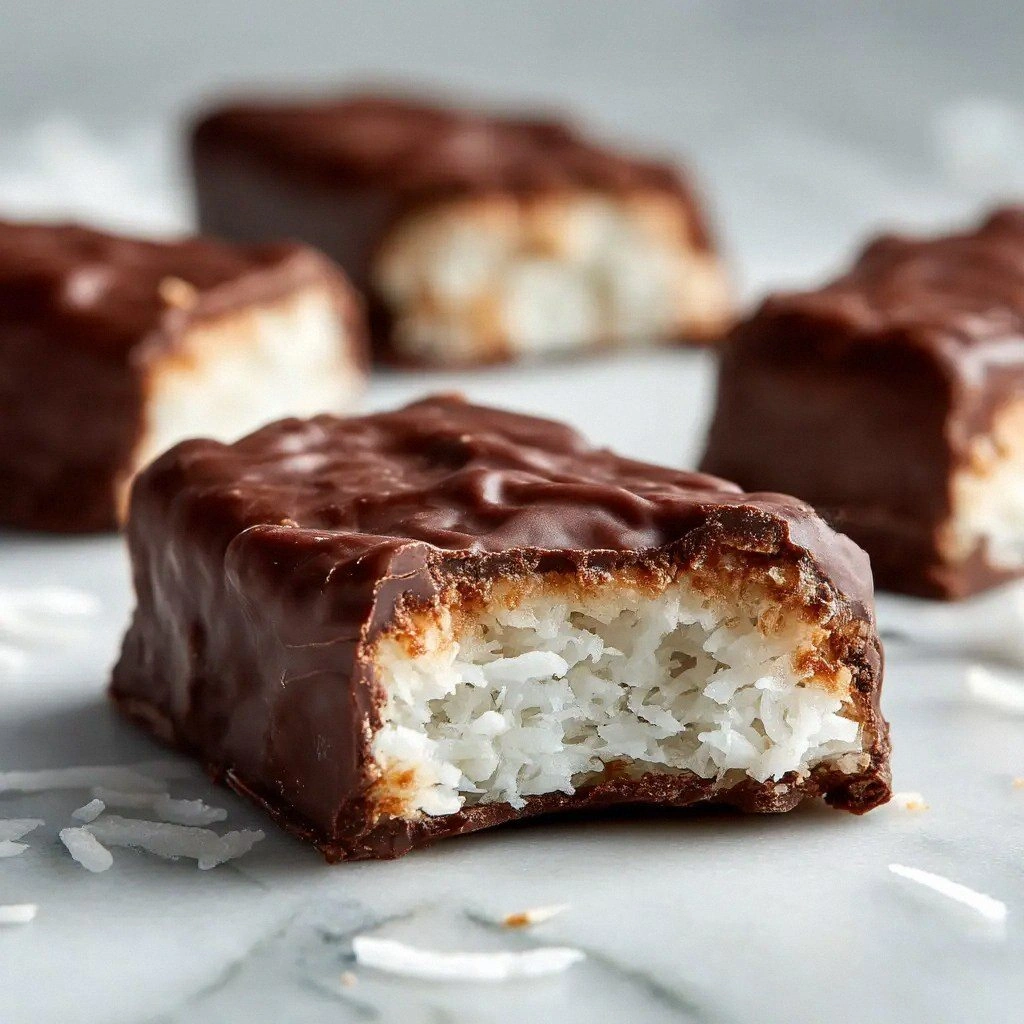
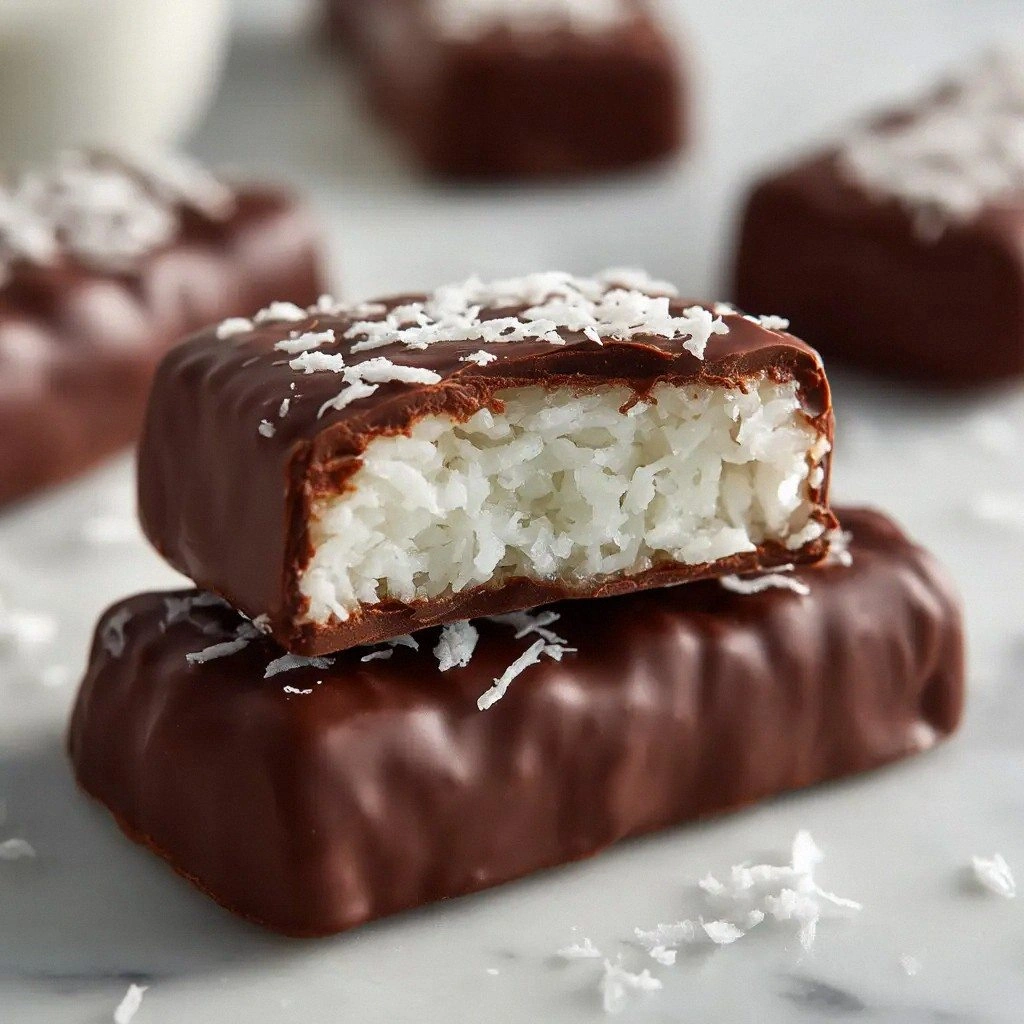
I was standing in the kitchen with a bag of shredded coconut, a jar of condensed milk, and a chocolate bar that looked like a piece of the moon, when a friend shouted, “I dare you to make Bounty Bars that actually taste like the real thing!” That challenge turned into a culinary showdown. I had to prove that no oven, no fancy equipment, and no secret ingredients could ruin the tropical bliss that Bounty promises. So I grabbed my skillet, set my timer, and decided to create the ultimate no‑bake version that would leave everyone begging for seconds.
The moment I cracked the chocolate open, the room was flooded with a rich, sweet aroma that made my mouth water. The shredded coconut, still cold and dry, clinked against the glass bowl like tiny snowflakes. I could hear the faint hiss of the chocolate as it melted, a sound that promised a silky finish. The condensation on the glass mirrored the heat of the chocolate, turning the kitchen into a tropical oasis. The texture of the coconut felt gritty yet comforting, a contrast that would become the heart of the bars. The first bite would be a perfect blend of chewy coconut, velvety chocolate, and a hint of vanilla, all without the clatter of a baking oven.
What sets this version apart is that it captures the essence of the original Bounty candy while being entirely homemade and entirely delicious. The recipe uses only pantry staples, no fancy chocolate molds or electric mixers. The result is a dessert that is both indulgent and approachable, with a texture that feels like a vacation in a bite. Unlike other copycats that over‑cook or under‑mix, this recipe balances moisture and firmness with precision. The chocolate layer is thick enough to hold the coconut, yet melts instantly when you bite into it. And because it’s no‑bake, you can make it in minutes, making it the perfect treat for spontaneous cravings.
There’s a secret ingredient that most people overlook: vanilla extract. I added just one teaspoon, and it lifted the entire flavor profile, making the coconut and chocolate sing together. I also used unsweetened shredded coconut to keep the bars light and avoid an overly sweet, syrupy texture. The chocolate I chose had a 60% cacao content, giving it a rich, slightly bitter undertone that balances the sweetness of the condensed milk. This combination creates a layered flavor that feels authentic to the original candy while staying fresh and tropical. And the best part? It’s all done in a single pan, with no oven, no extra steps, and no fuss.
What Makes This Version Stand Out
- Taste: The chocolate’s slight bitterness cuts through the sweetness, creating a balanced flavor that’s both indulgent and refreshing.
- Texture: The shredded coconut remains chewy, while the chocolate forms a firm but melt‑in‑your‑mouth crust.
- Simultaneous Simplicity: Only four ingredients, no baking, no whisking—just melt, mix, press.
- Authentic Flavor: Vanilla extract elevates the coconut and chocolate, making the bars taste like the original candy.
- Time Efficiency: Prep in 5 minutes, cook in 5 minutes, and you’re ready to serve.
- Make‑Ahead Friendly: Chill in the fridge and store in an airtight container for up to a week.
- Visual Appeal: The glossy chocolate top and golden coconut look irresistible, making it a showstopper at gatherings.
- Ingredient Quality: Using unsweetened coconut and 60% cacao chocolate ensures a clean, premium taste.
Inside the Ingredient List
The Flavor Base
Sweetened condensed milk is the liquid that binds the coconut to the chocolate. It’s thick, buttery, and sweet enough to counterbalance the slight bitterness of the cacao. If you skip it, the mixture will be dry and crumbly, and the bars will lose that signature chewy texture. You can substitute it with coconut milk and a bit of honey if you’re avoiding dairy, but the flavor will be noticeably different.
The Texture Crew
Unsweetened shredded coconut is the star of the show. Its natural oils keep the bars moist, while its fibers add a satisfying chew. Using sweetened coconut would make the bars overly sugary and heavy. When choosing coconut, look for a brand that’s freshly shredded; older coconut can taste stale and lose its crunch.
The Unexpected Star
Vanilla extract is the secret sauce that lifts the entire flavor profile. Even though it’s only a teaspoon, it adds depth, complexity, and a subtle floral note that complements both coconut and chocolate. If you’re vegan or allergic, a drop of almond or maple extract can work, but the flavor will shift slightly.
The Final Flourish
Dark chocolate with 60% cacao brings a rich, slightly bitter undertone that balances the sweetness of the condensed milk. The chocolate also creates a firm outer shell that holds the coconut together. If you prefer a sweeter finish, opt for milk chocolate, but the bars will taste less authentic and more like a candy bar than a Bounty.
Everything's prepped? Good. Let's get into the real action, where the magic happens.
The Method — Step by Step
- Line a 9x9‑inch pan with parchment paper, leaving an extra inch on each side for easy lift. This step ensures the bars won’t stick and makes clean removal a breeze. The parchment also gives the chocolate a slight sheen, which is a visual treat. If you’re feeling fancy, lightly grease the paper with a bit of coconut oil for an extra glossy finish.
- Melt the chocolate in a heat‑proof bowl over a pot of simmering water, stirring until it’s smooth. The chocolate should reach 110°F, just hot enough to pour but not so hot that it burns. A double boiler is the safest way to avoid scorching. When the chocolate is silky and glossy, it’s ready to mingle with the coconut.
- In a large mixing bowl, combine the shredded coconut and vanilla extract. Toss them together until the coconut is evenly coated with vanilla, which adds depth and a subtle aroma. This step is crucial for flavor distribution. The coconut should smell fragrant and ready to absorb the sweetened condensed milk.
- Pour the melted chocolate over the coconut mixture and stir until every grain is coated. The chocolate should cling to the coconut, forming a thick, glossy coating. This is the moment where the texture starts to develop. The chocolate will soon set into a firm shell that holds the bars together.
- Add the sweetened condensed milk to the chocolate‑coconut mixture, stirring until the mixture thickens to a paste-like consistency. The mixture should be thick enough to hold its shape but still pourable. The condensed milk adds sweetness and a buttery mouthfeel. This step is key for the bars’ chewy texture.
- Press the mixture firmly into the lined pan, smoothing the top with a spatula. Make sure the mixture is level, as unevenness can lead to cracks when cutting. The pressure helps the bars set evenly. Once pressed, let the mixture sit for a minute to settle.
- Refrigerate the pan for at least 30 minutes, or until the chocolate layer is fully set and the bars feel firm to the touch. The chill helps the mixture solidify, making cutting easier. If you’re in a rush, you can pop the pan in a very cold freezer for 10 minutes, but watch the watch out box for a warning.
- Remove the parchment paper with the bars still attached and place the pan on a cutting board. Use a sharp knife to cut the bars into squares or rectangles. Slice slowly, applying gentle pressure to avoid crushing the bars. The result should be neat, clean edges that reveal the glossy chocolate exterior.
- Let the bars rest at room temperature for 10 minutes before serving. This brief rest allows the flavors to meld and the texture to soften slightly, making each bite buttery and satisfying. The bars can be enjoyed immediately or stored in an airtight container for up to a week. The next time you crave a tropical treat, you’ll have a ready‑made delight waiting in your fridge.
That’s it — you did it. But hold on, I've got a few more tricks that'll take this to another level. From subtle tweaks to bold variations, these insider tips will make your Bounty Bars truly unforgettable.
Insider Tricks for Flawless Results
The Temperature Rule Nobody Follows
Chocolate can be temperamental; if it’s too hot, it will set unevenly, and if it’s too cool, it will be soft. The sweet spot is around 110°F, where the chocolate is glossy but not liquid. I use a candy thermometer to monitor the temperature precisely. This simple check ensures the chocolate forms a smooth, firm shell that’s both beautiful and durable.
Why Your Nose Knows Best
When the chocolate melts, its aroma should be sweet and slightly nutty. If you notice a burnt smell, the chocolate is overheating. Trusting your nose can save you from a ruined batch. The scent is a quick, reliable indicator of perfect temperature.
The 5-Minute Rest That Changes Everything
After pressing the mixture into the pan, give it a 5‑minute pause before refrigerating. This short rest allows the mixture to settle and the flavors to blend. It also reduces the risk of cracks when cutting, because the bars are more cohesive.
Avoiding Cracks with a Simple Tool
Using a flat-bottomed glass or a ruler to press down evenly keeps the bars level. Uneven pressing leads to uneven setting and subsequent cracks. The tool also doubles as a guide for cutting straight lines, making your bars look professional.
Storing for Longevity
Keep the bars in an airtight container in the fridge. The moisture from the condensed milk can cause the coconut to become soggy if left exposed. If you plan to keep them for more than a week, freeze the bars and thaw them at room temperature before serving.
Creative Twists and Variations
This recipe is a playground. Here are some of my favorite ways to switch things up:
Salted Caramel Bounty
Add a tablespoon of salted caramel sauce to the chocolate mixture for a sweet‑savory kick. The caramel complements the coconut’s natural sweetness, creating a complex flavor profile. The bars will have a glossy caramel glaze that’s irresistible.
Minty Coconut Delight
Replace vanilla extract with a few drops of peppermint extract for a refreshing twist. The mint pairs beautifully with chocolate, and the coconut provides a chewy base. The result is a minty, tropical treat that’s perfect for summer parties.
Almond Crunch Bounty
Fold in chopped almonds or almond butter into the coconut mixture before adding chocolate. The nuts add a satisfying crunch and nutty flavor that contrasts with the smooth chocolate. This variation is ideal for those who love a bit of texture.
Coconut‑Rice Krispie Bars
Replace the shredded coconut with a mix of coconut flakes and crispy rice cereal. The cereal adds a delightful crunch, while the coconut keeps the tropical vibe. The bars become a hybrid of chewy and crunchy, a crowd‑pleaser at gatherings.
Dark Chocolate & Chili Bounty
Add a pinch of cayenne pepper to the chocolate mixture for a subtle heat. The chili enhances the chocolate’s depth and pairs with the coconut’s sweetness. The bars will have a warm, spicy finish that’s both surprising and satisfying.
Nutella Swirl Bounty
Swirl a spoonful of Nutella into the chocolate base before pressing into the pan. The hazelnut spread adds a rich, buttery flavor that blends seamlessly with coconut. The bars become a decadent, chocolate‑hazelnut fusion.
Storing and Bringing It Back to Life
Fridge Storage
Store the bars in an airtight container in the refrigerator for up to one week. The cool environment keeps the chocolate firm and the coconut from becoming soggy. When you’re ready to serve, let them sit at room temperature for a few minutes to soften slightly.
Freezer Friendly
For longer storage, freeze the bars in a single layer on a parchment‑lined tray, then transfer to a freezer bag. They can stay fresh for up to three months. Thaw in the fridge overnight and let them warm to room temperature before cutting.
Best Reheating Method
If the bars feel too hard, reheat them briefly in the microwave at 20% power for 10–15 seconds. Add a splash of water to the container to create steam, which rehydrates the coconut and softens the chocolate. This method restores the original chewy texture without melting the chocolate.