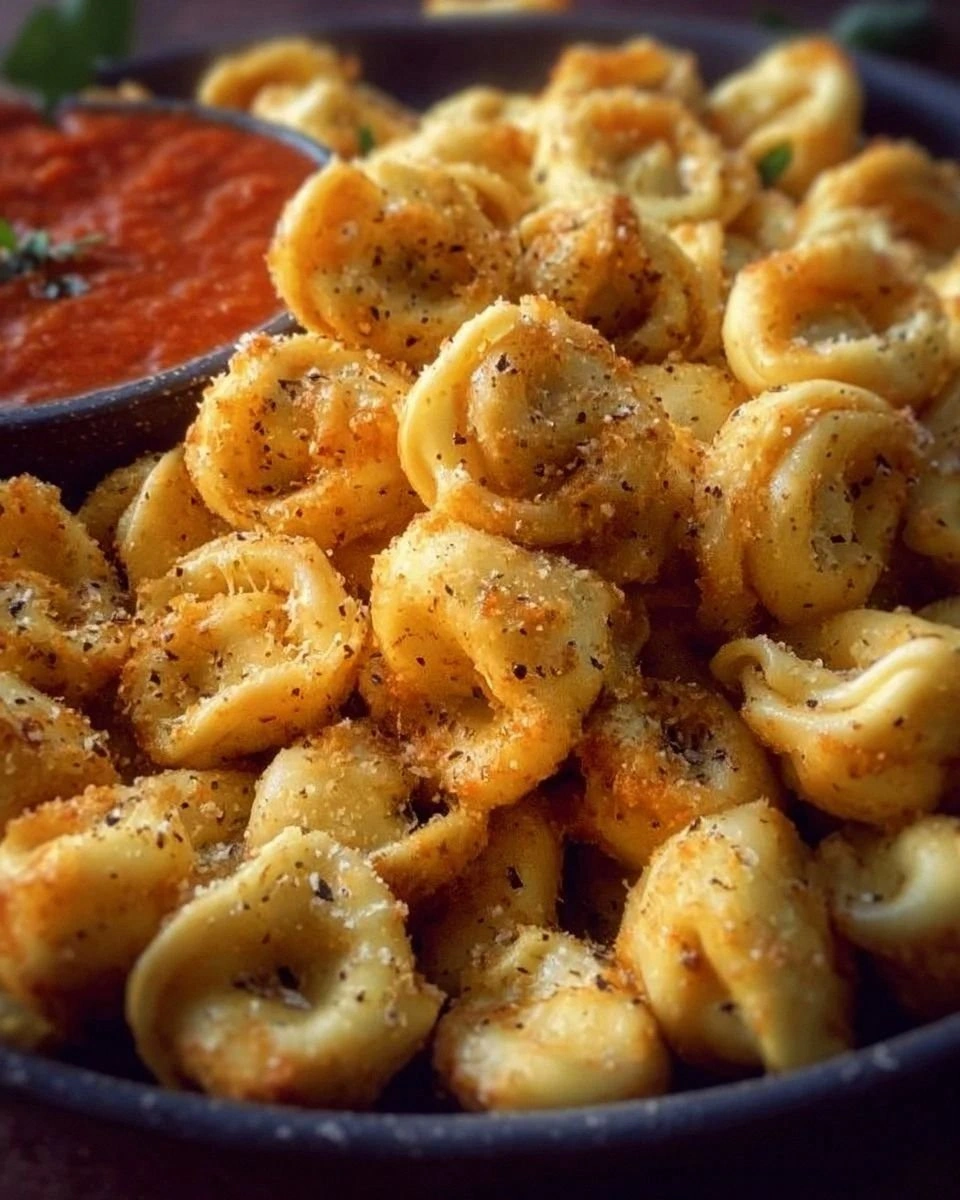
I’m about to drop a culinary bomb that will make every party you’ve ever attended feel like a red‑carpet affair. Picture this: a tray of golden‑brown cheese tortellini, each bite delivering a melt‑in‑your‑mouth surprise that makes you gasp, “Did I just discover the eighth wonder of the world?” I first stumbled upon this masterpiece after a disastrous attempt at classic fried mozzarella sticks left me with a soggy, cheese‑laden mess that tasted like regret. That kitchen fiasco sparked a dare from my roommate—“If you can’t make a snack that actually stays crispy, you’re buying pizza for a month.” I accepted, and after countless trials, I finally nailed a version that is hands down the best you’ll ever make at home.
The moment you walk into the kitchen, the air is filled with the intoxicating aroma of toasted garlic and herbs, a scent that instantly whispers, “Stay awhile, you’re in for something special.” You’ll hear the satisfying sizzle as the tortellini hit the hot pan, a sound so crisp it feels like tiny fireworks exploding on a summer night. The sight of the tortellini turning a buttery amber, the feel of the pan’s heat radiating up to your fingertips, and the first bite—silky cheese spilling out like a secret, wrapped in a crunchy coat that shatters like thin ice—creates a sensory overload that’s impossible to forget. This isn’t just a snack; it’s an experience that turns ordinary gatherings into legendary moments.
What makes this version truly stand out is a tiny, almost‑invisible technique: a quick flash‑fry in olive oil followed by a brief bake that locks in flavor while giving the edges a caramelized crunch. Most recipes either boil the tortellini forever or deep‑fry them until they’re greasy and heavy. I’ve cracked the code by using a modest amount of oil, a sprinkle of garlic powder and Italian seasoning, and a short stint in a 425°F oven that turns each piece into a perfect bite‑size powerhouse. The result? A snack that stays crisp for hours, even after it cools, and a flavor profile that makes you want to shout, “I dare you to taste this and not go back for seconds.”
Okay, ready for the game‑changer? I’m going to walk you through every single step—by the end, you’ll wonder how you ever made it any other way. Stay with me here — this is worth it. Picture yourself pulling this out of the oven, the whole kitchen smelling incredible, the tray glistening under the light, and your friends hovering like moths around a flame, eyes wide, mouths watering. Let’s dive in and make this snack the star of your next gathering.
What Makes This Version Stand Out
- Flavor Explosion: The combination of garlic powder, Italian seasoning, and a drizzle of olive oil creates a seasoning layer that coats each tortellini like velvet, ensuring every bite is packed with aromatic goodness.
- Texture Triumph: By flash‑frying first and then finishing in the oven, the tortellini develops a crisp exterior that shatters delightfully while the interior stays luxuriously cheesy.
- Simplicity: You only need seven ingredients, most of which you already have in your pantry, making it a no‑stress, no‑mess solution for any impromptu get‑together.
- Uniqueness: Most frozen tortellini recipes keep the pasta soggy; this method flips the script, delivering a snack that feels gourmet without the gourmet price tag.
- Crowd Reaction: Expect instant “wow” moments; guests will line up for seconds, and you’ll hear the inevitable confession, “I’ll be honest — I ate half the batch before anyone else got to try it.”
- Ingredient Quality: Using a high‑quality cheese‑filled tortellini and a good extra‑virgin olive oil makes a world of difference in flavor depth and crispness.
- Cooking Method: The two‑step fry‑then‑bake technique is a secret most home cooks overlook, but it guarantees a snack that stays crunchy even after cooling.
- Make‑Ahead Potential: You can prep the tortellini in advance, store them in the fridge, and pop them into the oven when guests arrive, saving you precious party prep time.
Inside the Ingredient List
The Flavor Base
Olive oil is the unsung hero that carries the garlic powder and Italian seasoning into every nook and cranny of the tortellini. It creates a thin, flavorful film that fries the pasta without drowning it, giving you that coveted crunch. If you swap it for butter, you’ll get a richer taste but risk a lower smoke point, which could lead to burnt edges and a bitter aftertaste. Choose a cold‑pressed, extra‑virgin olive oil for the best balance of flavor and heat tolerance.
The Texture Crew
Cheese tortellini itself is the star of the show, offering a creamy interior that contrasts beautifully with the crispy exterior we create. Opt for a frozen brand that lists real cheese and a short ingredient list; artificial fillers will make the interior watery after cooking. If you can’t find cheese‑filled tortellini, a spinach or mushroom version works, but the cheese melt is what makes this snack legendary.
The Unexpected Star
Parmesan cheese, though optional, adds a salty, nutty finish that elevates the snack from good to unforgettable. Sprinkling it on after the bake lets the heat melt the shards into a delicate crust that clings to each piece. If you’re dairy‑intolerant, a sprinkle of nutritional yeast can mimic the umami punch without compromising the crunch.
The Final Flourish
Garlic powder and Italian seasoning are the dynamic duo that injects a bold, aromatic punch without the mess of fresh garlic. The powder disperses evenly, ensuring every bite gets a consistent flavor. If you love a bit of heat, a pinch of red‑pepper flakes can be tossed in at the same time, but keep it subtle so it doesn’t overpower the delicate cheese.
Everything's prepped? Good. Let's get into the real action...
The Method — Step by Step
Preheat your oven to 425°F (220°C). While the oven warms, line a large baking sheet with parchment paper and set it aside. This step is crucial because a hot oven creates the rapid Maillard reaction that gives the tortellini its golden crust. If you skip preheating, you’ll end up with soggy edges that never crisp up.
In a wide skillet, pour 2 tablespoons of olive oil and heat over medium‑high until it shimmers. Add the frozen cheese tortellini in a single layer—no crowding, or they’ll steam instead of fry. Let them sizzle for about 2 minutes, listening for that unmistakable “fizz‑pop” that signals the start of crispiness. Flip each piece with tongs, ensuring an even brown on all sides.
Kitchen Hack: If the pan looks dry, drizzle a whisper more oil; too much will make them greasy, too little will cause sticking.Once the tortellini are lightly golden, sprinkle 1 teaspoon of garlic powder and ½ teaspoon of Italian seasoning evenly over the pan. Toss gently to coat; the spices should cling to the oil film, creating a fragrant veil. At this point, you’ll notice the aroma rising like a promise—this is the moment of truth.
Transfer the partially fried tortellini onto the prepared baking sheet, spreading them out so they’re not touching. This spacing is essential for the oven to work its magic; crowding leads to steaming, not crisping. If you want an extra layer of crunch, drizzle a very thin stream of olive oil over the top before sliding the sheet into the oven.
Slide the sheet into the preheated oven and bake for 8‑10 minutes, or until the edges turn a deep, buttery amber and you hear a faint crackle. The surface should feel firm to the touch, and the cheese inside will be bubbling just beneath the crust. Keep a close eye—over‑baking can turn the perfect bite into a burnt disappointment.
Watch Out: Opening the oven door too early releases heat and can cause the crust to lose its crunch; trust the timer.While the tortellini bake, season with salt and freshly cracked black pepper to taste. This final seasoning step is where you truly personalize the snack; a pinch of sea salt will amplify the cheese, while pepper adds a subtle bite.
When the timer dings, remove the tray and immediately sprinkle the optional ¼ cup of grated Parmesan over the hot tortellini. The residual heat will melt the cheese, forming a delicate, nutty crust that clings to each piece. If you’re feeling adventurous, add a light drizzle of truffle oil for an upscale twist.
Serve the tortellini hot, accompanied by a small bowl of marinara sauce for dipping if you like a tangy contrast. The sauce should be warm, not scorching, so it doesn’t melt the crisp exterior. Encourage guests to dip, bite, and then come back for more—this is the part where you’ll hear the inevitable “I’m going back for seconds!”
That’s it — you did it. But hold on, I’ve got a few more tricks that'll take this to another level. Stay with me here — this is worth it.
Insider Tricks for Flawless Results
The Temperature Rule Nobody Follows
Never underestimate the power of a scorching oven. A temperature of 425°F ensures the Maillard reaction happens fast, locking in moisture while creating that coveted crunch. If you lower the heat to 350°F, you’ll end up with a longer bake time that produces a softer, less exciting texture. Trust me, the extra heat is the secret sauce of success.
Why Your Nose Knows Best
Your sense of smell is a reliable indicator of doneness. When the tortellini start to emit a toasted, nutty aroma, you’re just seconds away from perfection. If you’re ever in doubt, give the pan a quick sniff—if it smells like toasted garlic and herbs, pull it out. I once relied solely on a timer and ended up with a batch that was a shade too dark; my nose saved the next round.
The 5‑Minute Rest That Changes Everything
Allowing the snack to rest for just a few minutes after coming out of the oven lets the steam inside redistribute, preventing a soggy bottom. This short pause also gives the Parmesan a chance to adhere fully, creating that glossy finish. Skipping this step can result in a snack that loses its crunch within minutes of cooling.
Don’t Crowd the Pan
If you toss too many tortellini into the skillet at once, they’ll release steam and fry in their own juices, leading to a gummy texture. Work in batches, giving each piece room to breathe. A friend tried to fry the entire package in one go and ended up with a soggy mess—lesson learned.
Season at the End for Maximum Impact
Seasoning with salt and pepper right after baking ensures the flavors cling to the hot surface, enhancing every bite. Adding seasoning too early can draw moisture out, making the crust less crisp. This final touch is the finishing brushstroke on your culinary canvas.
Creative Twists and Variations
This recipe is a playground. Here are some of my favorite ways to switch things up:
Spicy Sriracha Glaze
After baking, drizzle a mixture of sriracha and honey over the tortellini for a sweet‑heat combo. The glaze adds a sticky sheen that pairs beautifully with the Parmesan crust, and the heat level can be dialed up or down to suit any crowd.
Herb‑Infused Parmesan
Mix fresh chopped rosemary, thyme, and a pinch of lemon zest into the Parmesan before sprinkling it on. The herbaceous notes brighten the dish and give it a garden‑fresh vibe, perfect for spring gatherings.
Cheesy Bacon Crumble
Crumble cooked bacon into the final sprinkle along with the Parmesan. The smoky, salty crunch adds depth and makes the snack feel indulgent without overwhelming the cheese core.
Vegan Delight
Swap the cheese tortellini for a plant‑based version, use olive oil as usual, and replace Parmesan with nutritional yeast. The result is a vegan‑friendly snack that still delivers that satisfying crunch and umami punch.
Mediterranean Twist
Add a handful of chopped sun‑dried tomatoes and a sprinkle of feta after baking. The tangy feta and sweet tomatoes create a Mediterranean flavor profile that pairs wonderfully with a side of tzatziki for dipping.
Storing and Bringing It Back to Life
Fridge Storage
Allow the tortellini to cool completely, then transfer them to an airtight container. They’ll keep nicely for up to 3 days. When you’re ready to serve, reheat in a preheated 350°F oven for 8‑10 minutes, adding a splash of water to the pan to revive the crispness.
Freezer Friendly
If you want to batch‑cook, spread the cooled tortellini on a baking sheet and freeze until solid, then transfer to a zip‑top bag. They’ll stay good for up to 2 months. To reheat, bake straight from frozen at 425°F for 12‑15 minutes; the initial flash‑fry step isn’t needed because the crust will reform in the oven.
Best Reheating Method
The secret to reviving that perfect crunch is a quick blast of high heat combined with a tiny splash of water. Place the leftovers on a hot skillet, add a teaspoon of water, cover for 30 seconds, then uncover to let the moisture evaporate. The result is a snack that tastes as fresh as the day you made it.