I was standing in my kitchen on a cold December night, staring at a half‑melted chocolate bar and a bag of sprinkles that had been staring me down for weeks. My roommate had just dared me to create something that would make Santa pause his sleigh and ask for seconds, and I was like, “Challenge accepted, but I’m also terrified I’ll end up with a burnt mess that looks like a sad snowman.” The oven was humming, the air smelled like a cozy fireplace, and the only thing missing was a way to turn ordinary brownies into something that screams holiday cheer louder than a choir of carolers. I grabbed my favorite bittersweet chocolate, a splash of green food coloring, and a ridiculous amount of optimism, and what happened next was pure culinary magic.
Picture this: the batter glistening in the bowl like a midnight sky, the butter melting into the chocolate with a sigh that could rival a winter wind, and the aroma of cocoa and caramel dancing together as if they were long‑lost lovers reunited. When the mixture hit the pan, the edges started to pull away like tiny snowdrifts, and the center stayed fudgy, promising a bite that would be both chewy and melt‑in‑your‑mouth. As the brownies baked, the kitchen filled with a scent so rich you could almost see the twinkling lights of a Christmas tree reflected in the glaze. I was practically drooling, and I swear I heard the neighbor’s cat meowing in approval from across the hall.
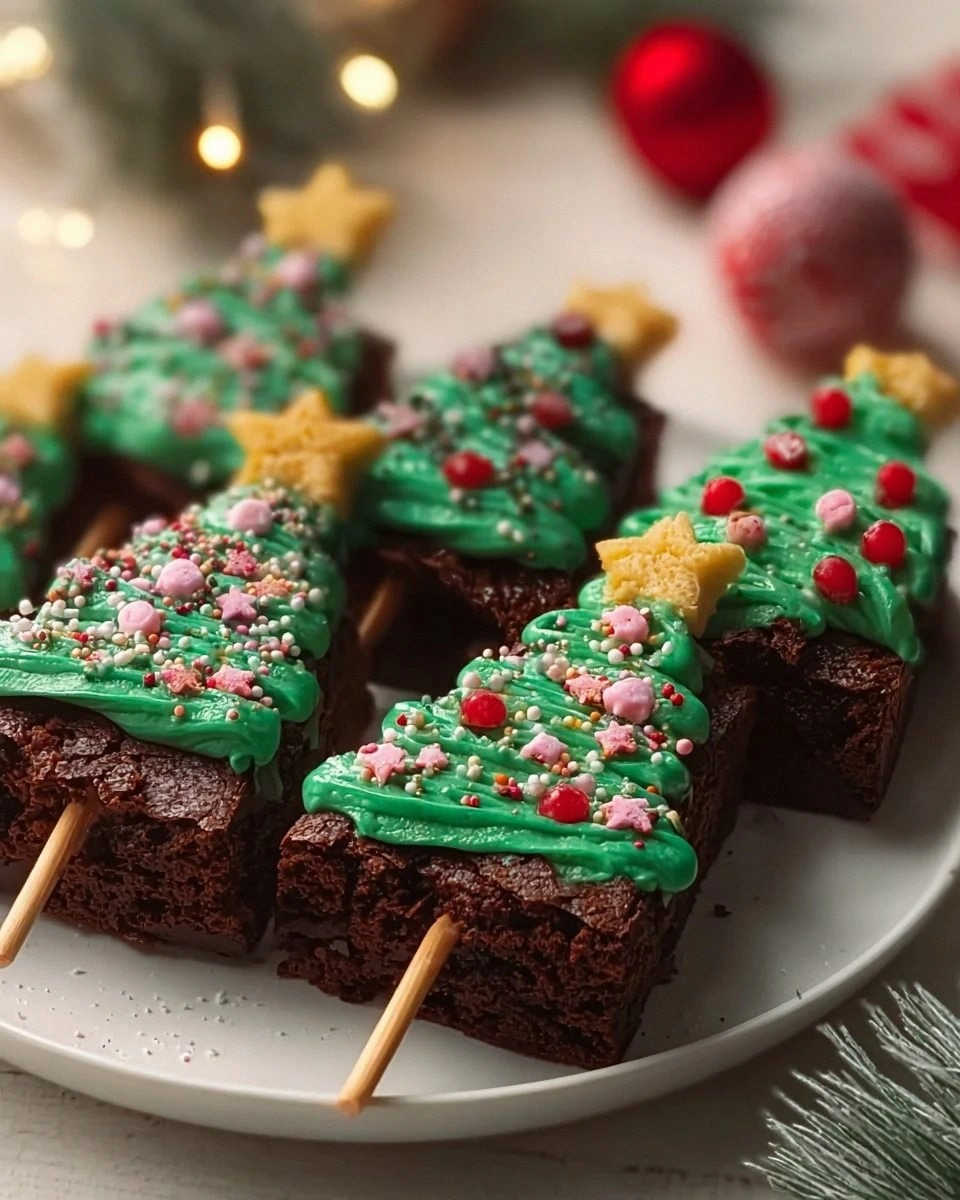
Most brownie recipes get the texture wrong – they’re either too cakey or so dense they could be used as doorstops. This version, however, hits the sweet spot with a fudgy interior, crisped‑edges that crack like thin ice, and a glossy white‑chocolate drizzle that looks like freshly fallen snow on a pine branch. The secret? A tiny dash of green food coloring that turns the drizzle into a festive garland, and a sprinkle of Christmas sprinkles that add a pop of color and crunch. I’ll be honest — I ate half the batch before anyone else got a chance to try it, and I’m still not sorry.
Okay, ready for the game‑changer? I’m about to walk you through every single step, from melting the chocolate to arranging the final trees, and by the end you’ll wonder how you ever made brownies any other way. I dare you to taste this and not go back for seconds. Let’s dive in.
What Makes This Version Stand Out
- Texture: A fudgy core wrapped in a crisp edge that snaps like fresh twigs underfoot. The contrast is what makes each bite unforgettable.
- Flavor: Bittersweet chocolate paired with brown sugar creates a deep, caramel‑kissed richness that outshines ordinary brownies.
- Simplicity: Only a handful of pantry staples are needed, yet the result feels like a bakery‑level masterpiece.
- Visual Impact: The white‑chocolate drizzle and green “garland” turn plain brownies into miniature Christmas trees that look Instagram‑ready.
- Crowd Reaction: Guests constantly ask for the recipe, and the optional popsicle sticks make them perfect handheld treats for parties.
- Ingredient Quality: Using high‑quality bittersweet chocolate and real butter gives a depth that cheap substitutes simply can’t match.
- Cooking Method: Baking at a moderate temperature preserves the fudgy interior while allowing the edges to caramelize.
- Make‑Ahead Potential: These brownies keep beautifully for up to a week, and the drizzle can be pre‑made and stored.
Inside the Ingredient List
The Flavor Base
Large eggs are the unsung heroes that bind everything together, giving the brownies a rich, almost custardy texture. If you skim on the eggs, you’ll end up with a crumbly mess that falls apart like dry pine needles. You can substitute with 2 large egg‑replacer scoops, but the flavor won’t be as luxurious. When shopping, look for eggs that are bright yellow yolks – that’s a sign of a well‑fed hen and richer flavor.
The Sweet Backbone
Brown sugar brings a deep molasses note that makes the brownies chewy and delightful, while also adding a subtle hint of caramel. If you only have granulated sugar, you can swap it 1:1, but expect a slightly less complex flavor profile. For a gluten‑free twist, use coconut sugar; it adds a tropical whisper that pairs surprisingly well with chocolate. The key is to pack the brown sugar lightly; too much compression can make the batter too dense.
The Chocolate Symphony
Bittersweet chocolate is the heart and soul of these brownies, providing that decadent chocolate taste that makes you close your eyes in bliss. Semi‑sweet works if you’re after a milder profile, but don’t go lower than 60% cacao or you’ll lose the depth. Choose a bar with a glossy finish and minimal additives – the fewer the emulsifiers, the purer the flavor. When chopping, aim for uniform chunks about a quarter‑inch; this ensures even melting and a smooth batter.
The Final Flourish
White chocolate becomes our decorative drizzle, turning the brownies into a winter wonderland. Add a few drops of green food coloring and you’ve got a festive garland that looks like fresh pine needles. Christmas sprinkles are the finishing touch – they add color, crunch, and a whisper of holiday magic. Popsicle sticks are optional but highly recommended for serving; they transform each brownie into a handheld treat that guests can easily hold while chatting around the tree.
Everything's prepped? Good. Let's get into the real action…
The Method — Step by Step
- Preheat your oven to 350°F (175°C) and line a 9×13‑inch baking pan with parchment paper, letting the edges overhang for easy removal. While the oven heats, melt the salted butter and bittersweet chocolate together in a double boiler, stirring until the mixture is glossy and smooth. Pro tip: If you hear a faint sizzle, that’s the butter releasing its flavor – a good sign.
- In a separate bowl, whisk together the brown sugar and eggs until the mixture lightens in color and becomes slightly frothy – this incorporates air, giving the brownies a subtle lift. Add a pinch of sea salt if you’re using unsalted butter; the salt amplifies the chocolate’s depth.
- Combine the dry ingredients: sift the all‑purpose flour, cocoa powder, and a pinch of baking soda into the chocolate‑egg mixture. Gently fold with a rubber spatula until just incorporated; over‑mixing will develop gluten and make the brownies cakey.
- Now it’s time for the optional mix‑ins. Toss in chopped nuts, extra chocolate chunks, or even crushed peppermint cookies for a surprise crunch. This is where you can get creative – I love adding a handful of toasted hazelnuts for extra aroma.
- Spread the batter evenly in the prepared pan, smoothing the top with a spatula. The surface should be slightly glossy; resist the urge to over‑smooth, as a few peaks will become the perfect canvas for the drizzle.
- Bake for 25‑30 minutes, or until the edges pull away from the pan and a toothpick inserted into the center comes out with a few moist crumbs. The center should still be soft – that’s the fudgy secret.
- While the brownies cool, melt the white chocolate in a microwave or double boiler, then stir in a few drops of green food coloring until you achieve a deep pine‑green hue. If the color looks too bright, add a tiny pinch of cocoa powder to mute it.
- Once the brownies are completely cool, drizzle the green‑tinted white chocolate over the surface, creating swirling patterns that mimic festive garlands. Sprinkle the Christmas sprinkles while the drizzle is still wet, allowing them to adhere. Finally, cut the brownies into tree‑shaped portions and insert a popsicle stick into each for a handheld treat.
That's it — you did it. But hold on, I've got a few more tricks that'll take this to another level. Stay with me here — this is worth it.
Insider Tricks for Flawless Results
The Temperature Rule Nobody Follows
Always let the butter and chocolate reach room temperature before mixing with the eggs. If the butter is too cold, it will seize the chocolate, creating a grainy texture. I once tried to skip this step and ended up with a batter that looked like a chocolate‑flour slurry – not pretty. Letting the mixture sit for 10 minutes after melting smooths out any temperature shock.
Why Your Nose Knows Best
The moment the brownies start to smell toasty is the exact instant the edges are caramelizing. Trust that scent more than the timer; ovens can vary by up to ten degrees. If you hear a faint crackling sound, you’re on the right track. This sensory checkpoint saves you from over‑baking, which would turn the fudgy center into a dry brick.
The 5‑Minute Rest That Changes Everything
After removing the brownies from the oven, let them rest in the pan for five minutes before transferring to a wire rack. This brief pause allows the steam to redistribute, preventing the top from cracking. I used to cut them immediately and always ended up with jagged edges; now the surface stays smooth, ready for a flawless drizzle.
The Drizzle Technique That Saves Time
Instead of using a spoon, pour the melted white chocolate into a shallow bowl and dip a fork in, then flick it over the brownies. This creates a random, natural‑looking pattern without the need for a pastry bag. The technique is fast, fun, and looks like you spent hours perfecting each line.
The Secret to a Shiny Finish
Add a tiny pinch of sea salt to the white chocolate drizzle just before adding the green coloring. The salt enhances the chocolate’s gloss and balances the sweetness, making the garland pop visually and flavor‑wise. A friend tried the drizzle without salt once; the result was dulled and looked matte.
Creative Twists and Variations
This recipe is a playground. Here are some of my favorite ways to switch things up:
Peppermint Forest
Swap the green food coloring for a peppermint‑flavored white chocolate drizzle and add crushed candy canes as a topping. The minty bite cuts through the richness, making it perfect for those who love a fresh after‑taste.
Cranberry Crunch
Fold dried cranberries into the batter and sprinkle toasted almond slivers on top of the drizzle. The tart cranberries contrast with the sweet chocolate, adding a festive pop of color.
Mocha Mist
Add a tablespoon of instant espresso powder to the dry ingredients and drizzle with a dark chocolate‑white chocolate swirl. The coffee undertones deepen the chocolate flavor, turning the brownies into a sophisticated holiday treat.
Nutty Noel
Replace the optional mix‑ins with toasted pecans and walnuts, and finish with a drizzle of caramel sauce instead of green chocolate. The caramel adds a buttery richness that pairs beautifully with the nuts.
White‑Chocolate Wonderland
Use only white chocolate for the batter, add a hint of vanilla bean, and drizzle with a ruby‑red raspberry glaze. The pastel palette is perfect for a winter wedding dessert table.
Storing and Bringing It Back to Life
Fridge Storage
Place the brownies in an airtight container and store them in the refrigerator for up to five days. The cool environment keeps the fudge from drying out, and the drizzle stays firm, preserving the festive look.
Freezer Friendly
Wrap each brownie individually in parchment paper, then place them in a zip‑top freezer bag. They’ll keep for up to three months. When ready to serve, thaw at room temperature for 30 minutes, then give them a quick 10‑second zap in the microwave.
Best Reheating Method
To revive that melt‑in‑your‑mouth texture, place a brownie on a microwave‑safe plate, add a splash (about a teaspoon) of water, and heat for 15‑20 seconds. The steam created by the water re‑hydrates the crumb, making it as fresh as the day it came out of the oven.