Picture this: I was scrambling to salvage a disastrous chocolate cake that had turned into a soggy, flavorless mess. The batter had been overmixed, the batter had been overbaked, and the frosting had collapsed into a sad, clumpy puddle. I stared at the ruined dessert, feeling the frustration bubble up like a pot left on a low flame. Then a friend texted me, “Try a chia pudding with coconut milk and cocoa, it’s a game‑changer.” That message was the spark that lit a culinary firestorm in my kitchen.
I grabbed my pantry, pulled out the ingredients, and began to whisk and stir, letting the aroma of toasted cocoa mingle with the sweet scent of coconut milk. The room filled with a warm, comforting haze that made me feel like I was in a tropical kitchen even though I was in the middle of a winter storm. Every spoonful of that silky, chocolatey mixture felt like a velvet blanket that wrapped my taste buds in a hug. The sound of the chia seeds swelling into a thick pudding was music to my ears—like a gentle, bubbling brook.
I was skeptical at first: could this simple mixture beat the complex, multi‑step dessert I had just ruined? I was about to taste the first spoonful and then I dared myself to taste it again, and again, until I was convinced that this was the best version of a chocolate pudding anyone could make at home. The texture was airy yet dense, the flavor was rich and chocolatey with a subtle coconut undertone, and the sweetness was perfectly balanced by the natural maple syrup. It was a revelation, and I knew I had to share this discovery with anyone who loves dessert but hates the effort.
What makes this version stand out is not just the ingredients—it’s the method, the timing, and the little tricks that elevate the whole experience. I’ve spent hours tweaking the ratios, experimenting with different types of coconut milk, and testing how long to let the chia seeds absorb the liquid. The result is a pudding that is creamy, decadent, and surprisingly easy to prepare. It’s a dessert that can be made in under an hour and can be stored for days, making it the perfect treat for busy weeknights or a last‑minute dessert for guests.
Let me walk you through every single step — by the end, you'll wonder how you ever made it any other way. I’ll show you the exact measurements, the precise timing, and the subtle techniques that make this pudding not just good, but unforgettable. From the first whisk to the final garnish, every moment matters, and every detail is worth savoring. Trust me, this is hands down the best version you'll ever make at home.
What Makes This Version Stand Out
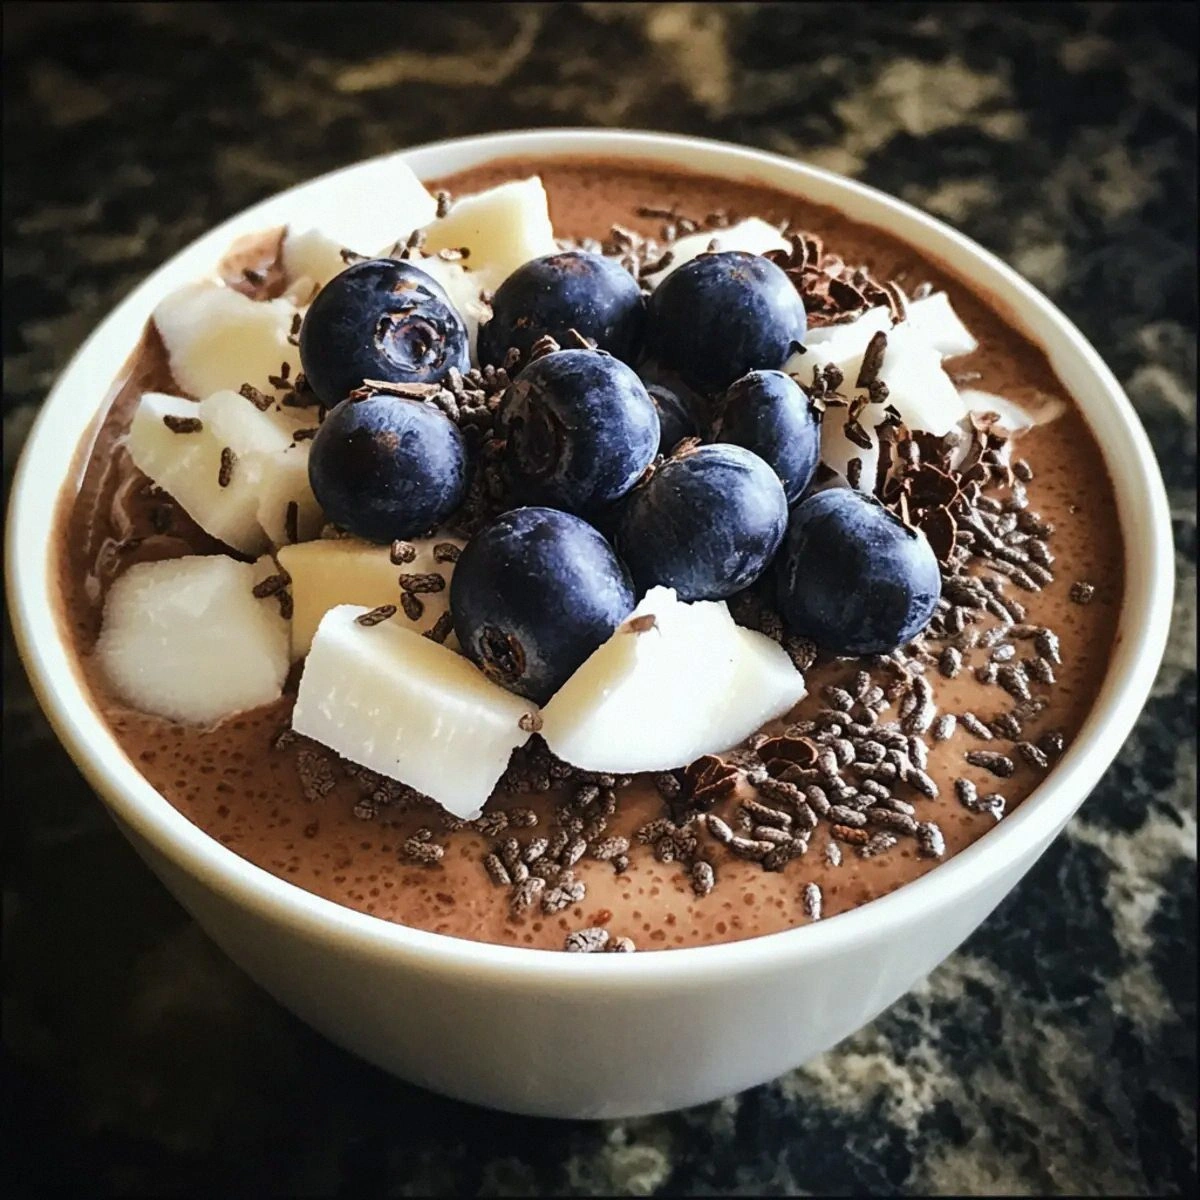
- Texture: The chia seeds swell into a silky, gel‑like consistency that holds the pudding together without becoming gummy. The result is a mouthfeel that’s both smooth and slightly nutty, like a chocolate mousse that never collapses.
- Flavor: A generous amount of unsweetened cocoa powder delivers deep chocolate flavor, while coconut milk adds a subtle tropical note that keeps the dish from tasting too heavy.
- Sweetness: Maple syrup or honey provides a natural sweetness that balances the bitterness of cocoa without overpowering the coconut undertone.
- Versatility: This pudding can be served on its own, topped with fresh berries, or used as a base for a layered parfait, making it adaptable to any occasion.
- Make‑ahead: The pudding can be prepared up to 48 hours in advance, allowing you to focus on other tasks while the flavors meld together.
- Nutrition: Packed with omega‑3 fatty acids from chia seeds, healthy fats from coconut milk, and antioxidants from cocoa, this dessert is as nourishing as it is indulgent.
- Presentation: The vibrant dark color of the pudding contrasts beautifully with the bright white of fresh berries and the golden crunch of toasted coconut, creating a dish that looks as good as it tastes.
- Time Efficiency: While the pudding sets overnight, the active prep time is just 15 minutes, making it a quick yet impressive dessert.
Inside the Ingredient List
The Flavor Base
The unsweetened cocoa powder is the backbone of this dessert. It brings depth and richness, and because it’s unsweetened, you have full control over the sweetness level. Skipping it would leave the pudding bland and unremarkable; the chocolate flavor is what makes this recipe memorable. If you’re looking for a darker, more intense chocolate experience, choose a high‑cocoa percentage (70% or higher) and reduce the maple syrup slightly.
The Texture Crew
Chia seeds are the secret weapon that turns liquid into a luscious gel. When soaked, they develop a mucilaginous coating that creates a silky mouthfeel while adding a pleasant crunch. If you’re allergic to seeds, you can substitute ground flaxseed, but the texture will be slightly different—less airy and more dense. A quick tip: let the chia seeds soak for at least 20 minutes to ensure they fully expand.
The Unexpected Star
Coconut milk brings a subtle tropical sweetness and a creamy body that balances the cocoa. Full‑fat coconut milk is essential for that rich mouthfeel; low‑fat versions will feel thin and watery. If you prefer a dairy alternative, coconut cream works well too, but it will be thicker and may require thinning with a splash of water. The coconut’s natural sweetness pairs beautifully with maple syrup, creating a harmonious flavor profile.
The Final Flourish
Shredded coconut, fresh berries, chopped nuts, and dark chocolate chips are not just toppings—they’re the finishing touches that add texture, flavor, and visual appeal. Each element contributes a contrasting element: the coconut adds chewiness, the berries bring juiciness, the nuts add crunch, and the chocolate chips provide a glossy, indulgent finish. Skipping any of these will diminish the overall experience, but you can adjust based on dietary preferences or what you have on hand.
Everything's prepped? Good. Let's get into the real action...
The Method — Step by Step
- In a medium bowl, whisk together the coconut milk, unsweetened cocoa powder, maple syrup, and vanilla extract until the mixture is smooth and the cocoa is fully dissolved. This step ensures that the chocolate flavor is evenly distributed throughout the pudding. The mixture should have a silky consistency before adding the seeds.
- Add the chia seeds to the wet mixture, stirring vigorously to prevent clumping. The seeds should be fully coated with the liquid, which helps them expand evenly. Let the mixture sit for about 5 minutes to allow the seeds to start absorbing the liquid.
- Stir again, then cover the bowl with plastic wrap or a lid and refrigerate for at least 30 minutes, or until the pudding has thickened to a custard‑like consistency. The refrigeration step is crucial; it allows the chia seeds to fully hydrate and the flavors to meld together. If you’re short on time, you can skip the chill and serve immediately, but the pudding will be thinner.
- After the initial chill, give the mixture a good stir to break up any lumps and ensure even texture. Check the consistency; it should be thick but pourable. If it’s too thick, add a splash of coconut milk or water to thin it out slightly.
- This is the moment of truth: taste a spoonful of the pudding. It should have a balanced chocolate flavor, a hint of coconut, and a sweet finish that doesn’t overwhelm. If you feel it needs more sweetness, drizzle a little extra maple syrup on top before serving.
- Divide the pudding into serving glasses or jars, reserving a portion for the topping. The portion reserved for topping will be used to create a layered effect when you add the fresh berries, nuts, and chocolate chips.
- Top each portion with a generous handful of shredded coconut, a scatter of fresh berries, a sprinkle of chopped nuts, and a drizzle of dark chocolate chips. The toppings should be distributed evenly so each bite has a balanced combination of textures.
- Refrigerate the assembled desserts for at least 30 minutes before serving to allow the toppings to set slightly and the flavors to meld. Serve chilled, and enjoy the contrast between the creamy pudding and the fresh, crunchy toppings.
That's it — you did it. But hold on, I've got a few more tricks that'll take this to another level...
Insider Tricks for Flawless Results
The Temperature Rule Nobody Follows
Chilling the pudding at a steady 4°C (39°F) is key to achieving the perfect gel. A sudden temperature drop can cause the chia seeds to contract, resulting in a gritty texture. Keep the pudding in an airtight container and avoid opening the fridge frequently during the initial 2 hours.
Why Your Nose Knows Best
Smell the pudding as it chills. A faint, toasted cocoa aroma indicates that the chocolate has fully integrated. If you notice a raw or off scent, the mixture may need a few more minutes of refrigeration or a small addition of vanilla to mask any off notes.
The 5‑Minute Rest That Changes Everything
After stirring the chia seeds into the liquid, let the mixture rest for exactly 5 minutes before covering it. This brief pause allows the seeds to start expanding, which reduces the chance of clumping and gives the pudding a smoother consistency. I’ve seen people skip this step and end up with a lumpy dessert.
The Sweetness Balance
Maple syrup is a natural sweetener that adds depth, but its flavor can be subtle. If you prefer a stronger sweetness, add a teaspoon of honey or a pinch of sea salt to enhance the chocolate’s richness. Remember, a little goes a long way.
The Topping Timing
Add the fresh berries and nuts just before serving, not before chilling. This keeps the berries from releasing too much juice and turning the pudding soggy. If you need to prep toppings ahead of time, keep them in the fridge on a paper towel to absorb excess moisture.
The Final Finish
A light dusting of cocoa powder or a drizzle of melted dark chocolate over the top can elevate the presentation. Sprinkle a few extra coconut flakes for a tropical touch. The final garnish should be both visual and flavorful.
Creative Twists and Variations
This recipe is a playground. Here are some of my favorite ways to switch things up:
Minty Matcha Madness
Replace half the cocoa powder with matcha green tea powder and add a splash of peppermint extract. The result is a vibrant green, slightly earthy pudding with a cooling mint finish. Perfect for a spring dessert.
Spiced Choco‑Coconut Delight
Stir in a pinch of cinnamon, nutmeg, and a dash of cayenne pepper. The spicy kick balances the sweetness and adds depth. This version is ideal for a cozy fall evening.
Berry‑Burst Layering
Alternate layers of pudding with layers of fresh strawberry puree and a swirl of blueberry jam. The colorful layers create a visual feast and a burst of fruity flavor with each bite.
Almond‑Infused Indulgence
Replace the shredded coconut with almond flour and add chopped toasted almonds. The nutty flavor pairs wonderfully with chocolate, creating a rich, creamy dessert that’s also gluten‑free.
Caramel‑Swirled Surprise
Fold in a swirl of homemade or store‑bought caramel sauce before chilling. The caramel adds a buttery sweetness that contrasts with the dark cocoa, giving the pudding a decadent twist.
Vegan Protein Power
Add a scoop of plant‑based protein powder (vanilla or chocolate) to the base mixture. This turns the pudding into a post‑workout treat that’s still indulgent and satisfies the sweet tooth.
Storing and Bringing It Back to Life
Fridge Storage
Store the pudding in airtight containers in the refrigerator for up to 3 days. The chia seeds will keep the pudding firm, and the flavors will deepen over time. When ready to serve, give it a quick stir to redistribute any settled topping.
Freezer Friendly
The pudding can also be frozen for up to 2 weeks. Portion it into individual servings, seal tightly, and label with the date. Thaw overnight in the fridge before serving. A quick stir will restore the silky texture.
Best Reheating Method
To warm a chilled portion, place it in a microwave‑safe bowl and heat on low for 20–30 seconds. Add a splash of coconut milk or water before microwaving to prevent it from drying out. Let it sit for a minute before topping and serving.