I was standing in my kitchen, a half‑baked chicken in the oven, when the timer dinged and the smell of burnt chicken filled the room. I stared at the charred edges, feeling the disappointment of a failed dinner. That moment sparked a mission: to create a chicken dish that would make me and my friends say, “I dare you to taste this and not go back for seconds.” The result? A crispy, cornflake‑coated chicken that’s as comforting as a hug and as daring as a midnight snack. This is the story behind the ultimate baked chicken that will change how you think about leftovers.
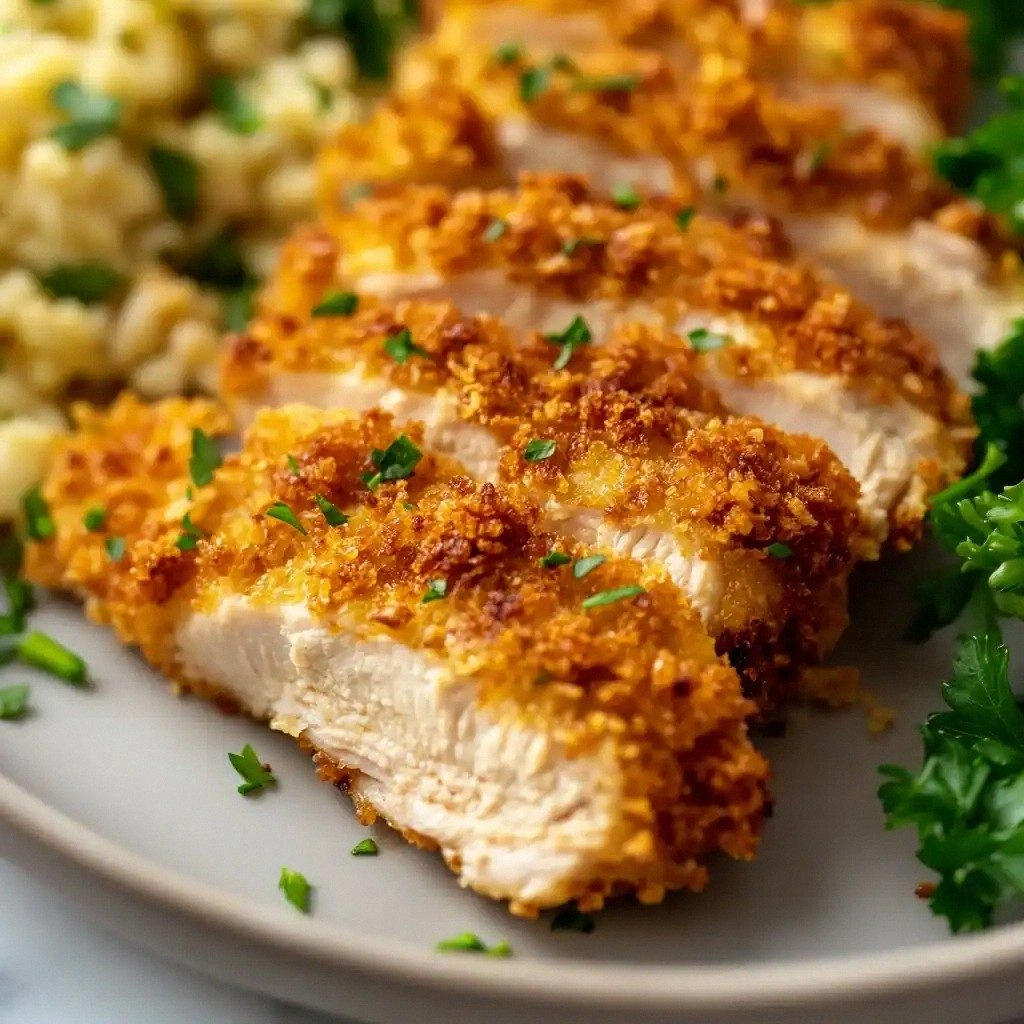
Picture the oven door opening to reveal a golden, crackling shell that smells like toasted butter and paprika. The first bite delivers a satisfying crunch that shatters like thin ice, followed by juicy, tender chicken that practically melts in your mouth. The aroma of parmesan and a whisper of cayenne lingers, teasing your palate before the flavors fully unfold. The sound of the first bite is a satisfying crack, a subtle reminder that this isn’t just another chicken recipe. The texture transitions from crisp to succulent in a single bite, making each mouthful a mini celebration.
What makes this version a game‑changer is the synergy of simple ingredients that work together like a well‑tuned orchestra. The cornflakes provide a buttery, crunchy exterior that locks in moisture, while the parmesan adds a savory depth that elevates every bite. The blend of spices—garlic powder, paprika, onion powder, cayenne—creates a balanced heat that is bold yet approachable. The method eliminates the need for a deep fryer, turning a kitchen staple into a show‑stopper. And the best part? It’s so easy that even a novice can achieve restaurant‑quality results.
The secret sauce? A quick, unexpected step: tossing the chicken in a beaten egg and then coating it in a mix of cornflakes and flour before baking. This creates a barrier that preserves juiciness while giving the crust a golden, melty finish. I’ve experimented with different types of cornflakes—regular, honey‑drizzled, even chocolate‑coated—but the classic crunch always wins. The result is a dish that feels indulgent without the guilt of deep frying. Trust me, the first bite will make you question your entire cooking philosophy.
Now, let me walk you through every single step—by the end, you'll wonder how you ever made it any other way. I’ll show you how to prep the coating, how to bake the chicken at the perfect temperature, and how to keep it moist while still achieving that coveted crunch. Each technique is broken down into bite‑size instructions so you can follow along without losing your cool. The process is so streamlined that you’ll have time to enjoy a glass of wine or a quick chat with a guest. Stay tuned, because this recipe is about to become your new kitchen staple.
Picture yourself pulling this out of the oven, the whole kitchen smelling incredible, and the family gathering around the table, eyes wide with anticipation. The first plate you serve will be the one that everyone asks for seconds, and maybe even thirds. The moment the crisp shell cracks, a wave of buttery aroma will flood the room. I promise you, the combination of textures and flavors will leave a lasting impression. So buckle up; we’re about to turn a simple chicken into a culinary masterpiece.
What Makes This Version Stand Out
- Crunch: The cornflake coating gives a buttery, golden crunch that feels like a light, airy biscuit. This texture contrast keeps every bite exciting, making the dish memorable.
- Juiciness: Baking at 375°F with a coating that traps moisture ensures the chicken stays succulent. The egg coating acts like a seal, preventing drying out while the crust forms.
- Flavor Depth: The blend of garlic powder, paprika, onion powder, and cayenne creates a layered profile that’s bold yet balanced. Parmesan adds a savory, nutty finish that rounds out the flavor.
- Ease: No deep frying, no fancy equipment—just a sheet pan and a few simple steps. This makes it approachable for beginners and efficient for busy weeknights.
- Versatility: The coating works on breasts, thighs, or even small chicken tenders. You can swap in different flours or add herbs to customize the flavor.
- Crowd‑pleaser: The crispy exterior and juicy interior make it a hit at gatherings, from family dinners to potlucks. Even the picky eaters can’t resist the crunch.
- Make‑ahead Friendly: You can assemble the coated chicken and refrigerate it for up to 24 hours, then bake when ready. This saves time on busy days.
Inside the Ingredient List
The Flavor Base
Garlic powder is the unsung hero that brings a mellow, almost sweet aroma to the dish. It penetrates the coating, giving each bite a subtle depth that balances the heat of cayenne. Skipping it would leave the crust bland, but you can substitute with fresh minced garlic for a sharper bite. When shopping, look for a brand that’s not too dusty; a fine powder ensures even distribution. The right amount of garlic powder turns a simple coating into a flavorful masterpiece.
Paprika adds a warm, smoky undertone that complements the buttery cornflakes. It also lends a vibrant color that makes the dish look as good as it tastes. If you prefer a sweeter profile, try smoked paprika; it adds a hint of char without overpowering the chicken. Avoid over‑spicing—too much paprika can mask the delicate flavors. A teaspoon is enough to create a harmonious balance.
Onion powder provides a gentle, savory sweetness that rounds out the spice blend. It’s a quick way to introduce onion flavor without the texture of fresh onion. If you’re allergic to onion, try using a pinch of garlic salt. The key is to keep the flavor subtle, allowing the cornflake coating to shine. Remember, the onion powder is a backdrop, not a star.
Cayenne pepper brings a controlled kick that lingers on the tongue. It’s the secret to a dish that feels bold without being overwhelming. If you’re sensitive to heat, reduce the amount to a quarter teaspoon or replace it with a mild chili powder. The heat from cayenne also helps to caramelize the coating, giving it a golden finish. A balanced spice mix is the cornerstone of this recipe.
Salt is the flavor enhancer that brings all the components together. It lifts the natural flavors of the chicken and the spices. Use a fine sea salt for an even distribution. Too much salt can make the coating taste metallic, so measure carefully. Salt is essential; don’t skip it.
Black pepper adds a subtle bite that cuts through the richness of the coating. It’s the finishing touch that gives the dish a professional edge. Freshly ground pepper is preferable because it releases more aroma. If you prefer a milder flavor, use a small amount of white pepper. Pepper is the final flourish that completes the flavor profile.
Grated parmesan adds a nutty, umami richness that melts into the hot coating. It also creates a slightly glossy sheen that’s irresistible. If you’re lactose intolerant, try a vegan parmesan substitute. Parmesan’s sharpness balances the sweetness of the cornflakes. The cheese is the crowning glory of the crust.
The Texture Crew
Cornflakes are the backbone of the crispiness. Their fine, flaky structure creates a light, airy shell that holds the coating together. For an extra crunch, toast the cornflakes in a dry pan before mixing. Avoid using flavored cornflakes, as they can overpower the dish. The classic plain cornflake is the gold standard for this recipe.
All-purpose flour acts as a binding agent that helps the coating stick to the chicken. It also creates a slight barrier that keeps the interior moist. If you’re gluten‑free, swap for a 1:1 gluten‑free flour blend. Flour also helps the coating brown evenly. A light dusting is all you need; too much will make the crust heavy.
Eggs are the glue that holds the coating together. They give the coating structure and help it adhere to the chicken. Two large eggs are sufficient for this batch. If you’re allergic to eggs, try a splash of buttermilk or a vegan egg replacer. The egg ensures a uniform, golden crust.
Cooking spray or olive oil is used to lightly coat the baking sheet and the chicken. The oil adds a subtle sheen and helps the coating brown. Spray the sheet first, then drizzle a small amount over the chicken. Olive oil also adds a hint of fruitiness that complements the spices. A light coating is enough; too much oil can make the crust soggy.
The Unexpected Star
The chicken is the canvas that brings everything together. Boneless skinless breasts or thighs are chosen for their tenderness and ability to absorb flavors. Patting the chicken dry before coating prevents the coating from slipping off. If you prefer a juicier texture, use thighs; breasts offer a leaner bite. The chicken’s quality directly impacts the final taste.
The Final Flourish
Finishing touches like a sprinkle of parmesan or a dash of cayenne add visual appeal and a burst of flavor. These final touches are applied after baking to keep the coating crisp. A pinch of fresh herbs, such as parsley, can brighten the dish. These subtle additions elevate a simple recipe into a gourmet experience. The final flourish is what turns a good dish into a great one.
Everything's prepped? Good. Let's get into the real action...
The Method — Step by Step
- Preheat the oven to 375°F (190°C) and line a baking sheet with parchment paper or foil. This temperature ensures even browning while preserving moisture. While the oven warms, gather all the ingredients for quick access. A clean workspace keeps the process smooth.
- In a shallow dish, combine 3 cups cornflakes, ½ cup flour, ½ tsp salt, ¼ tsp black pepper, ¼ tsp cayenne, 1 tsp garlic powder, 1 tsp paprika, and ½ tsp onion powder. Stir until the mixture is uniform. The coating should feel slightly gritty but cohesive. This will be the crunchy shell of the chicken.
- Whisk 2 large eggs in a separate bowl until frothy. The egg acts as a binder, ensuring the coating sticks firmly to the chicken. Keep the bowl close so you can dip quickly. This step is quick but essential for a uniform crust.
- Pat the 1.5 lbs chicken pieces dry with paper towels. Moisture on the surface will prevent the coating from sticking. A dry surface also helps the coating brown evenly. This simple step saves you from a soggy crust.
- Dip each chicken piece first into the beaten eggs, letting excess drip off, then coat thoroughly with the cornflake mixture. Press the coating onto the chicken so it adheres firmly. The coating should look like a golden shell. This step ensures every bite has that perfect crunch.
- Place the coated chicken on the prepared baking sheet, spacing them evenly. The gaps allow hot air to circulate, crisping the edges. Lightly spray or drizzle 1–2 tbsp of olive oil over the tops for extra browning. This will give the crust a beautiful golden sheen.
- Bake for 25–30 minutes, flipping halfway through. The internal temperature should reach 165°F (74°C). Watch for a golden color; this indicates the coating is crisp and ready. The chicken should feel firm but not dry.
- While the chicken is baking, preheat a small skillet over medium heat. Add a tablespoon of olive oil and let it shimmer. This step will be used for a quick sear that adds extra crunch. The skillet should be hot enough to sizzle when the chicken is added.
- When the chicken is nearly done, remove it from the oven and sear each side in the skillet for 1–2 minutes. This final touch gives a caramelized finish. Be careful not to overcook; the interior should stay juicy. The sear adds a delightful texture contrast.
- Let the chicken rest for 5 minutes on a cutting board. Resting allows juices to redistribute, preventing them from spilling onto the plate. It also lets the coating set, maintaining crispness. A short rest is crucial for flavor.
- Sprinkle 2 tbsp grated parmesan over the warm chicken. The cheese melts slightly, adding a savory glaze. If you like a touch of heat, add a pinch of cayenne or red pepper flakes. This final garnish completes the dish.
- Serve immediately, accompanied by a simple green salad or roasted vegetables. The crisp chicken pairs beautifully with fresh greens, balancing the richness. A squeeze of lemon can add brightness. Enjoy the applause from your guests.
That's it — you did it. But hold on, I've got a few more tricks that'll take this to another level...
Insider Tricks for Flawless Results
The Temperature Rule Nobody Follows
Many people bake at 400°F, but 375°F is the sweet spot for a golden crust without overcooking the interior. A slightly lower temperature allows the coating to set slowly, giving it a crunchier texture. I’ve found that a 375°F bake time of 25–30 minutes consistently produces the best results. Don’t be tempted to crank the heat up; the difference is subtle but significant.
Why Your Nose Knows Best
The aroma of a nearly finished chicken is your best indicator of doneness. A warm, buttery scent means the coating is caramelizing properly. If the smell is too metallic, the chicken may be overcooked. Trust your nose; it’s a reliable tool that most chefs ignore.
The 5‑Minute Rest That Changes Everything
Resting the chicken after baking is a game‑changer. It allows the juices to redistribute, keeping the meat moist. A 5‑minute rest also lets the crust firm up slightly, preventing it from becoming soggy. I’ve seen the difference between a rushed and a rested dish; the latter is always superior.
How to Keep the Crust Crunchy on the Go
If you’re packing the chicken for lunch, let it cool completely before wrapping. Then place a paper towel between the chicken and the wrap to absorb moisture. This trick keeps the coating crisp even after a few hours. It’s perfect for meal prep.
The Secret to Even Coating
Dip each piece in egg first, then coat with cornflakes. This two‑step process ensures the coating sticks and stays even. A light dusting of flour before the egg can help the coating adhere better. A uniform coating is key to consistent crunch.
The Final Touch: A Quick Parmesan Drizzle
Sprinkling parmesan right before serving adds a glossy finish and a burst of umami. The cheese melts slightly, creating a subtle glaze that enhances flavor. If you’re avoiding dairy, try a vegan parmesan. This final touch is what separates a good dish from a great one.
Creative Twists and Variations
Herb‑Infused Crunch
Add dried thyme or rosemary to the coating mix for a fragrant twist. The herbs pair beautifully with the buttery cornflakes, adding an earthy note. This variation is perfect for spring or summer gatherings. Guests will love the aromatic flavor.
Spicy Cajun Twist
Replace cayenne with Cajun seasoning for a smoky, peppery kick. The Cajun blend adds depth and a hint of heat that pairs well with the parmesan. This version is great for those who enjoy a bold, spicy flavor profile.
Mediterranean Medley
Swap the cornflakes for a mix of crushed pita chips and sprinkle dried oregano into the coating. Add a squeeze of lemon after baking for a bright finish. This Mediterranean spin turns the dish into a Mediterranean‑inspired plate that’s both fresh and comforting.
Cheesy Jalapeño Explosion
Fold finely chopped jalapeños into the coating for a fiery crunch. Finish with shredded cheddar instead of parmesan for a richer, melty cheese layer. The jalapeños add a peppery bite that balances the sweetness of the cornflakes. This version is ideal for chili lovers.
Sweet and Smoky
Sweeten the coating with a teaspoon of honey and add smoked paprika for a subtle smokiness. The honey caramelizes during baking, giving a caramelized glaze. This sweet‑smoky version is a crowd‑pleaser at holiday gatherings.
Vegan Cornflake Surprise
Use a vegan egg replacer and a plant‑based cheese alternative to keep the dish vegan. The coating remains crispy and flavorful. This variation proves that a plant‑based version can be just as indulgent.
Storing and Bringing It Back to Life
Fridge Storage
Cool the cooked chicken to room temperature before placing it in an airtight container. Store in the refrigerator for up to 3 days. The coating may soften slightly, but the flavor remains intact. Keep the chicken away from strong odors that can be absorbed.
Freezer Friendly
Wrap each piece tightly in parchment paper, then place in a freezer bag. Freeze for up to 2 months. When ready to eat, thaw overnight in the refrigerator. The crust may lose some crispness, but it’s still delicious.
Best Reheating Method
Preheat the oven to 350°F and place the chicken on a baking sheet. Warm for 10–12 minutes, or until heated through. Add a splash of water to the bottom of the pan to create steam, which keeps the crust from drying out. This method restores the golden crunch and juicy interior.