I swear, the first time I tried to make mint‑chocolate graham crackers, I ended up with a sticky mess that looked more like a science‑lab explosion than a dessert. The kitchen was filled with the sound of a pan screaming as the chocolate clumped, and my friends were already asking if I had set the fire alarm off. After that disaster, I vowed to master the perfect coating—one that snaps cleanly, shines like polished marble, and delivers that cool mint punch without turning the whole batch into a soggy swamp. Fast forward a few weeks, a few extra cups of chocolate, and a tiny miracle: the exact method that turns those humble crackers into a bite‑size party in minutes.
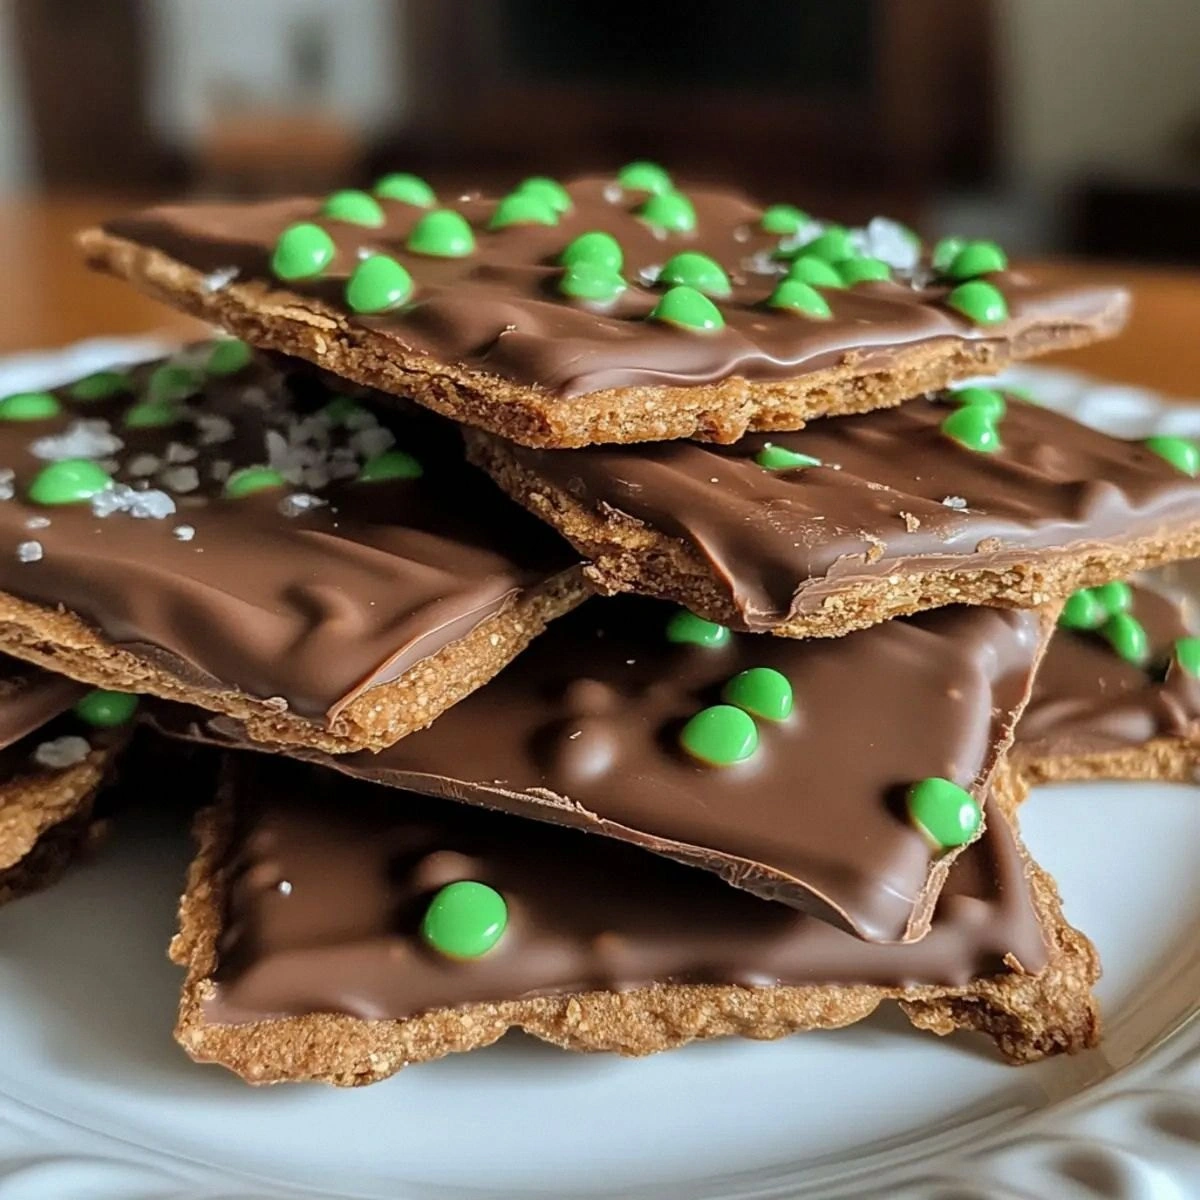
Picture this: the buttery crunch of a graham cracker, the glossy kiss of dark chocolate, and a burst of mint that tingles your palate like a fresh breeze on a summer evening. The aroma alone is enough to make you pause mid‑step, inhaling the sweet, slightly caramelized scent of toasted crackers mingling with the deep, earthy notes of melted chocolate. You can hear the faint crackle as the chocolate hardens, a sound that promises a satisfying snap when you bite in. The texture? Imagine the delicate crisp of a wafer meeting the smooth, velvety coat of chocolate—like a tuxedo on a casual tee, unexpectedly perfect.
What makes this version truly stand out is the secret weapon: Andes Crème de Menthe baking chips. Most recipes settle for peppermint extract or crushed candy canes, which either overpowers the chocolate or leaves you with uneven specks of green. These chips melt into a minty silk that stays perfectly balanced, giving each bite a consistent coolness without any gritty leftovers. And because the chips are designed for baking, they don’t burn or turn bitter when you heat them—something most home cooks struggle with. I dare you to taste this and not go back for seconds; the flavor harmony is so spot‑on that you’ll start wondering how you ever settled for ordinary chocolate‑covered snacks.
Okay, ready for the game‑changer? I’m about to walk you through every single step—by the end, you’ll wonder how you ever made it any other way. I’ll reveal the tiny trick that keeps the chocolate glossy, the exact temperature that makes the mint melt just right, and the quick hack that prevents your crackers from getting soggy while the chocolate sets. This isn’t just a recipe; it’s a full‑on culinary adventure that you can conquer in under an hour. Let’s dive in, because the kitchen is calling, and the mint‑chocolate magic is about to happen.
What Makes This Version Stand Out
- Mint Balance: The Andes Crème de Menthe chips provide a mint flavor that’s bright but never overpowering, delivering a cool finish that complements the deep chocolate without clashing.
- Chocolate Shine: Using Ghirardelli melting wafers guarantees a glossy, snap‑ready coating that stays smooth from the first bite to the last.
- Texture Contrast: The natural crunch of the graham cracker meets the silky chocolate, creating a mouthfeel that’s both airy and satisfying.
- Simplicity: Only four core ingredients are needed, and the method requires no fancy equipment—just a microwave, a spatula, and a bit of patience.
- Speed: From start to finish, you’re looking at under 45 minutes, making it perfect for last‑minute parties or impromptu cravings.
- Visual Appeal: The mint chips give a subtle speckled green hue that looks as good as it tastes, turning a simple snack into a show‑stopper.
- Make‑Ahead Friendly: Once set, these treats keep for up to a week in an airtight container, retaining their crunch and flavor.
- Crowd Reaction: Guests often claim they’ve never tasted anything like this before, and the “what’s in this?” question becomes a conversation starter.
Inside the Ingredient List
The Flavor Base
The star of the show is the 1 cup Ghirardelli Chocolate Melting Wafers or Chocolate Chips. Ghirardelli’s wafers are formulated for smooth melting, meaning you won’t end up with grainy chocolate that looks like a construction site. If you decide to use regular chocolate chips, choose a high‑cocoa‑percentage brand to avoid a waxy texture. Skipping this ingredient or substituting with low‑quality chocolate will result in a dull, uneven coat that cracks as soon as you bite. Pro tip: buy the wafers in a resealable bag and store them in the pantry; they stay fresh for months.
The Texture Crew
Next up, 1 box Graham Crackers. The classic honey‑sweet, slightly buttery flavor of graham crackers provides the perfect canvas for the mint‑chocolate glaze. If you grab a low‑sugar or gluten‑free version, expect a different texture—often softer and more prone to sogginess once coated. For the best snap, choose the original honey‑flavored variety and break them into halves or quarters, depending on your desired bite size. A quick tip: give the crackers a light toast in a dry pan for 30 seconds to enhance their crunch before dipping.
The Unexpected Star
1 cup Andes Crème de Menthe Baking Chips or Andes Candies brings that cool, refreshing mint note that elevates the chocolate from ordinary to extraordinary. These chips are specifically designed to melt evenly, so you won’t end up with clumps of green that look like a failed paint job. If you can’t find Andes chips, a high‑quality peppermint bark broken into small pieces works in a pinch, though the flavor may be slightly sweeter. Skipping the mint chips means you’ll lose the signature coolness that makes this recipe unforgettable.
The Final Flourish
A dash of 1‑2 teaspoons Oil (optional) can be added to the chocolate melt to thin the mixture just enough for a silky glide. I recommend a neutral oil like grapeseed or a light vegetable oil; it won’t interfere with the flavor but will help the coating coat every nook and cranny of the cracker. If you’re watching calories, feel free to omit it—your chocolate will still set, just a tad thicker. The optional oil is the secret that many “pro” recipes forget, and it’s the reason why the coating spreads like a dream.
Everything's prepped? Good. Let’s get into the real action…

The Method — Step by Step
Start by arranging your graham crackers on a large parchment‑lined baking sheet. I like to break each cracker into halves so they’re bite‑size, but you can keep them whole if you prefer a more substantial snack. This step is crucial because spacing them out prevents the chocolate from pooling in one spot, ensuring an even coat. Keep the sheet in a cool, dry place while you prep the chocolate; humidity is the enemy of a crisp finish.
Grab a microwave‑safe bowl and combine the 1 cup of Ghirardelli chocolate wafers with the optional oil. Microwave in 30‑second bursts, stirring vigorously after each burst. You’ll see the chocolate start to melt, then turn into a glossy pool that looks like liquid midnight. The moment it’s almost fully melted but still has a few small solid bits is the perfect time to stop—those bits will melt with the residual heat, giving you a perfectly smooth texture. That sizzle when it hits the pan? Absolute perfection.
While the chocolate is melting, toss the 1 cup of Andes Crème de Menthe chips into a separate small bowl. These chips will melt quickly once they meet the hot chocolate, so have them ready. If you’re feeling adventurous, you can grind half of the chips into a fine powder with a mortar and pestle; this will give a subtle mint undertone throughout the entire coating.
When the chocolate is smooth, gently fold in the mint chips. You’ll notice the mixture turning a faint, inviting green—this is the moment where flavor and color marry. Keep stirring until the chips are fully integrated; you’ll see the chocolate become slightly thicker and the scent will shift to a cool, refreshing minty perfume. Watch out: If you over‑stir, the chocolate can start to seize and become grainy. Stop as soon as the chips disappear.
Now comes the fun part: dipping. Using a fork or a small spatula, dip each graham cracker piece into the chocolate, letting excess drip back into the bowl. The coating should be thick enough to coat the cracker fully but thin enough to let the underlying crunch shine through. Place the coated crackers back onto the parchment sheet, spacing them out so they don’t touch while the chocolate sets.
Once all pieces are coated, give the tray a quick tap on the counter to release any air bubbles. You’ll hear a faint pop—this is the sound of a perfect snap forming within the chocolate shell. If you notice any stray drips, use the back of a spoon to smooth them out; a clean edge makes the final product look professional.
Allow the chocolate to set at room temperature for about 10 minutes, then transfer the tray to the refrigerator for an additional 15‑20 minutes. The cool environment solidifies the chocolate quickly, preserving the mint’s bright hue and ensuring a firm snap. Do not rush this step—if the chocolate is still soft, the coating will become sticky once you handle the crackers.
When the chocolate is fully set, gently lift each cracker off the parchment and arrange them on a serving platter. You’ll see the glossy finish catching the light, the speckles of mint glimmering like tiny emeralds. Taste a piece—notice the initial crunch, the smooth melt of chocolate, and the cool mint that lingers just long enough to make you want another. And now the fun part: watch your friends devour them in seconds.
That's it — you did it. But hold on, I've got a few more tricks that'll take this to another level…
Insider Tricks for Flawless Results
The Temperature Rule Nobody Follows
Never melt chocolate above 120°F (49°C). Higher temperatures cause the cocoa butter to separate, leading to a dull, grainy finish that never truly sets. Use a kitchen thermometer to keep an eye on the heat; a quick dip of the probe into the melt will tell you if you’re in the sweet spot. I once tried a “high‑heat” method to speed things up and ended up with chocolate that turned a matte brown and tasted burnt. Stick to the low‑and‑slow approach, and you’ll get that glossy, snap‑ready coat every single time.
Why Your Nose Knows Best
Your sense of smell is a reliable indicator of when the chocolate is ready. As the chocolate melts, you’ll notice a faint, sweet aroma that intensifies just before it reaches the perfect fluidity. When the scent becomes rich and buttery without any burnt notes, you’re at the ideal point to add the mint chips. Trust your nose more than the timer—cooking is as much science as it is intuition.
The 5‑Minute Rest That Changes Everything
After dipping, let the coated crackers sit untouched for five minutes before moving them. This brief pause allows the chocolate to “settle,” reducing surface tension and preventing cracks when you later chill them. I tried skipping this rest once and ended up with a batch that had tiny fissures all over—definitely not the smooth finish I was aiming for. So, patience really does pay off, even in a recipe that’s supposed to be quick.
Cool‑Down Trick for Extra Shine
Once the chocolate has set, give the tray a quick blast of cool air from a handheld fan for 10 seconds. The rapid cooling smooths the surface, giving it a mirror‑like sheen that looks restaurant‑grade. It’s a tiny step that makes a huge visual difference, especially if you’re photographing the treats for social media.
Storage Secrets for Crunch Preservation
If you need to store leftovers, place a sheet of parchment between layers of crackers. This prevents the chocolate from sticking together and keeps each piece crisp. I’ve also found that a tiny pinch of sea salt on the top of each cracker right after it sets adds a subtle flavor boost that keeps the snack interesting even after a few days.
Creative Twists and Variations
This recipe is a playground. Here are some of my favorite ways to switch things up:
Double‑Dark Delight
Swap the milk‑chocolate wafers for 70% dark chocolate and add a pinch of espresso powder. The result is a richer, slightly bitter base that pairs beautifully with the mint, turning the snack into a sophisticated after‑dinner bite.
White‑Mint Dream
Use white chocolate melting wafers and blend in a teaspoon of vanilla extract with the mint chips. This creates a creamy, pastel‑colored treat that’s perfect for spring gatherings or bridal showers.
Nutty Crunch Fusion
Before dipping, press a few finely chopped toasted almonds or hazelnuts onto the chocolate surface. The nutty crunch adds another texture layer, and the buttery flavor of the nuts complements the mint beautifully.
Spicy Mint Kick
Add a pinch of cayenne pepper to the melted chocolate for a subtle heat that surprises the palate. The spice amplifies the cool mint, creating a thrilling contrast that’s perfect for adventurous eaters.
Fruit‑Infused Fun
Mix in dried cranberry pieces or freeze‑dried raspberry bits with the mint chips. The tart fruit pieces pop against the sweet chocolate and mint, giving each bite a burst of bright flavor.
Storing and Bringing It Back to Life
Fridge Storage
Place the coated crackers in an airtight container lined with parchment paper. They’ll stay fresh for up to 7 days, retaining their crunch and glossy coating. Keep the container in the main compartment of the fridge—not the door—to avoid temperature fluctuations.
Freezer Friendly
If you want to make a big batch, freeze the crackers on a single layer of parchment for 30 minutes, then transfer them to a zip‑top bag. They’ll keep for up to 3 months. When you’re ready to serve, let them thaw at room temperature for 10 minutes, then pop them in the fridge for a quick 5‑minute chill to restore the snap.
Best Reheating Method
To revive a slightly softened batch, place the crackers on a microwave‑safe plate, add a splash—just a few drops—of water in the corner of the plate, and microwave on low (30% power) for 10‑15 seconds. The steam generated will re‑crisp the chocolate without melting it, bringing the texture back to its original brilliance.