I was standing in a kitchen that smelled like burnt sugar and regret when the phone rang. My friend dared me to make the most decadent pastel de nata in under an hour, and I was already half‑way through a disastrous batch that had turned the oven into a smoking alarm clock. The memory of that gooey, under‑cooked custard still haunts me, but it also sparked a relentless quest for perfection. I swore I would find a version that made my taste buds dance and my neighbors ask for the recipe before I even served the first bite.
Picture the kitchen: the air thick with cinnamon and citrus, the faint clink of a metal spoon against a stainless‑steel saucepan, the gentle hiss of milk heating. As the custard thickens, a caramelized crust begins to form, releasing a warm, buttery aroma that feels like a hug. The sound of the first golden edge popping in the oven is a tiny, satisfying pop of triumph. The texture of the pastry, crisp on the outside yet tender on the inside, feels like a delicate balance between crunchy and cloud. The taste, once you take that first bite, is a silky blend of vanilla, lemon zest, and a whisper of cinnamon that lingers like a secret.
What makes this version stand out is that it is the culmination of three simple yet powerful twists: a double‑layered puff pastry that locks in moisture, a custard thickened with a touch of flour to keep it silky, and a subtle lemon‑cinnamon infusion that cuts through the sweetness. It’s not just another recipe; it’s a revelation that turns an ordinary dessert into a showstopper. I dare you to taste this and not go back for seconds. If you’re skeptical, just imagine the buttery bite, the airy custard, and the final dusting of powdered sugar that melts into a sweet cloud.
And now, let’s get into the meat of it. I’ll walk you through every single step, from the first roll of pastry to the final dusting of powdered sugar. By the end, you’ll wonder how you ever made it any other way. This is hands down the best version you’ll ever make at home. Picture yourself pulling this out of the oven, the whole kitchen smelling incredible, and the moment your guests gasp in unison. Stay with me here—this is worth it.
What Makes This Version Stand Out
- Flaky Pastry: The use of a double‑layered frozen puff pastry creates a buttery, flaky base that holds the custard without becoming soggy. The extra layer also adds a subtle crunch that contrasts beautifully with the creamy filling. The result is a pastry that feels like a buttery cloud with a satisfying snap.
- Silky Custard: A splash of all‑purpose flour thickens the custard, preventing it from running when baked. This gives the filling a velvety texture that coats the tongue like velvet. It also allows the custard to set perfectly without becoming rubbery.
- Citrus‑Cinnamon Fusion: Lemon peel and a cinnamon stick infuse the milk, delivering a bright, aromatic base. The citrus cuts the sweetness, while the cinnamon adds depth and warmth. The combination feels like a warm hug in a cup.
- Effortless Assembly: The recipe requires minimal hands‑on time, making it ideal for busy evenings or last‑minute gatherings. The steps flow naturally, and the puff pastry’s pre‑frozen state saves valuable prep minutes. It’s a recipe that works even for the most kitchen‑newbies.
- Show‑stopping Finish: A light dusting of powdered sugar and a final sprinkle of ground cinnamon add visual flair and a subtle crunch. The dusting catches the light, creating a glossy, almost decadent appearance. It’s the kind of finish that makes people ask for the recipe right away.
- Make‑Ahead Friendly: Once assembled, the pastries can be stored in the refrigerator for up to 24 hours or frozen for up to a week. They reheat beautifully, maintaining their crispness and custard’s smoothness. This flexibility makes it a reliable go‑to dessert for any occasion.
Inside the Ingredient List
The Puff Pastry Base
Frozen puff pastry is the backbone of this recipe, providing a buttery, flaky foundation that cradles the custard. When thawed properly, it retains its layers and doesn’t become soggy. If you can’t find frozen pastry, fresh pastry works too, but it requires a longer chilling time to achieve the same crispness. The key to a perfect base is ensuring the pastry is completely thawed yet still slightly chilled before you roll it out.
Dusting the rolling pin with a tablespoon of flour keeps the pastry from sticking. It’s a simple trick that saves a lot of frustration during assembly. If you’re allergic to wheat, consider using a gluten‑free pastry; just adjust the flour dusting to a gluten‑free alternative. The pastry’s flavor is subtle, allowing the custard’s richness to shine through.
If you’re in a hurry, you can skip the flour dusting and use parchment paper instead. The parchment paper will keep the pastry from sticking while still giving a nice edge. However, the flour dusting gives a slightly different mouthfeel—more airy and light. The choice is yours, but the flour dusting is the more forgiving option for beginners.
When selecting your pastry, look for one that’s pre‑flavored or plain. A plain pastry lets the custard’s flavors dominate, whereas a flavored pastry can add a hint of vanilla or almond. For this recipe, plain is the safest bet, but feel free to experiment if you’re adventurous. The pastry should be crisp after baking, with golden edges that crackle as you bite.
The Sweet Cream Layer
The custard is the soul of the pastel de nata. It’s a mixture of whole milk, egg yolks, and a splash of all‑purpose flour. The flour acts as a thickening agent, giving the custard a silky, stable consistency. It also helps the custard set evenly in the oven, preventing any watery pockets.
Granulated sugar is added to sweeten the custard, but it’s balanced by the citrus zest and cinnamon. The sugar’s crystals dissolve into the milk, creating a smooth base that caramelizes slightly during baking. If you prefer a less sweet version, reduce the sugar by a quarter cup. The custard will still set beautifully and taste divine.
The milk’s richness comes from whole milk, which provides a creamy base. If you’re lactose intolerant, a full‑fat plant milk can work, though the texture may slightly differ. The key is to use a milk with at least 30% fat for the best mouthfeel. The custard should be thick enough to hold its shape but still pourable when you lift a spoon.
The lemon peel infuses a bright, citrusy aroma that cuts through the sweetness. It also adds a subtle tang that balances the richness of the milk and eggs. Peel the lemon carefully to avoid the bitter white pith. The zest should be fine and bright; if it’s too coarse, it can make the custard gritty.
The Aromatic Accents
A cinnamon stick steeps in the milk, releasing its warm, woody flavor. The stick adds depth to the custard, giving it a comforting, spiced note. After the custard has set, the cinnamon stick is removed to avoid any bitterness. If you prefer a stronger cinnamon flavor, you can add a pinch of ground cinnamon to the custard before baking.
Ground cinnamon is optional but highly recommended. A light dusting on top of each pastry after baking gives a subtle crunch and a visual pop of color. The cinnamon’s aroma lingers even after the pastry has cooled, adding a lingering warmth to the flavor profile. If you’re sensitive to cinnamon, reduce the amount or omit it entirely.
The powdered sugar dusting at the end is the final flourish. It caramelizes slightly in the oven, creating a sweet, slightly crisp shell. The sugar also adds a touch of visual elegance, giving the pastries a glossy, almost glossy appearance. The powdered sugar should be fine; a coarse sugar can ruin the texture.
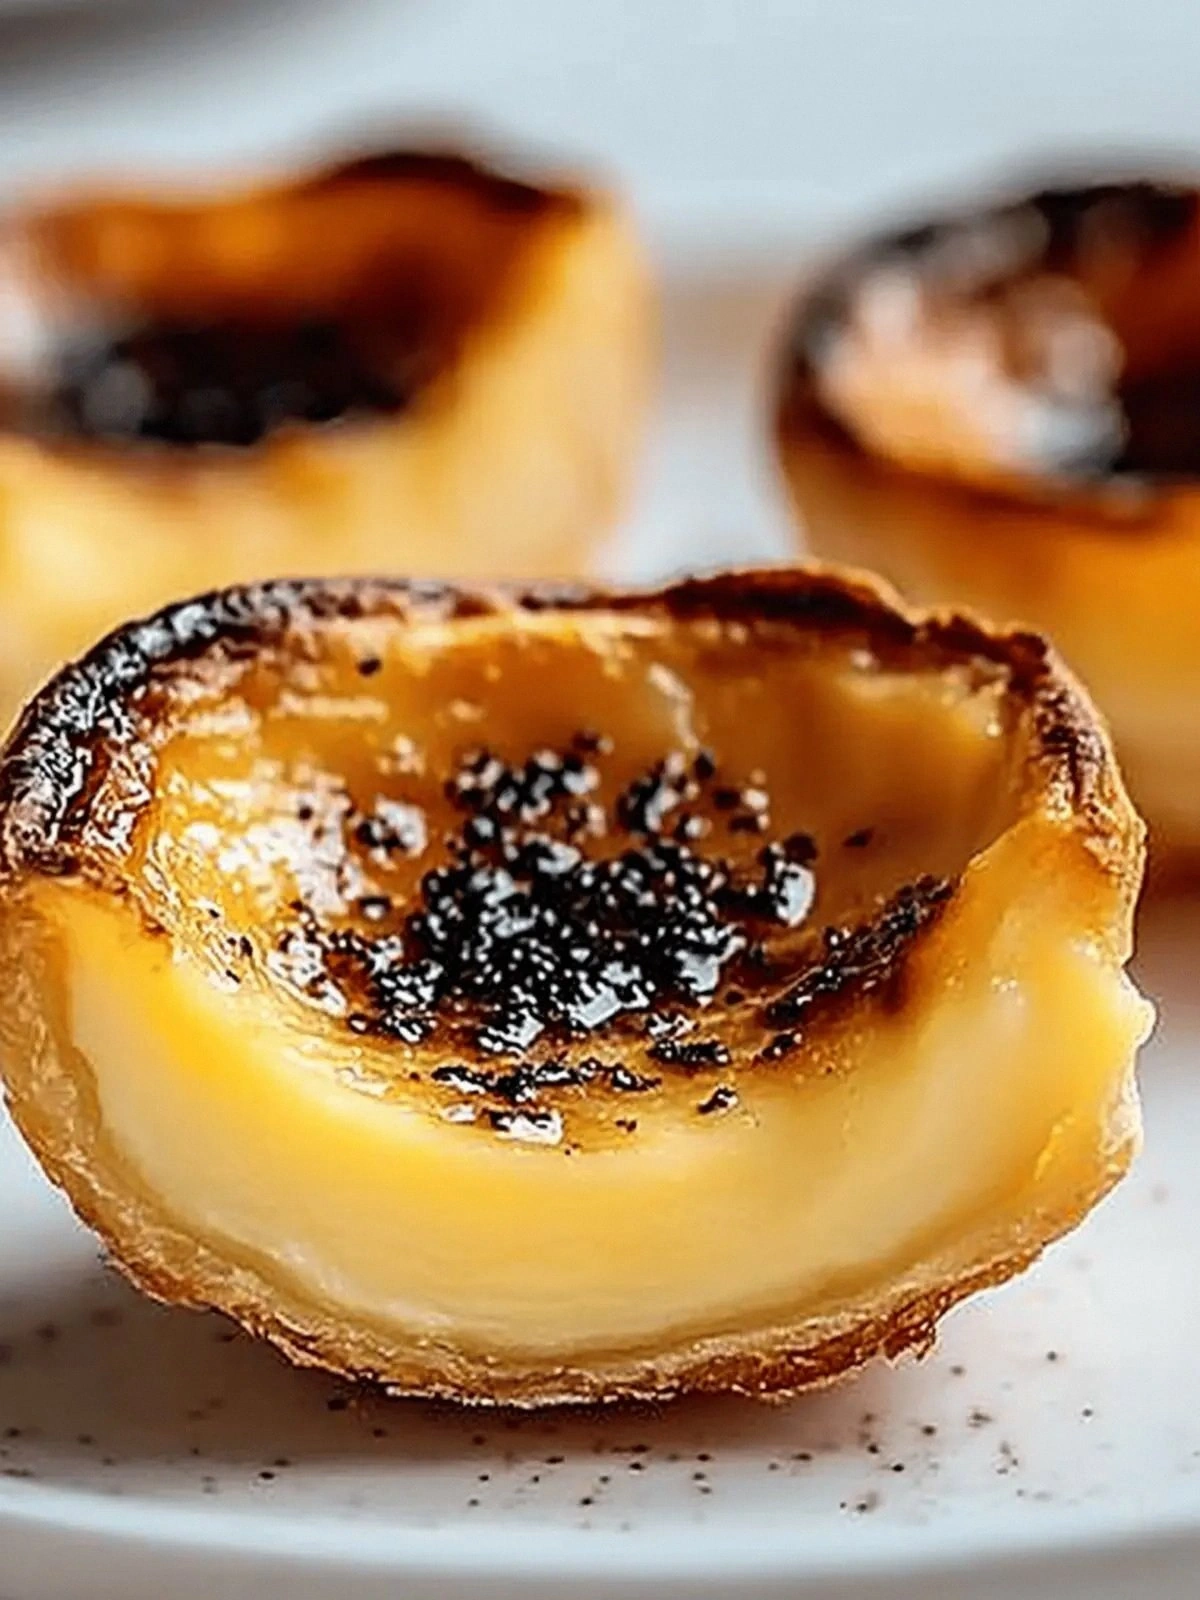
When baking, keep an eye on the edges of the pastry. They should puff up and turn golden brown without burning. The custard should look set and slightly golden on top. The final product should have a slight sheen from the powdered sugar, and the inside should be silky smooth. These visual cues help you gauge when the pastries are ready.
The Final Flourish
The dusting of powdered sugar and ground cinnamon is the finishing touch that elevates the pastry from simple to spectacular. The powdered sugar melts into a thin, sweet glaze that clings to the pastry’s surface. The cinnamon adds a subtle crunch and a hint of spice that lingers on the palate. Together, they create a harmonious balance of sweet and warm.
When serving, you can add a small drizzle of honey or a dusting of cocoa powder for a different twist. The honey adds a golden glow and a subtle floral note, while the cocoa powder gives a richer, chocolatey finish. Both options work well for guests who crave something extra indulgent. The key is to keep the final presentation clean and elegant.
If you’re planning a large gathering, consider pre‑baking the pastries and keeping them warm in a low‑heat oven. This ensures each piece arrives hot and fresh. Alternatively, you can freeze the assembled pastries and bake them straight from the freezer, which is convenient for last‑minute events. Either way, the result is a crowd‑pleasing dessert that looks as good as it tastes.
Everything’s prepped? Good. Let’s get into the real action.
The Method — Step by Step
-
1.
Begin by thawing the frozen puff pastry according to the package instructions. Let it sit at room temperature until it’s pliable but still cool. Roll the pastry out on a lightly floured surface to a thickness of about 3mm. Cut the dough into circles that fit snugly into a 9cm muffin tin or a traditional pastel de nata mold.
-
2.
Press each pastry circle into the bottom of the tin, ensuring there are no air pockets. The pastry should be snug but not over‑compressed, so it can rise during baking. Once all the cups are filled, chill them in the refrigerator for 10 minutes to set the shape and prevent the pastry from puffing too much.
-
3.
In a saucepan, combine the whole milk, a cinnamon stick, and the lemon peel. Heat gently over medium heat until the mixture is steaming but not boiling. This step infuses the milk with citrus and spice, creating a fragrant base for the custard.
-
5.
Whisk the egg yolks with the flour and sugar until the mixture is smooth and pale. Gradually pour the hot milk into the yolk mixture, whisking constantly to prevent curdling. Return the combined custard to the saucepan and cook over low heat, stirring until it thickens enough to coat the back of a spoon.
-
6.
Remove the cinnamon stick and lemon peel from the custard. Pour the thickened custard evenly into each pastry cup, filling them about three‑quarters full. The custard should look glossy and silky, with a slight sheen that promises a creamy bite.
-
7.
Preheat the oven to 220°C (428°F). Place the tin on a baking sheet and bake for 20 minutes, or until the pastry edges are golden brown and the custard has set. The tops of the custard should have a slight golden crust, indicating readiness.
-
8.
Once baked, remove the pastries from the oven and let them cool in the tin for 5 minutes. This resting period allows the custard to firm up and prevents it from cracking. After cooling, carefully lift the pastries out of the tin and place them on a wire rack to cool completely.
-
9.
Dust the cooled pastries with powdered sugar and a light sprinkle of ground cinnamon. The dusting should be even, creating a subtle contrast between the golden pastry and the white sugar. This final step adds a finishing touch that enhances both flavor and presentation.
-
10.
Serve immediately, or store in an airtight container at room temperature for up to 2 days. For best results, reheat in a 160°C oven for 5 minutes before serving to revive the crispness. Each bite should be a harmonious blend of buttery pastry, silky custard, and aromatic spices.
Insider Tricks for Flawless Results
The Temperature Rule Nobody Follows
Many bakers bake at 200°C, but raising the temperature to 220°C gives the pastry a superior golden crust and prevents the custard from over‑cooking. The higher heat also creates a slight caramelization on the custard’s surface, adding depth. Keep the oven rack in the middle to ensure even heat distribution. The result is a pastry that looks and tastes like a professional dessert.
Why Your Nose Knows Best
A good way to tell if your custard is ready is to smell it. A warm, buttery aroma that hints at caramel is the sweet spot. If it still smells raw, give it a few more minutes. The scent is a reliable indicator of doneness, more so than a timer alone.
The 5‑Minute Rest That Changes Everything
After baking, let the pastries rest in the tin for 5 minutes before removing them. This short rest allows the custard to set properly and prevents it from cracking. It also makes lifting the pastries easier, as the pastry cups have had time to cool slightly. Skipping this step can result in a messy presentation.
The Perfect Dusting Technique
Use a fine sieve to dust powdered sugar and cinnamon evenly over the pastries. This ensures a smooth, even coating without clumps. Shake the sieve lightly to avoid over‑dosing. A light dusting is key to maintaining the pastry’s delicate appearance.
The Secret of a Crispy Edge
If you want extra crispness, brush the pastry edges with a beaten egg white before baking. The egg white creates a glossy, golden edge that adds a satisfying crunch. Remember to wipe off any excess egg white to avoid a greasy feel. This trick elevates the pastry from good to unforgettable.
Creative Twists and Variations
Chocolate‑Infused Natas
Swap out half of the milk for dark chocolate‑infused milk for a rich, mocha flavor. Add a tablespoon of cocoa powder to the custard for depth. The chocolate pairs beautifully with the cinnamon, creating a layered taste profile that feels indulgent. This version is perfect for chocolate lovers who still want that classic custard base.
Berry‑Burst Pastel de Nata
Fold fresh berries into the custard before baking for a burst of fruity freshness. Blueberries, raspberries, or blackberries work well; just be sure to strain the mixture to avoid excess moisture. The berries add a pop of color and a tart contrast to the sweet custard. Serve with a drizzle of berry compote for an extra wow factor.
Spiced Rum‑Laced Delight
Add a splash of spiced rum to the milk mixture for a subtle boozy note. The rum enhances the cinnamon’s warmth and adds a complex finish. Keep the amount small—about 1 tablespoon—to avoid overpowering the custard. This variation is ideal for adult gatherings or holiday parties.
Almond‑Glazed Natas
Replace the powdered sugar dusting with almond flour and a dash of almond extract. The nutty flavor complements the pastry’s buttery base. Dust the pastries with finely ground almonds for a crunchy texture. This twist offers a nutty, aromatic alternative that’s still true to the original spirit.
Vegan Version
Use a plant‑based milk and a vegan egg replacer to create a dairy‑free custard. Substitute the puff pastry with a vegan pastry or a shortbread base. The result is a creamy, sweet treat that’s inclusive for all dietary needs. The vegan version maintains the same flavor profile with a lighter, plant‑based finish.
Miniature Natas for Party
Cut the pastry into smaller circles to create bite‑size treats. Bake them in a mini muffin tin for a fraction of the time. These miniatures are perfect for parties, offering a sweet, elegant finger food. Serve them on a platter with a small dusting of powdered sugar for a polished look.
Storing and Bringing It Back to Life
Fridge Storage
Store the cooled pastries in an airtight container at room temperature for up to 2 days. The pastry will remain crisp, and the custard will stay creamy. If you notice the pastry softening, place a paper towel in the container to absorb excess moisture. This method is ideal for quick snack or dessert options.
Freezer Friendly
For longer storage, keep the pastries in a freezer bag and freeze for up to 1 week. To reheat, place them on a baking sheet and bake at 160°C for 5 minutes. The heat revives the crispness while keeping the custard silky. Freezing is a great option for busy days or when you want to batch‑cook.
Best Reheating Method
The best way to bring the pastries back to life is to preheat the oven to 160°C and bake for 5 minutes. Add a splash of water to the bottom of the pan to create steam, which prevents the custard from drying out. Let them cool for a minute before serving; this final step preserves the pastry’s crunch and the custard’s silky texture.