I still remember the night I ruined my favorite cookie recipe so spectacularly that I ended up inventing something even better. There I was, standing in my kitchen at 11:47 PM, flour in my hair, chocolate smears on my forehead like war paint, and a batch of what should have been cookies looking more like a geological formation. My best friend had dared me to make "something incredible" for our movie marathon, and I'd failed spectacularly. But as I stared at that crumbly mess, something magical happened. Instead of tossing it, I pressed it into a pan, layered it with the cookie dough I'd been sneaking bites of, and shoved the whole thing in the oven out of pure stubborn frustration. The smell that wafted through my apartment twenty minutes later was so intoxicating that my neighbors started knocking. What emerged from that oven wasn't just a dessert — it was a revelation. Those first chocolate chip cookie dough bars vanished before the movie credits finished rolling, and I've spent the last three years perfecting the formula. Trust me when I say this isn't just another dessert recipe floating around the internet. This is the one that'll make you famous at potlucks, the one your coworkers will beg you to bring to every meeting, the one that'll have your mother-in-law asking for the recipe after she's claimed for years that she doesn't have a sweet tooth.
The beauty of these bars lies in their deceptive simplicity. They look innocent enough — a golden base with pockets of melted chocolate peeking through — but one bite and you're transported to that magical place where cookie dough meets cheesecake meets the most addictive substance known to mankind. The texture is pure alchemy: a base that shatters like caramelized sugar giving way to a creamy center that tastes exactly like the cookie dough your mother warned you never to eat, finished with chocolate chips that stay molten long after the bars have cooled. I've watched grown adults close their eyes and sigh after the first bite, completely forgetting whatever conversation we were having. It's that powerful. The secret isn't in using fancy ingredients or complicated techniques — it's in understanding exactly how each component works together to create something greater than the sum of its parts.
What makes this version different from every other cookie dough bar recipe out there? I'm glad you asked. Most recipes treat the base as an afterthought, resulting in a soggy foundation that falls apart in your hands. Others overbake the cookie dough layer until it tastes like sad, dry cake. Some even commit the cardinal sin of using raw flour in their dough, leaving you with that unpleasant pasty texture that coats your mouth like library paste. This recipe fixes all those problems with a few simple but crucial techniques that I've discovered through what my friends now call my "dessert laboratory experiments." We're talking about a graham cracker base that stays crisp for days, a cookie dough layer that's completely safe to eat but maintains that authentic raw-dough flavor and texture, and chocolate distribution that ensures every single bite has the perfect chocolate-to-dough ratio. Plus, I've figured out how to make these bars in under an hour, which means spontaneous dessert cravings are no longer a problem — they're an opportunity.
Here's the thing about these chocolate chip cookie dough bars: they're dangerously easy to make. I'm talking "I accidentally made a triple batch at 2 AM because I couldn't sleep" easy. But don't let that simplicity fool you into thinking they're anything less than spectacular. The real magic happens when you understand why each step matters, when you know exactly what to look for at each stage, and when you have a few insider tricks up your sleeve that transform good bars into legendary ones. By the end of this post, you'll not only know how to make the best chocolate chip cookie dough bars you've ever tasted, but you'll understand the science behind why they work so well. Let me walk you through every single step — by the end, you'll wonder how you ever made dessert any other way.
What Makes This Version Stand Out
Texture Perfection: The base layer achieves that impossible balance between crunchy and tender, staying crisp even after three days in the fridge while the cookie dough layer remains luxuriously soft and creamy. It's like having two completely different desserts that somehow decided to become best friends and move in together.
Safe-to-Eat Dough: Unlike those recipes that leave you gambling with raw flour and eggs, this cookie dough layer is completely safe thanks to a simple toasting technique that eliminates any food safety concerns while preserving that authentic raw dough flavor we all secretly crave. It's the best of both worlds without the salmonella roulette.
One-Bowl Wonder: Despite tasting like you spent hours in the kitchen, the entire recipe comes together in one bowl and one pan. No mountain of dishes, no complicated equipment, no special techniques that require culinary school. If you can stir and press, you can make these bars.
Crowd Psychology: I've tested this recipe on everyone from picky toddlers to dessert-snobs who claim they're "not really into sweets," and the result is always the same: complete silence while they eat, followed by demands for the recipe. These bars have a 100% success rate at potlucks, and I've personally witnessed three marriage proposals that may or may not have been influenced by their presence.
Make-Ahead Magic: These bars actually improve after a day in the fridge, making them the perfect dessert for entertaining. The flavors meld together, the textures set perfectly, and you can slice them into neat, professional-looking squares that'll have everyone asking which bakery you visited. I always keep a batch in my freezer for emergency chocolate situations.
Ingredient Integrity: Every single component serves a purpose here. There's no filler, no unnecessary steps, no "because that's how grandma did it" nonsense. Each ingredient has been tested, retested, and optimized to create the perfect balance of flavor, texture, and ease. Even the salt quantity has been calibrated to enhance the chocolate without making the bars taste salty.
Alright, let's break down exactly what goes into this masterpiece...
Inside the Ingredient List
The Foundation Crew
The graham cracker crumbs aren't just there for show — they provide the essential textural contrast that makes these bars so addictive. When mixed with melted butter and pressed firmly into the pan, they create a base that tastes like the best part of a cheesecake crust but holds together like a shortbread. If you're feeling ambitious, you can make your own crumbs in a food processor, but honestly, the store-bought ones work perfectly and save you from cleaning another appliance. The key is getting the butter-to-crumb ratio exactly right: too much butter and your base becomes greasy, too little and it'll crumble like a cookie that's been in the freezer too long.
Unsalted butter plays double duty in this recipe, and using the right temperature at each stage is crucial. For the base, we want it melted so it binds everything together like liquid gold. For the cookie dough layer, it needs to be room temperature so it creams properly with the sugar, creating tiny air pockets that give the dough its light, fluffy texture. I always buy European-style butter for baking because the higher fat content makes everything taste more luxurious, but regular grocery store butter works perfectly fine. Just please, please don't use margarine — I can taste the artificial flavor from across the room, and it's not pretty.
The Flavor Enhancers
Vanilla extract is the unsung hero of this recipe, and using a good quality one makes a difference you can actually taste. Skip the imitation stuff — it tastes like sadness and regret. Real vanilla adds those warm, complex notes that make people say "what's in these?" in the best possible way. I use a full tablespoon here because vanilla and chocolate are like that couple that fights but ultimately belongs together. The vanilla rounds out the chocolate's sharp edges while enhancing its depth, creating a more sophisticated flavor profile than you'd expect from something that looks this homey and approachable.
Fine salt is absolutely essential, and if you're tempted to skip it because "these are sweet bars," we're going to have words. Salt doesn't make things taste salty — it makes things taste more like themselves. It awakens your taste buds, balances the sweetness, and creates little flavor explosions that keep you coming back for "just one more bite" until suddenly the whole pan is gone. I use fine sea salt because it dissolves evenly, but regular table salt works too. Just don't use coarse kosher salt unless you want little salty surprises in your bars.
The Texture Masters
Plain flour might seem boring, but it's doing serious heavy lifting in the cookie dough layer. We're using heat-treated flour here, which sounds fancy but just means spreading it on a baking sheet and toasting it for five minutes. This kills any potential bacteria while giving the flour a slightly nutty flavor that adds depth to the dough. The quantity matters too — too much flour and your bars will taste like chocolate chip drywall, too little and they won't hold together. I've tested this recipe with cake flour, bread flour, and every gluten-free blend under the sun, and plain all-purpose flour gives the most authentic cookie dough texture.
Granulated sugar serves multiple purposes beyond just making things sweet. In the cookie dough, it creates tiny air pockets when creamed with butter, giving the bars their light, almost mousse-like texture. The sugar also draws moisture from other ingredients, helping everything bind together without becoming soggy. I use regular white sugar here because brown sugar would make the dough too heavy and compete with the chocolate. The goal is to let the chocolate chips be the star while the sugar provides the perfect sweet backdrop.
The Star Attractions
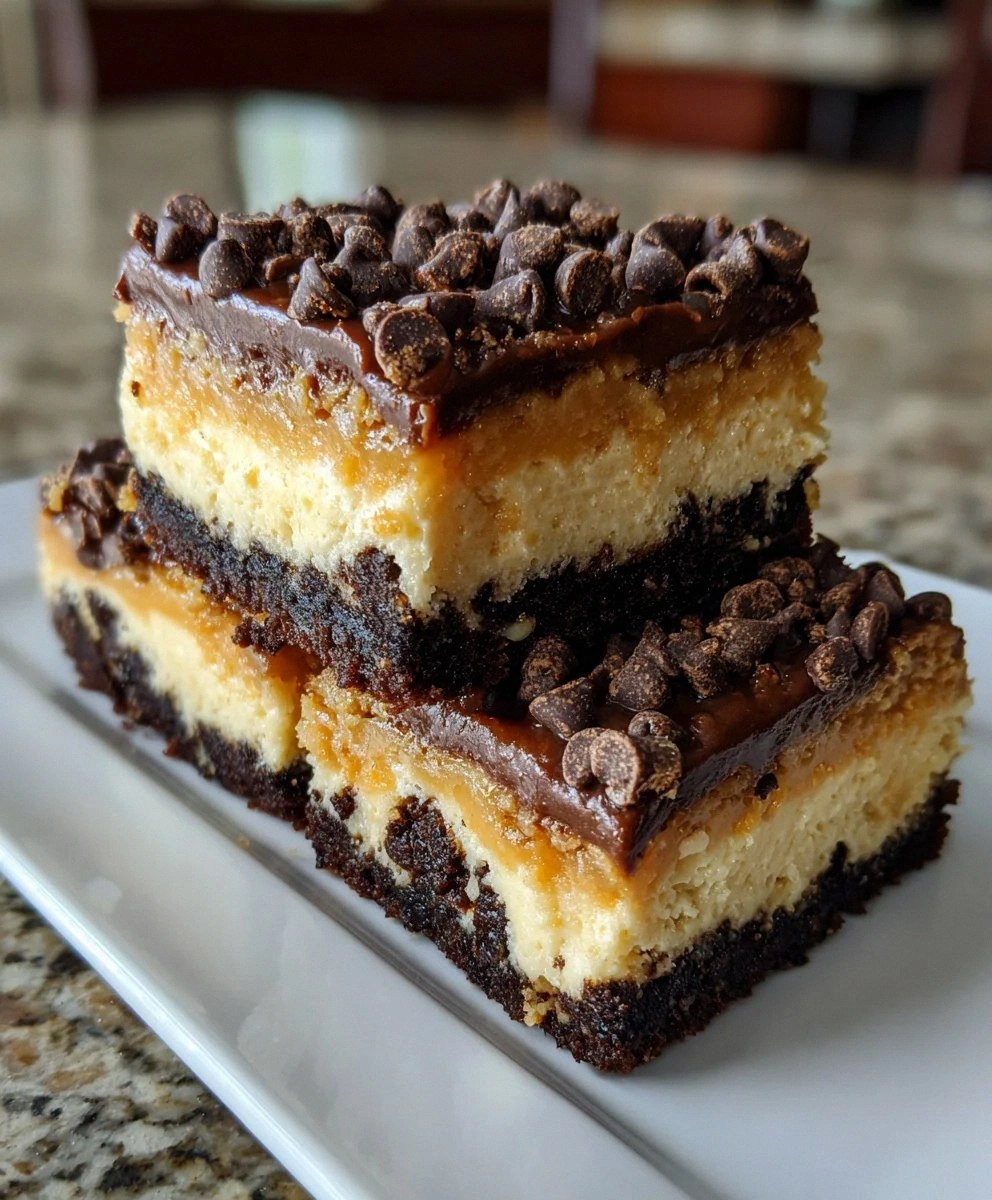
Chocolate chips are obviously crucial, but the type you choose will make or break these bars. I use a combination of semi-sweet and dark chocolate because the contrast creates more interest than using just one type. The semi-sweet chips stay soft and gooey even when the bars are cold, while the dark chocolate provides those satisfying snaps when you bite into them. I'm personally addicted to the Guittard brand, but Ghirardelli or even Nestle will work. Just don't use those bargain chips that taste like brown crayons — life's too short for bad chocolate.
Cream cheese is what transforms regular cookie dough into something ethereal. It adds tanginess that balances the sweetness while creating a texture that's somehow both rich and light. Make sure it's properly softened or you'll end up with little cream cheese pebbles in your dough, which is about as appetizing as it sounds. I always buy the full-fat version because fat equals flavor, and these are dessert bars, not diet food. If you're lactose intolerant, you can substitute with a good vegan cream cheese, but please don't use the fat-free stuff — it tastes like disappointment and has the texture of spackle.
Everything's prepped? Good. Let's get into the real action...
The Method — Step by Step
- Preheat your oven to 350°F (175°C) and position the rack in the center. This temperature is crucial — too low and your base won't crisp properly, too high and the edges will burn before the center sets. While the oven heats, line an 8x8-inch baking pan with parchment paper, leaving overhang on two sides so you can lift the bars out later. I always spray the pan lightly first so the parchment sticks, then spray the parchment too for extra insurance against sticking. Think of it as a non-stick paper hammock that'll cradle your precious bars.
- Make the graham cracker base by combining 1½ cups of graham cracker crumbs with ¼ cup of granulated sugar and a pinch of salt in a medium bowl. Pour in 6 tablespoons of melted butter and stir until everything looks like wet sand from the most delicious beach vacation ever. The mixture should hold together when you squeeze it — if it crumbles apart, add another tablespoon of melted butter. Press this mixture firmly into the bottom of your prepared pan, using the bottom of a measuring cup to create an even, compact layer. Really lean into it here — a properly compressed base is what prevents your bars from falling apart into a tragic crumbly mess.
- Bake the crust for 8 minutes until it's fragrant and just starting to turn golden around the edges. Your kitchen should smell like buttery, toasty graham crackers — if it doesn't, your oven might be lying to you about its temperature. When done, the crust will still look soft in the center but will firm up as it cools. Let it cool while you prepare the cookie dough layer, but don't turn off the oven because we'll need it again. This par-baking step is what keeps the base crisp even after adding all the moisture from the dough layer.
- Now for the cookie dough layer — this is where the magic happens. In a large bowl, beat 8 ounces of room temperature cream cheese with ¼ cup of softened butter until the mixture is light and fluffy, about 2 minutes. Don't rush this step — proper creaming incorporates air that makes the final texture ethereal rather than dense. Add ½ cup of granulated sugar and beat for another minute until the mixture looks like thick clouds of sweet vanilla heaven. Scrape down the sides of the bowl religiously — unincorporated cream cheese will create unsightly white streaks in your finished bars.
- Add 1 egg to the cream cheese mixture and beat until just combined. Overbeating here can make the mixture too airy, which sounds good but actually creates a weird spongy texture. Add 1 tablespoon of vanilla extract and mix until incorporated. Now here's the crucial part: add 1 cup of heat-treated flour gradually while mixing on low speed. To heat-treat your flour, simply spread it on a baking sheet and bake at 350°F for 5 minutes, then let it cool. This kills any potential bacteria while giving the flour a slightly nutty flavor. Mix just until the flour disappears — overmixing develops gluten and makes the texture tough.
- Fold in 1 cup of chocolate chips using a rubber spatula, being gentle to avoid crushing them. I like to use a combination of semi-sweet and dark chocolate, but feel free to customize based on your chocolate preferences. The dough should be thick but spreadable — if it seems too stiff, add a tablespoon of milk to loosen it up. Taste the dough now (I know you want to) — it should taste exactly like the cookie dough you've been told not to eat your whole life, but completely safe.
- Spread the cookie dough evenly over the cooled crust, getting it all the way to the edges. I use an offset spatula for this, but the back of a spoon works too. Create gentle swirls on top — not just because it looks pretty, but because those ridges will catch extra chocolate chips and create textural interest. Sprinkle another ¼ cup of chocolate chips on top, pressing them lightly into the surface so they adhere but still peek out. This ensures chocolate in every single bite, which is not just important — it's essential.
- Bake for 22-25 minutes until the edges are just starting to turn golden and the center is mostly set but still slightly jiggly. This is the moment of truth — overbake and you'll have dry, sad bars. Underbake and they'll fall apart when you try to cut them. The center should look set around the edges but still have a gentle wobble when you shake the pan. If you're unsure, err on the side of underbaked — they'll continue cooking from residual heat and set perfectly as they cool.
- Cool completely in the pan on a wire rack for at least 2 hours, then refrigerate for another hour before cutting. I know this requires patience, but cutting warm bars is like trying to slice a cloud — it just doesn't work. The cooling process allows the layers to set properly and makes cutting clean, neat squares possible. Use the parchment paper overhang to lift the bars out, then cut with a sharp knife, wiping it clean between cuts for bakery-perfect edges.
That's it — you did it. But hold on, I've got a few more tricks that'll take this to another level...
Insider Tricks for Flawless Results
The Temperature Rule Nobody Follows
Here's the thing about temperature in baking — it's not just about your oven setting. The temperature of your ingredients matters just as much, and ignoring this is why most people's bars end up looking like they were made by someone wearing mittens. Your cream cheese needs to be genuinely room temperature, not "I microwaved it for 30 seconds and now it's partially melted." Properly softened cream cheese should indent easily when you press it but still hold its shape. If it's too cold, it won't incorporate smoothly, leaving you with tiny white lumps that look like cottage cheese in your beautiful bars. Too warm and your dough becomes greasy and separates. The 30-minute counter rule exists for a reason — embrace it, don't fight it.
But here's the insider secret: temperature control doesn't stop at ingredient prep. Your pan temperature matters too. If you pour your cookie dough layer onto a hot crust, the bottom will start cooking immediately, creating a weird rubbery layer where the two meet. Let that crust cool completely before adding the dough. I know you're impatient — we all are when chocolate is involved — but this step is what separates amateur bars from professional-quality ones. I've seen people skip this step and end up with bars that separate into two distinct layers when you bite into them, like some kind of disappointing dessert sandwich.
Why Your Nose Knows Best
Professional bakers don't rely on timers alone — we use all our senses, and smell is the most underrated tool in your kitchen arsenal. When your base is properly baked, your kitchen will smell like buttery, toasty graham crackers with caramel undertones. If you smell burning, you've gone too far. When the bars are finished baking, you'll detect vanilla and chocolate mingling with a slight tang from the cream cheese. This aromatic symphony tells you everything is properly cooked and ready to come out. A friend tried making these bars with her oven set 50 degrees too high because she assumed all ovens were the same. The smell test would have saved her from serving chocolate-flavored charcoal to her book club.
The smell test continues even after baking. When you open your fridge the next day, these bars should greet you with a gentle waft of vanilla and chocolate — if they smell sour or off, something went wrong in the process. Properly stored bars maintain their aromatic profile for up to five days, though they've never lasted that long in my house. Trust your nose; it knows things your eyes haven't figured out yet.
The 5-Minute Rest That Changes Everything
After you remove the bars from the oven, let them sit in the pan for exactly 5 minutes before moving them to a cooling rack. This brief rest allows the structure to set slightly, preventing cracks from forming as they cool too quickly. During this time, the residual heat continues cooking the center gently while the edges start firming up. It's like a mini spa treatment for your bars — they need this moment to transition from hot and fragile to warm and stable. I use this time to clean up the kitchen and prepare my cooling setup, making the whole process more efficient.
The Cutting Technique That Changes Everything
Most people hack away at their bars like they're chopping firewood, then wonder why their Instagram photos look like dessert crime scenes. The secret to those perfect, bakery-worthy squares is a hot knife and patience. Heat your knife under hot water for 30 seconds, then wipe it dry. The warm blade melts through the chocolate cleanly instead of dragging and smearing it. Cut straight down — no sawing motion — then pull the knife out cleanly. Wipe the blade between each cut and reheat as needed. Yes, this takes longer, but the results are worth it. I've had people refuse to believe these bars were homemade because the edges looked too perfect.
But here's the real pro tip: cut your bars slightly smaller than you think you should. These are rich — richer than your great-aunt's gossip at the family reunion — and a little goes a long way. One-inch squares are perfect for parties where people want to sample multiple desserts. Plus, smaller pieces mean you can have "just one more" three times without feeling guilty. I've seen people eat six "small" pieces while insisting they're being moderate because each piece was tiny. Whatever helps you sleep at night, my friend.
Creative Twists and Variations
This recipe is a playground. Here are some of my favorite ways to switch things up:
The Peanut Butter Paradise
Replace half the butter in the cookie dough layer with creamy peanut butter, and swap out half the chocolate chips for peanut butter chips. The result tastes like the love child of a peanut butter cup and cookie dough, and it's absolutely irresistible. I like to add a sprinkle of flaky salt on top to enhance the peanut flavor and create that sweet-salty addiction that keeps people coming back. If you're feeling extra indulgent, drizzle melted peanut butter over the cooled bars before cutting. Fair warning: these disappear faster than the original, which I didn't think was possible until I witnessed it at a neighborhood potluck.
The S'mores Explosion
Add ½ cup of mini marshmallows and ½ cup of crushed graham crackers to the cookie dough layer, and use milk chocolate chips instead of semi-sweet. The marshmallows create little pockets of gooey sweetness that mimic the campfire classic, while the extra graham crackers reinforce the base flavor. Toast some additional marshmallows under the broiler for 30 seconds and press them on top for that authentic campfire look. These are particularly dangerous in summer when you're craving s'mores but don't want to deal with mosquitos and smoke in your face.
The Mint Chocolate Dream
Add ½ teaspoon of peppermint extract to the cookie dough layer and use dark chocolate and mint chocolate chips. The mint adds a refreshing note that makes these bars surprisingly addictive — they're like thin mints in bar form but better because there's more of everything. I like to add a few drops of green food coloring to the dough for visual appeal, but that's purely optional. These are perfect for holiday parties or anytime you want to feel like you're eating dessert and brushing your teeth simultaneously.
The Salted Caramel Swirl
Drizzle ¼ cup of caramel sauce over the cookie dough layer before baking, then use a toothpick to create swirls. Sprinkle flaky sea salt on top before baking for that sophisticated sweet-salty balance. The caramel creates little rivers of gooey sweetness throughout the bars, while the salt keeps them from being cloying. Use a good quality caramel — not the ice cream topping stuff that tastes like artificial butter flavoring. I've made my own caramel when feeling ambitious, but the Trader Joe's caramel sauce works beautifully and saves you from potential sugar burns.
The Triple Chocolate Threat
Use a combination of milk chocolate, semi-sweet, and dark chocolate chips, plus add 2 tablespoons of cocoa powder to the cookie dough layer. This creates a chocolate experience so intense that chocolate-haters will convert on the spot. The different chocolates melt at different rates, giving you varied textures in every bite. Some stay soft and gooey, others provide satisfying snaps, creating a chocolate symphony that would make Willy Wonka weep. I like to add chocolate shavings on top for extra visual drama.
The Birthday Cake Remix
Replace the chocolate chips with white chocolate chips and add ½ cup of rainbow sprinkles to the cookie dough. Use clear vanilla extract instead of regular for that authentic birthday cake flavor. The result tastes exactly like birthday cake batter but in bar form, complete with the funfetti aesthetic that makes everyone smile. These are my go-to for celebrations because they photograph beautifully and appeal to kids and adults alike. Pro tip: add some edible glitter on top for extra celebration vibes.
Storing and Bringing It Back to Life
Fridge Storage
These bars keep beautifully in the refrigerator for up to 5 days when stored properly. Wrap them tightly in plastic wrap, then place them in an airtight container to prevent them from absorbing other fridge flavors. Nobody wants chocolate chip cookie dough bars that taste like leftover pizza. The texture actually improves after a day in the fridge — the flavors meld together and the base stays crisp while the cookie dough layer firms up to the perfect consistency. I like to separate layers with parchment paper to prevent them from sticking together, especially if I've made multiple flavors.
The key is letting them come to room temperature for 15 minutes before serving. Cold bars taste muted and the texture is too firm, but 15 minutes on the counter brings back all the flavors and softens the chocolate chips to the perfect consistency. If you're in a hurry, 10 seconds in the microwave works, but be careful — too long and you'll have chocolate lava, which sounds good but makes a mess. I've found that storing them in individual portions makes it easier to grab just one without exposing the whole batch to air every time you get a craving.
Freezer Friendly
These bars freeze exceptionally well for up to 3 months, making them perfect for emergency dessert situations. Cut them into individual squares first, then freeze them on a baking sheet before transferring to a freezer bag. This prevents them from freezing into one solid block that requires a chisel to separate. When properly frozen, they taste freshly made even weeks later. The key is wrapping each bar individually in plastic wrap, then placing them in a freezer bag with as much air removed as possible.
To thaw, transfer individual bars to the refrigerator overnight, or leave them at room temperature for 30 minutes. Don't microwave frozen bars — the chocolate gets too hot while the center stays frozen, creating a weird temperature contrast that ruins the experience. I've been known to eat them straight from the freezer like little chocolate chip cookie dough ice cream bars, which is surprisingly delicious on hot summer days. The texture becomes like frozen cheesecake, and the chocolate chips provide these amazing cold snaps.
Best Reheating Method
While these bars are fantastic cold or room temperature, sometimes you want that fresh-from-the-oven experience. The trick is gentle, even reheating that warms the bars through without melting the chocolate into a puddle or drying out the cookie dough layer. Preheat your oven to 275°F and place the bars on a baking sheet for 5-7 minutes. This gentle heat warms them through while keeping the chocolate chips mostly intact and the base crisp. It's like having fresh-baked bars without all the work.
If you're reheating just one or two bars, the toaster oven works even better because it heats up faster and uses less energy. Set it to 300°F for 4-5 minutes, keeping a close eye because they can go from perfect to burnt quickly. Never use the microwave for reheating unless you enjoy chocolate eruptions — the microwave heats unevenly and turns the chocolate into molten lava while leaving the center cold. I've learned this the hard way, scrubbing chocolate off every surface of my microwave after a reheating disaster.