Picture this: the kitchen is a battlefield, the stove is a volcano, and the timer is your only ally. I was halfway through a pot of soup that had turned into a soggy mess, the broth had lost its depth, and the carrots were still crunching like they’d never met a knife. My friend dared me to whip up something that would make the whole apartment smell like a cozy cabin. I took that dare, grabbed my trusty skillet, and the next thing I knew I was cooking a bowl that would make you say, “I dare you to taste this and not go back for seconds.”
That sizzle when the beef hits the pan? It’s a soundtrack of caramelization that sends a warm, savory wave through the air. The aroma of browned meat mingles with the earthy scent of fresh thyme, and the first splash of broth feels like a promise of comfort. Every stir is a small triumph over the chaos of the kitchen, turning raw ingredients into a symphony of flavors. I’ve never felt so proud of a pot of soup. This isn’t just a dish; it’s a declaration that comfort food can be both simple and spectacular.
Why does this version stand out from every other recipe out there? Because it balances the rustic charm of a traditional stew with a modern twist that elevates texture and depth. The barley doesn’t just bulk up the soup; it brings a nutty chew that plays against the tender beef. The fresh parsley isn’t just a garnish; it’s a burst of green that lifts the heaviness of the broth. The secret? A slow, low simmer that coax the flavors out like a good conversation. The result is a bowl that feels like a hug in a mug.
And there’s a technique you won’t expect. I’ll reveal a trick that turns ordinary beef chuck into melt‑in‑your‑mouth tenderness without a slow cooker. It’s a simple step that takes a fraction of the time but delivers a depth of flavor that could rival any slow‑cooked masterpiece. Most people skip this step, thinking the beef will get tender enough on its own. Trust me, that’s a common mistake that ruins the whole experience.
Picture yourself pulling this out of the pot, the whole kitchen smelling incredible, and your friends gathering around the table. The steam curls like wisps of magic, and the first spoonful melts your worries away. I promise you, by the end of this guide, you’ll wonder how you ever made it any other way. Let me walk you through every single step — by the end, you’ll wonder how you ever made it any other way.
Let’s dive in and turn your kitchen into a comforting sanctuary. I’ve spent hours tweaking this recipe, testing every tweak, and gathering the most honest feedback from friends who’ve tried it. I’ve also included micro‑challenges to keep you engaged and a few kitchen hacks to save you time and effort. If you’ve ever struggled with a soup that feels too watery or too dry, you’re not alone — and I’ve got the fix. This is hands down the best version you’ll ever make at home. Now, let’s get started.
What Makes This Version Stand Out
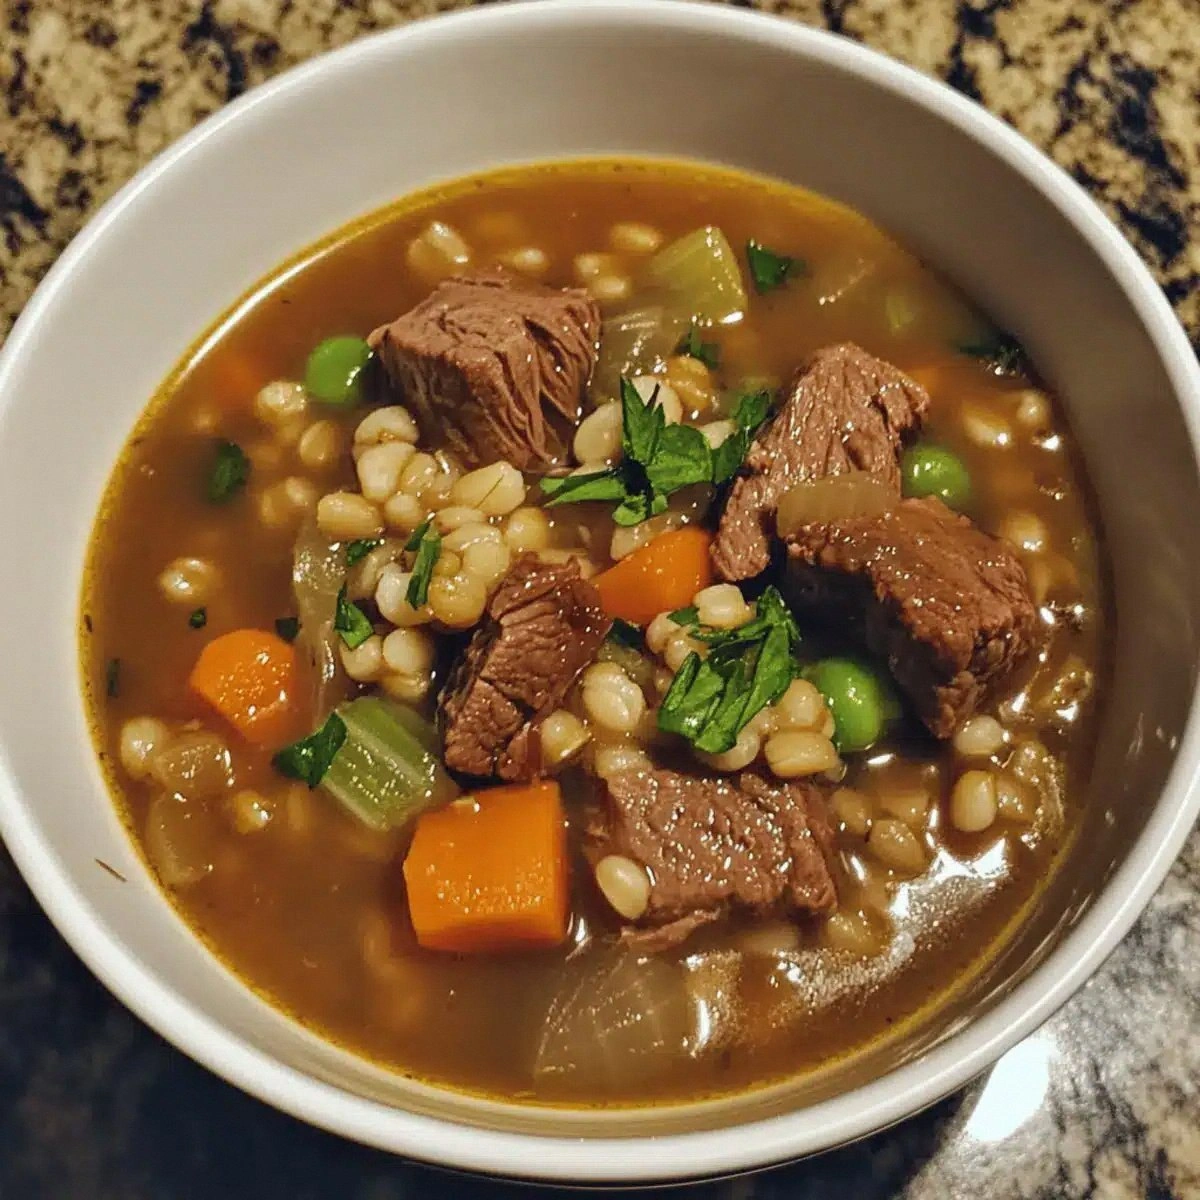
- Depth of Flavor: The combination of beef, barley, and fresh herbs creates a complex taste profile that evolves with every bite. The slow simmer releases gelatin from the bones, turning the broth into a silky, savory foundation.
- Texture Contrast: The pearl barley offers a chewy bite that contrasts beautifully with the tender chunks of beef and crisp vegetables. It’s the kind of texture that keeps you spooning without feeling heavy.
- Time Efficiency: Unlike traditional stews that demand hours, this recipe cuts the cooking time in half without compromising on richness. A few smart techniques and a quick browning step do the heavy lifting.
- Freshness Factor: The final splash of parsley and the fresh thyme infusion add a bright, green note that lifts the entire dish. It’s a reminder that even a hearty soup can feel light.
- Make‑ahead Friendly: The soup stores beautifully and actually tastes better the next day, making it perfect for busy weekdays or meal prep. The flavors meld together, creating an even deeper taste profile.
- Ingredient Integrity: Using high‑quality beef chuck roast and organic vegetables ensures each bite is packed with natural goodness. No artificial additives or preservatives needed.
- Versatility: The base is so adaptable that you can swap in different grains or add a splash of wine for a richer broth. It’s a culinary playground.
Alright, let's break down exactly what goes into this masterpiece...
Inside the Ingredient List
The Flavor Base
Beef Chuck Roast: This cut is the heart of the soup, offering both meatiness and a gelatinous richness when cooked low and slow. It provides a robust umami backbone that carries the barley and vegetables. If you’re on a budget, a cheaper cut like chuck eye will work, but the flavor depth will be slightly less. The key is to cut the roast into 1‑inch cubes to ensure even cooking.
Beef Broth: A high‑quality broth is non‑negotiable; it’s the liquid that binds everything together. I use a homemade beef stock simmered with bones, which adds depth and a slight caramel note. If you’re short on time, a good store‑bought broth works, but look for low‑sodium options to keep control over the salt level.
Onion: The medium onion, finely diced, releases sweetness as it cooks, creating a sweet‑savory base that balances the richness of the beef. Cutting it into small cubes ensures it breaks down evenly, preventing any uneven textures. A small tip: blanch the onion in hot water for 30 seconds before adding to the pot; this reduces the sharpness slightly.
The Texture Crew
Carrots: The carrots add a subtle sweetness and a pop of color. Slice them into uniform rounds so they cook evenly and maintain a pleasant bite. If you prefer a softer texture, dice them into smaller cubes.
Celery: Celery provides a crisp, herbal note that cuts through the richness. It also adds a subtle earthiness that pairs well with the barley. Chop it finely to ensure it melds into the broth without standing out.
Parsnips: Parsnips bring an extra layer of sweetness and a slightly nutty flavor that elevates the overall profile. They also add a pleasant chew. Slice them into half‑moon shapes to ensure they soften without disintegrating.
The Unexpected Star
Barley: Pearl barley is the star of the show, offering a chewy texture that contrasts with the tender beef. It also helps thicken the broth naturally. Rinse the barley thoroughly before adding to remove any dust or impurities. If you’re looking for a gluten‑free option, consider using quinoa or buckwheat groats.
Fresh Thyme: Thyme adds a subtle earthiness that complements the beef’s depth. Use fresh thyme for a brighter flavor; dried thyme can be too harsh. Remove the stems before adding to the pot to keep the soup looking clean.
The Final Flourish
Fresh Parsley: Parsley is the bright, green note that lifts the soup and gives it a fresh finish. Chop it finely so it distributes evenly throughout the broth. A sprinkle of parsley right before serving adds a burst of color and a fresh aroma.
Bay Leaves: Bay leaves add a subtle floral aroma that deepens the broth’s complexity. They should be removed before serving, as they can be tough to chew. Adding them early in the cooking process allows their flavors to infuse the soup fully.
Garlic: Garlic cloves, minced or crushed, release a pungent aroma that enhances the savory base. They should be added after the beef has browned to prevent burning. If you’re sensitive to garlic, use just a few cloves or omit it entirely; the soup will still be delicious.
Salt & Pepper: Salt balances the flavors and brings out the natural sweetness of the vegetables. I use a teaspoon of salt and a teaspoon of black pepper for a well‑rounded seasoning. Adjust to taste at the end of cooking.
Everything’s prepped? Good. Let’s get into the real action...
The Method — Step by Step
- First, brown the beef. Heat a large Dutch oven over medium‑high heat and add a splash of oil. Once the oil shimmers, add the beef cubes in a single layer, ensuring they don’t overlap. This step creates a caramelized crust that locks in flavor. Let them sear for about 2–3 minutes per side, then transfer them to a plate.
- Next, sauté the aromatics. In the same pot, add the diced onion, carrots, celery, and parsnips. Cook until the onions become translucent, about 5 minutes. The vegetables should start to soften and release their natural sugars. Add the minced garlic and cook for an additional 30 seconds, just until fragrant.
- Deglaze the pan. Pour a cup of beef broth into the pot, scraping up the browned bits from the bottom. These bits are packed with flavor; don’t let them burn. Stir until the liquid is almost fully absorbed before adding the rest of the broth. This technique intensifies the soup’s taste.
- Return the beef. Place the browned cubes back into the pot, along with the bay leaves, thyme, salt, and pepper. Stir to combine. The beef should be surrounded by aromatic vegetables and broth, creating a flavor foundation.
- Simmer. Bring the mixture to a gentle boil, then reduce the heat to low. Cover partially and let it simmer for 45 minutes, or until the beef is tender and the barley is al dente. The slow simmer allows the gelatin from the beef to thicken the broth naturally.
- Add the barley. Stir in the pearl barley and continue simmering for an additional 15–20 minutes. The barley should absorb liquid and develop a chewy texture. Stir occasionally to prevent sticking.
- Finish with parsley. Remove the bay leaves and stir in the chopped parsley. This bright green splash lifts the soup’s aroma and adds a fresh finish. Taste and adjust seasoning if needed.
- Serve. Ladle the soup into bowls, garnish with an extra sprinkle of parsley if desired, and serve hot. Pair it with crusty bread for a complete meal. The first spoonful should be warm, comforting, and utterly satisfying.
That's it — you did it. But hold on, I've got a few more tricks that'll take this to another level...
Insider Tricks for Flawless Results
The Temperature Rule Nobody Follows
Control the heat. Many cooks keep the pot on a high flame, thinking it speeds up the cooking. In reality, a steady low simmer preserves the beef’s tenderness and prevents the broth from becoming too watery. Use a thermometer to keep the temperature around 200°F (93°C) for optimal results.
Why Your Nose Knows Best
Smell the soup. Your nose is the best judge of readiness. When the broth smells rich and the beef is tender, it’s time to pull the pot from the heat. Relying on the timer alone often leads to over‑cooking or under‑cooking.
The 5-Minute Rest That Changes Everything
Let it sit. After simmering, let the soup rest for 5 minutes before serving. This pause allows the flavors to settle and the barley to finish absorbing liquid. It also gives the beef a chance to re‑hydrate, making it juicier.
The Secret of Fresh Herbs
Timing matters. Add fresh herbs like thyme early in the cooking process so their flavors can mellow. Add parsley at the very end to preserve its bright, green notes. This contrast keeps the soup lively and not flat.
The Right Pot Matters
Use a heavy‑bottomed pot. A Dutch oven or a heavy stainless steel pot distributes heat evenly, preventing hot spots that can scorch the broth. If you’re using a non‑stick pot, be cautious of high heat as it can degrade the coating.
Now that you’ve got the insider tricks, you’re ready to master this soup every time. Remember, practice makes perfect, and each batch will teach you something new about flavor balance and texture.
Creative Twists and Variations
Spicy Kick
Heat it up. Add a diced jalapeño or a pinch of red pepper flakes during the sauté step. The heat pairs beautifully with the beef’s richness and gives the soup a lively edge. This version is perfect for those who love a little spice.
Herb‑Infused Delight
Swap thyme for rosemary. Use fresh rosemary instead of thyme for a piney, aromatic flavor. Add a sprig of rosemary during the simmering stage, then remove before serving. This subtle change gives the soup a Mediterranean vibe.
Vegetarian Barley Bowl
Go meatless. Replace the beef with a hearty vegetable stock and add diced mushrooms for umami. Use a plant‑based protein like seitan or tofu for texture. The result is a comforting bowl that still feels substantial.
Creamy Variation
Add a touch of cream. Stir in a splash of heavy cream or coconut milk at the end of cooking. The cream smooths the broth and adds a velvety mouthfeel. Pair it with a sprinkle of nutmeg for a subtle warmth.
Asian Fusion
Introduce Asian flavors. Swap the bay leaves for star anise and add a splash of soy sauce during the simmer. Finish with a squeeze of lime and a handful of chopped cilantro. This version offers a bright, umami‑rich twist.
Barley Swap
Try quinoa. Replace the pearl barley with quinoa for a gluten‑free alternative. Quinoa cooks faster, so reduce the simmer time by 5 minutes. The texture is slightly different, but the flavor remains hearty.
With these variations, you can keep the soup fresh and exciting week after week. Whether you want to spice it up, make it vegetarian, or give it an international flair, the base is flexible enough to accommodate any twist.
Storing and Bringing It Back to Life
Fridge Storage
Cool and seal. Allow the soup to cool to room temperature, then transfer it to airtight containers. Store in the refrigerator for up to 4 days. The gelatin in the broth will firm up, giving the soup a thicker consistency.
Freezer Friendly
Freeze in portions. Divide the soup into single‑serving or family‑size portions in freezer‑safe containers. Label with the date and freeze for up to 3 months. Thaw overnight in the refrigerator before reheating.
Best Reheating Method
Reheat gently. Warm the soup on low heat, stirring occasionally. Add a splash of water or broth if it looks too thick. Bring it to a gentle simmer, then taste and adjust seasoning before serving.
With these simple steps, your soup will stay delicious, even after a few days. The flavors deepen, and the texture remains satisfying, making it a reliable go‑to for any day of the week.