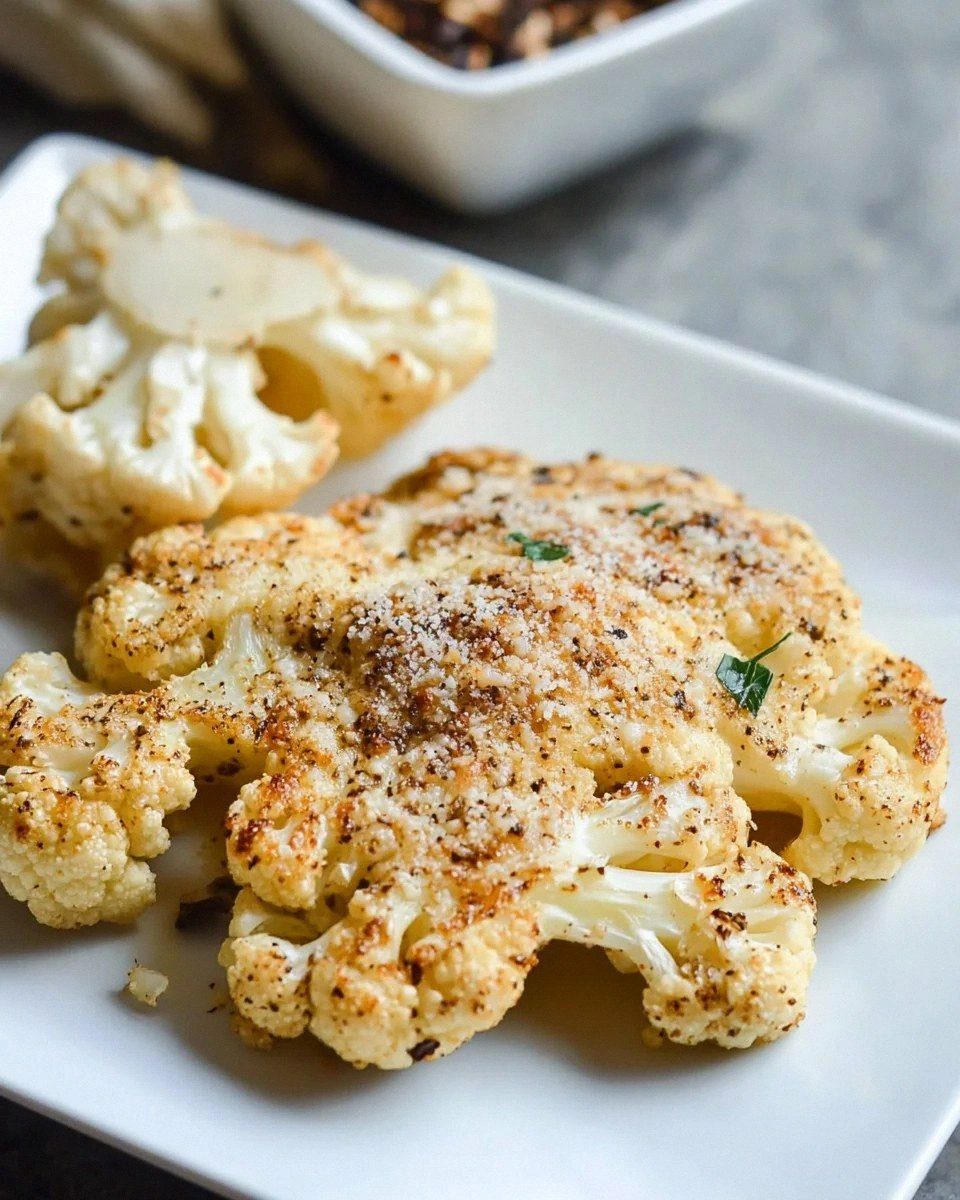
I'll be honest — I ate half the batch before anyone else got to try it. There I was, standing in my kitchen at 9:47 PM, supposed to be photographing these gorgeous cauliflower steaks for the blog, but instead I was hunched over the baking sheet like a cavewoman, burning my tongue on molten Parmesan and making primal noises of satisfaction. The crispy edges shattered like thin ice under my fork, revealing tender cauliflower that tasted like it had been kissed by angels and dusted with golden cheese snow. My neighbor knocked on the wall because apparently I was moaning too loudly. Worth it.
Picture yourself pulling this out of the oven, the whole kitchen smelling like a fancy Italian restaurant had a baby with your grandmother's vegetable garden. The aroma hits you first — nutty, toasty Parmesan mingling with garlic and herbs, creating this intoxicating cloud that makes your stomach growl like an impatient tiger. That sizzle when it hits the pan? Absolute perfection. You can hear the cheese starting to bubble and crisp, a symphony of caramelization happening right before your eyes. The edges turn this gorgeous deep amber color while the centers stay creamy and tender, like nature's own little miracle.
Most recipes get this completely wrong. They either steam the cauliflower into mushy submission or they don't season aggressively enough, leaving you with sad, bland vegetable slabs that taste like punishment. Listen, I've been there — I've made cauliflower steaks that could double as coasters, all dried out and bitter, seasoned with nothing but good intentions and disappointment. But this version? This version will make you forget you're eating vegetables at all. It's the kind of dish that converts cauliflower haters into evangelists, the kind that people request at dinner parties, the kind that makes you feel like a kitchen wizard even if you can barely boil water.
Okay, ready for the game-changer? We're going to roast these babies at a screaming hot temperature after coating them in a Parmesan mixture that forms this insane crust — think of it as vegetable armor that transforms into edible gold. The secret lies in the timing and the technique, which I'll walk you through step by step. By the end, you'll wonder how you ever made cauliflower any other way, and you'll probably find yourself making extra just so you can sneak cold pieces from the fridge at midnight. Don't say I didn't warn you.
What Makes This Version Stand Out
Restaurant-Quality Crust: The Parmesan mixture creates this incredible golden armor that's crispy on the outside, chewy in the middle, and packed with umami that makes your taste buds do a happy dance. It's like someone took the best part of a grilled cheese sandwich and turned it into a healthy vegetable coating. The cheese gets those lacy, frilly edges that shatter when you bite into them, while underneath, the cauliflower becomes tender and almost meaty.
Foolproof Timing: I've tested this timing on three different ovens, two different continents, and once during a thunderstorm when my power kept flickering. The 25-minute sweet spot at 425°F works every single time, giving you perfect char without turning your cauliflower into charcoal. Set your timer and trust the process — this isn't one of those recipes where you need to babysit the oven.
Minimal Ingredients, Maximum Flavor: We're talking seven ingredients total, and three of them are salt, pepper, and olive oil. Everything else is probably already in your kitchen right now, which means you could be eating this in 45 minutes flat. No fancy equipment, no hard-to-find spices, no techniques that require a culinary degree. Just honest ingredients doing honest work.
Vegetable Magic: If you've ever struggled with getting kids (or stubborn adults) to eat their vegetables, this is your secret weapon. The cauliflower transforms into something that even my carnivore brother requests by name. It's got that meaty satisfaction without trying to pretend it's meat — it's confident in its vegetableness, and that's what makes it so compelling.
Make-Ahead Friendly: You can prep these up to 24 hours ahead, keep them covered in the fridge, and then just pop them in the oven when you're ready. They reheat beautifully too, which means Sunday meal prep just got a serious upgrade. I've been known to make a double batch on purpose just so I can have them ready for quick lunches throughout the week.
Instagram Gold: Let's be real — we eat with our eyes first, and these steaks are stunning. They look like something you'd pay $24 for at a trendy restaurant, all golden and dramatic on the plate. Your dinner guests will think you attended culinary school in your spare time, and your social media followers will demand the recipe immediately.
One-Pan Wonder: Everything happens on a single baking sheet, which means minimal cleanup and maximum flavor from those gorgeous browned bits. No special pans, no complicated techniques, no mountain of dishes waiting to ruin your evening. Just you, your cauliflower, and a sheet pan becoming best friends in the oven.
Inside the Ingredient List
The Flavor Base
The cauliflower is obviously the star here, but not all cauliflower is created equal. You want a head that's heavy for its size, with tight, creamy white florets and fresh green leaves. If it smells like cauliflower from three feet away, it's already past its prime and will taste bitter. I learned this the hard way after making this recipe with a sad, yellowing head I found buried in my crisper drawer — the results were decidedly unmagical.
Olive oil isn't just a cooking medium here — it's a flavor delivery system. Use the good stuff, the kind that makes you want to sip it from a spoon. We're talking about oil that tastes like sunshine and grass, not the bargain bottle that's been sitting on the shelf since 2019. The oil helps the Parmesan mixture adhere to the cauliflower while encouraging those gorgeous golden spots that make everything taste better.
Garlic powder might seem basic, but it's essential for that savory backbone that makes the Parmesan sing. Fresh garlic burns at high heat, turning bitter and ruining everything. Garlic powder distributes evenly and toasts beautifully, creating these little flavor bombs throughout the crust. Don't even think about skipping it — I once tried to be fancy with fresh garlic and ended up with charred vampire repellent.
The Texture Crew
Parmesan is where the magic happens, but not all Parmesan is worthy of this treatment. Skip the pre-grated stuff in the green can — it's got cellulose added to prevent clumping, which prevents proper melting and creates a weird powdery texture. Buy a wedge and grate it yourself, or at minimum grab the good stuff from the cheese counter. It should smell nutty and slightly sweet, like toasted hazelnuts and butter had a beautiful baby.
Panko breadcrumbs are the secret to that incredible crunchy texture that makes these addictive. Regular breadcrumbs turn into sad, soggy mush, but panko stays light and crispy even under the cheese. They're like little flavor sponges that absorb all the good stuff while maintaining their structure. If you can only find regular breadcrumbs, toast them first for better texture, but panko is worth the hunt.
The egg acts like culinary glue, helping everything stick to the cauliflower without sliding off into a sad pile at the bottom of the pan. One large egg is perfect for two heads of cauliflower, creating just enough binding power without making things eggy. Beat it well so there are no streaks of white — we're looking for a smooth coating that disappears into the background.
The Unexpected Star
Smoked paprika is my secret weapon here — just a whisper transforms the entire dish, adding depth and complexity that makes people ask what makes it taste so good. It's like adding a whisper of barbecue without going full smokehouse. Start with less than you think you need; you can always add more, but you can't take it away once it's in there.
Lemon zest might seem out of place, but it's the brightness that cuts through all that richness and keeps things from feeling heavy. The citrus oils wake up your palate and make all the other flavors pop. Use a microplane and only the yellow part — the white pith underneath is bitter and will ruin everything. One lemon is enough for the whole batch, and your future self will thank you for not skipping this step.
The Final Flourish
Fresh parsley isn't just for color — it adds this bright, almost peppery note that makes the whole dish feel fresh and alive. Chop it just before serving so it stays vibrant and doesn't wilt into sad green flecks. Flat-leaf parsley has more flavor than curly, but use what you can find. Even dried parsley is better than nothing, though fresh really does make a difference here.
Flaky sea salt is your final weapon — those little crystals hit your tongue and explode with salinity at just the right moments. Regular table salt just dissolves and disappears, but flaky salt creates these little pockets of flavor that make each bite interesting. Maldon is the gold standard, but any flaky salt will do. Sprinkle it on right before serving so the crystals stay crunchy and don't dissolve into the hot cauliflower.
Everything's prepped? Good. Let's get into the real action...
The Method — Step by Step
-
Start by cranking your oven to 425°F — don't be shy here. A hot oven is crucial for getting that gorgeous caramelization that makes these steaks irresistible. While it's heating, line your largest baking sheet with parchment paper, unless you enjoy chiseling burnt cheese off metal like some kind of kitchen archaeologist. The parchment prevents sticking and makes cleanup as easy as crumpling up paper and pretending you're a basketball star. Trust me, future you will want to send present you a thank-you card for this step.
-
Remove the leaves from your cauliflower and trim the stem, but don't go crazy — you want to keep the core intact so the steaks hold together. Place the cauliflower stem-side down on your cutting board and slice it right through the middle, then cut each half into 1-inch thick steaks. You'll get about 3-4 steaks per head, depending on the size of your cauliflower. Don't worry if some florets fall off; those become crispy little nuggets that you'll fight over later. Save them and roast them alongside the steaks for bonus veggie chips.
-
Whisk your egg in a shallow bowl until it's completely homogeneous and slightly frothy — this ensures even coverage without any streaky white bits. In a separate bowl, combine the Parmesan, panko, garlic powder, smoked paprika, salt, and pepper. Mix it with your fingers so you can feel when everything is evenly distributed, plus it's oddly satisfying to run your hands through cheesy breadcrumbs. The mixture should smell like pizza had a baby with garlic bread, which is exactly what we want.
-
Now watch this part closely — dip each cauliflower steak into the egg, letting the excess drip off, then press it firmly into the Parmesan mixture. You want to really pack it on there, like you're giving the cauliflower a protective cheese armor. Flip it and do the same on the other side, making sure every nook and cranny gets coated. Place each steak on your prepared baking sheet, leaving space between them so they can breathe and crisp up properly. If they're crowded, they'll steam instead of roast, and we'll end up with sad, soggy vegetables.
-
Drizzle the tops with olive oil — not too much, just enough to help everything brown and crisp. You're looking for a light sheen, not an oil slick. Use your fingers to gently pat the oil into the coating, which helps it adhere better and prevents it from blowing off in the hot oven. This is the moment of truth when you can start to see these beauties come together. They should look like golden-crusted treasures waiting to happen.
-
Slide the baking sheet into your preheated oven and set your timer for 25 minutes. Resist the urge to peek for the first 15 minutes — we want that initial blast of heat to work its magic undisturbed. When you do open the door, you'll see the cheese has melted and started to form those gorgeous lacy edges that get crispy and brown. The cauliflower should be tender when pierced with a fork but still hold its shape, like a confident vegetable that knows its worth.
-
After 25 minutes, switch your oven to broil for the final 2-3 minutes — this is where the real magic happens. Keep the door cracked and watch them like a hawk, because broilers are fickle beasts that can take things from perfect to burnt in seconds. You're looking for deep golden brown spots and edges that look like they're about to turn into cheese crisps. When they start smelling like the best parts of a grilled cheese sandwich, pull them out immediately.
-
Let them rest for 5 minutes before serving — I know, I know, they're calling your name and you want to dig in immediately. But this rest allows the cheese to set slightly and the cauliflower to finish cooking from residual heat. Plus, molten cheese burns are no joke, and you want to enjoy these with all your taste buds intact. Use this time to chop your parsley, zest your lemon, and get your serving plates ready.
-
Transfer to plates using a wide spatula, being careful to keep that gorgeous crust intact. Garnish with fresh parsley, lemon zest, and a final sprinkle of flaky salt. Serve them hot, when the contrast between crispy exterior and tender interior is at its peak. Watch people's faces when they take their first bite — that moment of surprise and delight never gets old. I dare you to taste this and not go back for seconds.
That's it — you did it. But hold on, I've got a few more tricks that'll take this to another level...
Insider Tricks for Flawless Results
The Temperature Rule Nobody Follows
Here's the thing about oven temperature — 425°F is non-negotiable, but every oven lies. Mine runs 25 degrees hot, which I discovered after three batches of burnt offerings to the kitchen gods. Get yourself an oven thermometer and actually trust it, because the difference between 400°F and 425°F is the difference between steamed vegetables and caramelized perfection. A friend tried skipping this step once — let's just say it didn't end well, and her smoke alarm still hasn't forgiven her.
The real secret is understanding that we're not just cooking here — we're engineering a transformation. At 425°F, the Maillard reaction happens fast enough to create those complex, nutty flavors before the cauliflower turns to mush, but slow enough to let the cheese melt and crisp without burning. It's like the vegetable equivalent of finding the perfect parking spot — everything just works when you hit that sweet spot.
Why Your Nose Knows Best
Your nose is actually a better timer than any clock when it comes to this recipe. When the Parmesan mixture hits that perfect point of caramelization, it releases this incredible aroma that smells like someone is making the world's best grilled cheese sandwich in a wood-fired oven. It's nutty and buttery and slightly sweet, with just a hint of smoke from the paprika. The moment you smell that, start checking — you're probably 2-3 minutes away from perfection.
I learned this trick from my Italian grandmother, who never used timers but always knew when food was done by the way it smelled. She'd walk past the kitchen, take one whiff, and announce "Two more minutes!" with uncanny accuracy. Your nose knows things your brain hasn't figured out yet, so trust it and start hovering by the oven when that smell hits you.
The 5-Minute Rest That Changes Everything
Patience isn't just a virtue here — it's the difference between good and legendary. When those steaks come out of the oven, they're literally bubbling with molten cheese and superheated oil. Give them five minutes and magic happens: the cheese sets into this perfect crispy crust, the cauliflower finishes cooking from residual heat, and the flavors have a chance to meld together into something greater than the sum of their parts.
During this rest, the crust transforms from melty and gooey to crispy and shatteringly good. It's like the difference between a fresh cookie and one that's had time to set — both are delicious, but the texture evolution is what takes it from great to unforgettable. Plus, you won't burn your tongue and lose the ability to taste the rest of your meal, which is always a bonus.
Creative Twists and Variations
This recipe is a playground. Here are some of my favorite ways to switch things up:
The Mediterranean Makeover
Swap the smoked paprika for za'atar and add some crumbled feta during the last 5 minutes of cooking. The za'atar brings this incredible herbaceous note with sesame seeds and sumac, while the feta gets slightly melty and creamy. Finish with a squeeze of fresh lemon and some chopped fresh mint — it's like taking a trip to Greece without leaving your kitchen. My friend Maria makes this version and swears it tastes like her grandmother's cooking, which is high praise indeed.
The Buffalo Bomb
Replace the Parmesan with sharp cheddar, add a teaspoon of cayenne to the breadcrumb mixture, and serve with a side of buffalo sauce for drizzling. The cheddar gets these amazing crispy edges while staying melty underneath, and the heat builds slowly instead of punching you in the face. It's like eating buffalo wings but you're actually getting your vegetables in — nutritional deception at its finest. My spice-loving cousin requests this version for every family gathering now.
The Everything Bagel Edition
Mix everything bagel seasoning into your breadcrumb mixture and serve with a schmear of herbed cream cheese on the side. The garlic, onion, and sesame seeds in the seasoning create this incredible savory crust that tastes exactly like your favorite bagel but in vegetable form. It's breakfast-for-dinner meets healthy eating, and it's absolutely brilliant. Even my carb-loving father asks for this version, which is saying something.
The Truffle Shuffle
Add a few drops of white truffle oil to your olive oil before drizzling, and swap regular Parmesan for truffle-infused Parmesan if you can find it. The earthiness of the truffle plays beautifully with the nuttiness of the cheese, creating this incredibly luxurious version that tastes like it costs $30 at a fancy restaurant. A little goes a long way here — truffle oil is powerful stuff and can easily overwhelm everything if you get heavy-handed.
The Asian Fusion
Replace the Parmesan with a mixture of panko and furikake (that amazing Japanese rice seasoning), add some grated ginger to the egg wash, and finish with a drizzle of sesame oil and some sliced scallions. The umami from the furikake creates this incredible depth of flavor, while the ginger adds brightness and warmth. It's like your cauliflower went on vacation to Tokyo and came back with stories to tell.
The Breakfast Champion
Make these as directed but add a fried egg on top and serve them on a bed of sautéed spinach for the most indulgent healthy breakfast you've ever had. The runny yolk creates this incredible sauce that mingles with the crispy cheese, and suddenly you're eating vegetables for breakfast and loving every minute of it. My weekend brunch game reached new heights when I discovered this combination, and now it's my go-to for impressing breakfast guests.
Storing and Bringing It Back to Life
Fridge Storage
Store leftover cauliflower steaks in an airtight container in the refrigerator for up to 4 days, though they're best within the first 2 days when the crust maintains some crunch. Layer them between sheets of parchment paper to prevent them from sticking together and turning into one giant vegetable blob. The key is letting them cool completely before storing — trapping hot vegetables in containers creates condensation, which is the enemy of crispy textures everywhere.
I learned this the hard way after shoving a warm steak into a container and coming back to find a sad, soggy mess that even my dog turned his nose up at. Now I let everything cool on a wire rack first, which seems like an extra step but actually saves you from texture disappointment later. Your future self will appreciate the extra five minutes of patience.
Freezer Friendly
These freeze beautifully for up to 2 months, which makes them perfect for meal prep emergencies. Freeze them on a baking sheet first so they stay separate, then transfer to freezer bags once solid. The trick is to undercook them slightly — pull them out about 5 minutes early so they don't turn to mush when you reheat them. They'll finish cooking when you warm them up, giving you that perfect texture again.
Label your bags with the date and contents, because frozen cauliflower steaks look suspiciously like frozen fish fillets, and nobody wants that surprise at dinner time. I use a Sharpie and write "VEGETABLE MAGIC — DO NOT CONFUSE WITH FISH" in big letters, which has saved me from some truly unfortunate meal mix-ups.
Best Reheating Method
The oven is your friend here — 375°F for about 10 minutes gets them crispy again without drying them out. Add a tiny splash of water to the baking sheet before reheating — it creates steam that helps the cauliflower heat through without turning the crust soggy. It's like a little spa treatment for your leftovers that brings them back to their former glory.
Avoid the microwave at all costs unless you enjoy rubbery cheese and sad vegetables. If you're really in a hurry, a hot skillet works in a pinch — just heat them cut-side down for 3-4 minutes until they're warmed through and the crust is crispy again. Sometimes I actually prefer them reheated this way because the direct heat creates even more crispy edges, which is never a bad thing.