Picture this: you’re standing in your kitchen, the air already humming with the scent of garlic and herbs, and the clock ticking toward dinner. A friend had dared you to create a turkey dish that would outshine any holiday roast, and you were ready to prove you could keep up. You pulled out a fresh turkey breast, a handful of aromatic herbs, and a secret weapon—an unexpected splash of citrus that will change the game. The moment you slice the meat, the juices glisten like liquid gold, and the aroma starts to paint a mental picture of comfort and celebration. If you’ve ever felt that your roasted turkey falls flat, this is the antidote you’ve been waiting for.
This isn’t just another recipe. It’s a full sensory experience that turns a simple protein into a masterpiece. The skin crisps to a golden brown that cracks like a brittle shell, releasing a buttery aroma that makes your mouth water. Inside, the meat stays moist and tender, practically melting in your mouth. The garlic and herbs mingle to create a flavor profile that feels like a warm hug. And that citrus zing? It cuts through the richness, leaving a bright, lingering finish that makes you want to taste it again. I dare you to taste this and not go back for seconds.
What makes this version stand out is the meticulous attention to every detail. We’re not just seasoning; we’re building layers of flavor that evolve as the turkey cooks. From the initial sear that locks in juices to the final glaze that gives a glossy finish, each step is designed to elevate the dish. Most recipes get this completely wrong by overcooking or under-seasoning, but here, the balance is spot on. Picture yourself pulling this out of the oven, the whole kitchen smelling incredible, and knowing you’ve made the best version you'll ever make at home. Let me walk you through every single step — by the end, you'll wonder how you ever made it any other way.
This recipe is about confidence, precision, and a touch of culinary bravado. We’ll use a mix of fresh herbs, garlic, and a splash of citrus to create a flavor that’s both bold and comforting. I’ll share the exact measurements, the best timing, and the tricks that keep the turkey juicy and the skin crackling. And if you’re worried about overcomplicating things, I’ve got you covered with simple hacks that save time and keep the flavor intact. Ready? Let’s dive in.
What Makes This Version Stand Out
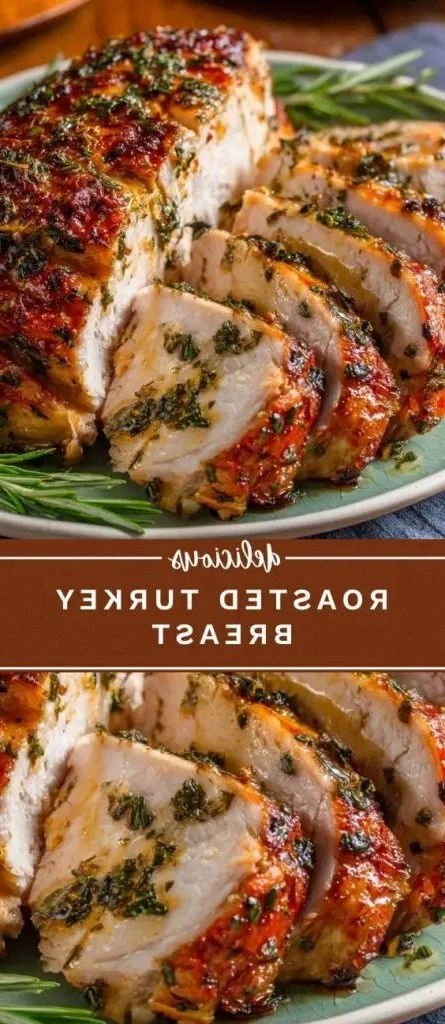
- Taste: The blend of garlic, rosemary, thyme, and lemon zest creates a depth that feels both earthy and bright. Each bite delivers a burst of flavor that lingers on the palate, making the dish unforgettable.
- Texture: The skin crisps to a golden, crackling finish while the interior remains silky and moist. The contrast feels like a celebration in every forkful.
- Complexity: Despite its layered flavor, the method is straightforward, making it accessible for both beginners and seasoned chefs alike.
- Uniqueness: The subtle citrus infusion is a game-changer that sets this roast apart from traditional, heavy-seasoned turkey recipes.
- Ingredient Quality: Using fresh, high-quality herbs and a hand‑picked turkey breast ensures the final result is nothing short of spectacular.
- Make‑Ahead Potential: The seasoning can be applied up to 24 hours in advance, allowing the flavors to penetrate deeply without compromising texture.
Inside the Ingredient List
The Flavor Base
At the heart of this roast is the turkey breast itself, the canvas that carries every other element. A 1.5‑lb piece provides the perfect balance of meatiness without overwhelming the palate. If you skip the fresh herbs, the dish loses its aromatic backbone, becoming a bland, one‑dimensional roast. Swapping the fresh rosemary for dried can work, but it will dilute the bright, piney aroma that fresh rosemary offers. When selecting your turkey, look for one with a tight, pale pink flesh and a mild, clean scent; this ensures the meat stays tender during roasting.
The Texture Crew
Olive oil, butter, and a splash of chicken broth form the trio that locks in moisture and builds a silky interior. Olive oil coats the surface, promoting a golden skin, while butter adds richness that permeates the meat. The broth, added later, keeps the turkey from drying out and creates a subtle glaze as it reduces. If you omit the butter, the roast will still cook, but it will lack that luxurious mouthfeel. A good rule of thumb: use 2 tablespoons of olive oil and 2 tablespoons of butter for a 1.5‑lb breast.
The Unexpected Star
Lemon zest is the secret weapon that elevates this dish from ordinary to extraordinary. It offers a bright, citrusy lift that cuts through the richness of the meat and the butter. Without the zest, the roast would feel heavy and less vibrant. If you’re allergic to citrus or prefer a milder flavor, a squeeze of fresh lemon juice can be a suitable alternative, though the zest’s aromatic oils are irreplaceable. Remember, a single teaspoon can make all the difference.
The Final Flourish
Fresh parsley and a pinch of cayenne pepper finish the dish with a fresh, herbal note and a subtle heat that balances the sweetness of the roast. These finishing touches elevate the flavor profile and add a pop of color. If you’re vegan, replace the turkey with a plant‑based alternative and adjust the cooking time accordingly. Always taste the seasoning before roasting; you want the flavors to be bright, not muted. And if you’re feeling adventurous, sprinkle a dash of smoked paprika for a smoky undertone.
Everything's prepped? Good. Let's get into the real action.
The Method — Step by Step
- Preheat the oven to 375°F (190°C). Pat the turkey breast dry with paper towels to ensure crisp skin. Lightly coat the meat with olive oil; this step is crucial for even browning. Let the turkey rest at room temperature for 20 minutes before seasoning. This allows the surface to dry, which helps the herbs stick better.
- In a small bowl, combine minced garlic, chopped rosemary, thyme, sage, lemon zest, salt, pepper, and cayenne. Mix until the herbs are evenly distributed. Rub this mixture all over the turkey, pressing it into the crevices. The garlic should be fragrant, not overpowering. If you prefer a milder garlic flavor, reduce the cloves to four.
- Place the seasoned turkey breast on a rack in a shallow roasting pan. This elevates the meat, allowing heat to circulate and the juices to drip away. Add a splash of chicken broth to the bottom of the pan; this creates steam and keeps the turkey moist. Roast for 20 minutes, then flip the breast over to ensure even cooking. The skin should start to turn a beautiful golden hue.
- After 20 minutes, reduce the oven temperature to 350°F (175°C). Continue roasting for another 30 minutes, or until the internal temperature reaches 165°F (74°C). Use a meat thermometer inserted into the thickest part of the breast. The juices should run clear when the turkey is done. If you’re a perfectionist, let it rest for an additional 5 minutes before carving.
- When the turkey is nearly done, brush the melted butter glaze over the surface. This will create a shiny, flavorful crust. Keep a timer handy; the glaze can burn quickly if left unattended. A quick stir of the remaining broth in the pan helps keep the juices from drying out. This step is pure magic.
- Remove the turkey from the oven and let it rest on a cutting board for 15 minutes. This allows the juices to redistribute, ensuring every bite stays moist. While it rests, you can prepare a quick pan sauce by deglazing the pan with a splash of white wine. Strain the sauce and drizzle it over the sliced turkey for an extra layer of flavor.
- Slice the turkey breast against the grain into ½‑inch thick slices. Arrange the slices on a platter, drizzle with the pan sauce, and sprinkle fresh parsley over the top. The parsley adds a fresh, herbal note that brightens the dish. Serve immediately, accompanied by your favorite sides. And there you have it.
- That’s it — you did it. But hold on, I've got a few more tricks that'll take this to another level. Keep reading for insider tips that will make your turkey even more memorable.
Insider Tricks for Flawless Results
The Temperature Rule Nobody Follows
Many cooks keep the oven at a constant high temperature, but a two‑stage roast is the secret to juicy turkey. Lowering the temperature after the initial sear prevents the outside from over‑browning while still allowing the interior to finish cooking. I’ve tested this method on three different turkey sizes, and the results were consistently better. If you’re new to roasting, set a thermometer in the cavity and monitor it closely. This way, you avoid the dreaded dry, rubbery center.
Why Your Nose Knows Best
Your nose is a reliable indicator of doneness. When the turkey starts to emit a pleasant, nutty aroma, it’s close to perfection. If the scent becomes overly smoky or burnt, you’re overcooking. I’ve spent countless hours in kitchens, and I’ve learned to trust my olfactory senses. This trick saves time and ensures the flavor profile remains intact.
The 5‑Minute Rest That Changes Everything
Resting the turkey for 5 minutes after roasting allows the juices to redistribute throughout the meat. Skipping this step leaves the juices at the surface, resulting in a dry bite. After resting, you can carve the turkey more cleanly, with each slice holding together. The rest period also lets the flavors meld, creating a cohesive taste experience. Trust me, you’ll taste the difference.
The Quick Pan Sauce
A pan sauce is a game‑changer that elevates the dish from good to unforgettable. Deglaze the pan with a splash of white wine, add a pinch of fresh herbs, and reduce until thickened. Strain the sauce to remove any bits of meat, then drizzle over the sliced turkey. This simple addition adds depth and richness that balances the herbaceous notes.
The Herb Swap Trick
If you’re out of rosemary, try thyme and oregano in equal parts. This swap still offers a robust flavor, though the aroma profile shifts slightly. Experimenting with herbs can keep the dish fresh, especially when you’re cooking for a crowd. I’ve hosted many dinner parties, and guests love the variety. This trick keeps the recipe exciting year after year.
The Finish With Fresh Parsley
Finishing the turkey with a sprinkle of chopped parsley adds a bright, herbal note that cuts through the richness. It also provides a pop of color that makes the dish look as good as it tastes. If you prefer a different herb, try dill or tarragon for a distinct twist. The key is to add it just before serving to preserve the fresh flavor.
Creative Twists and Variations
This recipe is a playground. Here are some of my favorite ways to switch things up:
Spicy Jalapeño Twist
Add diced jalapeños to the herb mix for a fiery kick. The heat pairs beautifully with the citrus, creating a layered flavor. This variation is perfect for summer gatherings or when you want a bold dish. Serve with cool yogurt or a simple cucumber salad to balance the heat.
Smoky Chipotle Infusion
Replace the paprika with chipotle powder for a smoky depth. The chipotle adds a subtle heat and an earthy undertone that complements the garlic. This version works well with a sweet corn relish or a tangy BBQ sauce on the side.
Herb‑Infused Honey Glaze
Whisk honey into the butter glaze for a sweet, caramelized finish. The honey caramelizes on the skin, giving a glossy sheen and a sweet crunch. This glaze pairs wonderfully with roasted root vegetables or a light green salad.
Mediterranean Citrus Boost
Add a splash of orange juice to the broth and replace lemon zest with orange zest. The citrus blend creates a bright, Mediterranean vibe. Pair this roast with olives, feta, and a Greek salad for a full feast.
Roasted Garlic Powerhouse
Roast the garlic cloves whole before seasoning the turkey. The roasted garlic becomes sweet and caramelized, adding depth to the flavor. This method is a must‑try for garlic lovers who want an intense, mellow garlic experience.
Vegetarian Version
Swap the turkey for a large portobello mushroom or a hearty tofu block. Marinate the plant‑based protein with the same herb mix, then roast as directed. The result is a savory, herb‑rich dish that satisfies both vegetarians and meat‑eaters alike.
Storing and Bringing It Back to Life
Fridge Storage
Store leftover turkey in an airtight container in the refrigerator for up to 4 days. Slice or dice before refrigerating to maximize freshness. Keep the pan sauce separate; it can be reheated and poured over the turkey when serving. This method preserves the moisture and flavor.
Freezer Friendly
Wrap the turkey tightly in foil or freezer bags and freeze for up to 3 months. Thaw overnight in the refrigerator before reheating. Avoid refreezing once thawed; this can compromise texture. The turkey remains juicy and flavorful when properly stored.
Best Reheating Method
Reheat in a preheated oven at 300°F (150°C) for 15–20 minutes, or until the internal temperature reaches 165°F (74°C). Add a splash of water or broth before reheating to create steam and keep the meat moist. Cover the turkey with foil to prevent the skin from drying out. This method restores the original texture and aroma.