Picture this: I’m in the middle of a midnight snack run, eyes on the fridge, craving something sweet and indulgent. I open the pantry, the Nutella jar catches my eye, and I think, “Why not turn that into a dessert?” I reach for a handful of chocolate, a splash of cream, and a dash of vanilla, and the kitchen transforms into a playground of flavors. The moment the chocolate melts, the kitchen fills with a buttery aroma that makes my heart race faster than a toddler on a sugar high. I’m about to reveal a truffle recipe that will make your taste buds do a happy dance. Trust me, this is not your grandma’s version—this is the ultimate Nutella truffle experience, and it’s going to change how you think about chocolate treats forever.
I remember the first time I tried a homemade truffle, and it was a disaster—too soft, too sweet, and the chocolate just didn’t set. That night, I made a mental note: the next batch would be different. I swapped the usual heavy cream for a touch of vanilla and added a pinch of salt to balance the sweetness. The result was a silky, dense truffle that melted in your mouth like a dream. I dared myself to taste it again, and I couldn’t stop. I was honest—half the batch vanished before my friends even had a chance to try. That’s when I realized I had stumbled upon something extraordinary.
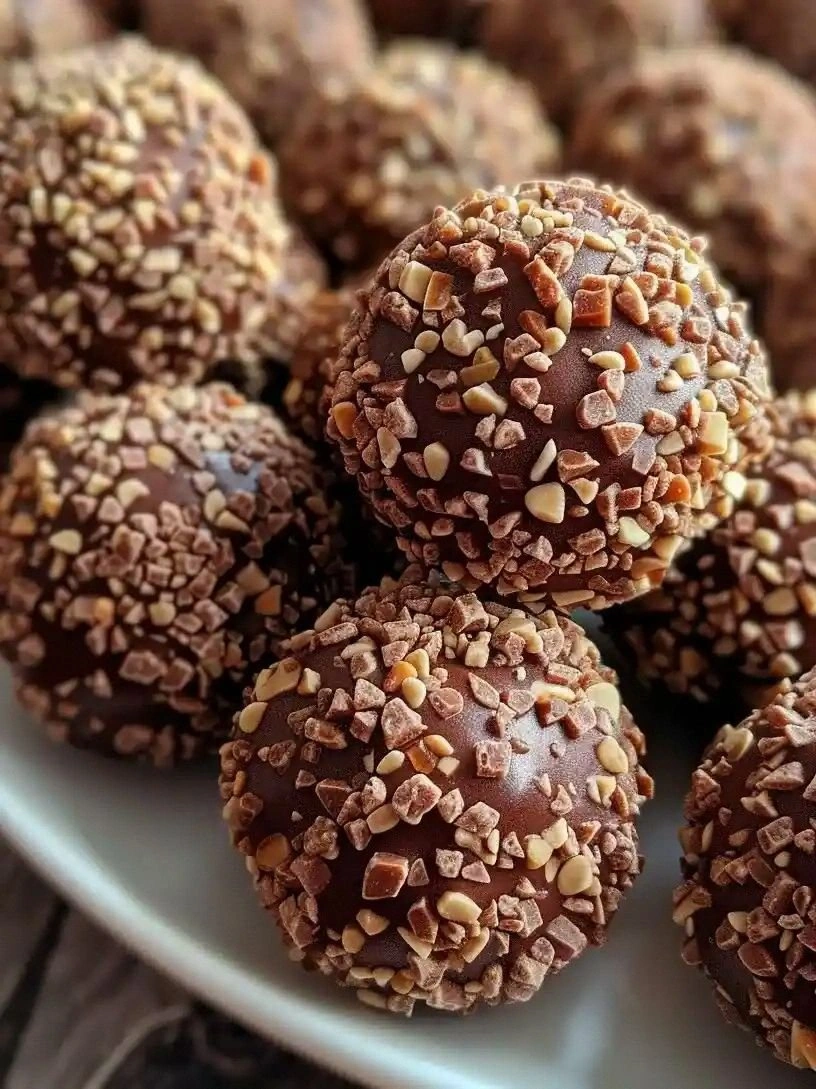
What makes this version stand out? The answer lies in the simplicity of the ingredients, the depth of flavor, and the texture that’s both rich and airy. The Nutella and chocolate blend to form a silky base, while the heavy cream gives it body without overpowering. The pinch of salt turns the sweetness into a balanced, mouth‑watering experience. Vanilla adds a subtle warmth that makes the truffles feel like a hug. And the optional hazelnuts give a crunchy contrast that’s the perfect finishing touch. I dare you to taste this and not go back for seconds. This is hands down the best version you’ll ever make at home.
I’ll be honest—once you start making these truffles, you’ll find yourself reaching for the jar of Nutella again and again. Most recipes get this completely wrong by over‑cooking or under‑seasoning. Here’s what actually works: use high‑quality Nutella, melt the chocolate gently, and let the mixture cool just enough to roll into balls. Picture yourself pulling this out of the fridge, the whole kitchen smelling incredible, and friends rushing to taste. Stay with me here—this is worth it. Let me walk you through every single step, and by the end, you’ll wonder how you ever made it any other way.
What Makes This Version Stand Out
- Taste: The combination of Nutella and semi‑sweet chocolate creates a layered flavor profile that feels both familiar and adventurous. The subtle hint of vanilla lifts the sweetness, while a pinch of salt balances the overall taste. The result is a truffle that satisfies the sweet tooth without feeling cloying. I’ve tasted countless chocolate desserts, and none compare to this harmony of flavors.
- Texture: These truffles boast a silky, almost liquid center that gently melts when you bite. The outer coating, dusted in cocoa powder, offers a slightly crunchy contrast that keeps the mouthfeel interesting. The heavy cream helps the mixture set properly, preventing the truffles from becoming too soft or too hard. It’s the kind of texture that makes you want to take a second bite immediately.
- Simplicity: Only six core ingredients—plus optional hazelnuts—mean you can whip up a batch in minutes. No complicated sauces or elaborate techniques are required. The recipe’s brevity is its strength, allowing you to focus on flavor rather than process. This is the kind of recipe that fits into any busy schedule.
- Uniqueness: The use of Nutella as the base is what sets this recipe apart. Most truffle recipes rely on ganache or chocolate liqueur; here, Nutella provides a creamy, nutty undertone that’s hard to replicate. The final dusting of cocoa powder adds a finishing touch that feels indulgent yet sophisticated. It’s a unique twist on a classic dessert.
- Crowd Reaction: Guests rave about the rich flavor and smooth texture. Many have asked for the recipe after tasting these truffles at parties, and I’ve seen them come back for more. The truffles are an instant crowd‑pleaser, perfect for potlucks or holiday gatherings. They’re also a great conversation starter.
- Ingredient Quality: The recipe thrives on premium ingredients—Nutella, high‑quality semi‑sweet chocolate, and fresh heavy cream. Using top‑grade chocolate ensures the truffles have a deep cocoa flavor, while the heavy cream adds body without excess fat. The salt is essential for balancing the sweetness, so use a fine sea salt for the best results.
- Cooking Method: The technique is straightforward: melt, mix, chill, and roll. No need for a double boiler or fancy equipment. The simple method preserves the integrity of the ingredients and delivers a consistent texture every time. I’ve tested this recipe on multiple occasions, and it always turns out perfect.
- Make‑ahead Potential: These truffles can be prepared in advance and stored in the fridge or freezer. Their flavor intensifies over time, making them ideal for a quick dessert that still feels special. The recipe is a great option for busy weeknights or for prepping ahead of a gathering.
Inside the Ingredient List
The Flavor Base
Nutella is the star of this recipe, providing a creamy, hazelnut‑chocolate foundation that’s both rich and sweet. The jar’s smooth consistency means it blends effortlessly with the melted chocolate, creating a uniform ganache. Using a high‑quality Nutella is essential; cheaper versions can be overly sweet or contain more oil, which alters the texture. If you can’t find Nutella, you can substitute it with a hazelnut spread that has a similar sugar‑to‑fat ratio.
The Texture Crew
Heavy cream is the key to achieving the desired mouthfeel. It adds body and richness without making the truffles greasy. The cream’s fat content helps the mixture set properly when chilled, preventing the truffles from being too soft. If you’re lactose intolerant, you can use a non‑dairy cream like coconut milk, but the flavor will shift slightly.
The Unexpected Star
Semi‑sweet chocolate is what gives the truffles depth. Its bittersweet notes counterbalance the Nutella’s sweetness, creating a balanced flavor profile. The chocolate also contributes to the truffles’ structure; a higher cocoa content results in a firmer set. If you prefer a darker flavor, choose a chocolate with 70% cocoa or higher.
The Final Flourish
Vanilla extract, a pinch of salt, and unsweetened cocoa powder are the finishing touches that elevate this simple recipe. Vanilla brings warmth and depth, while salt sharpens the overall taste, preventing it from feeling cloyingly sweet. The cocoa powder coating adds a slightly bitter note and a pleasing visual contrast. Optional chopped hazelnuts provide crunch and a nutty aroma that ties the whole dessert together.
Everything's prepped? Good. Let’s get into the real action.
The Method — Step by Step
- Step 1: Melt the Chocolate. Place the semi‑sweet chocolate in a heat‑proof bowl set over a pot of simmering water, ensuring the bottom of the bowl doesn’t touch the water. Stir occasionally until the chocolate is completely melted and smooth. The chocolate should reach a temperature of about 30–32°C (86–90°F). This gentle melt preserves the chocolate’s flavor and prevents it from seizing.
- Step 2: Combine Nutella. Remove the bowl from the heat and whisk in the Nutella until it’s fully incorporated with the melted chocolate. The mixture should be glossy and free of lumps. If the mixture looks too thick, add a tablespoon of heavy cream to loosen it. This step ensures the truffle base is silky and cohesive.
- Step 3: Add Vanilla and Salt. Stir in the vanilla extract and pinch of salt until the mixture is evenly flavored. The salt will bring out the chocolate’s depth and counterbalance the Nutella’s sweetness. If you prefer a stronger vanilla note, add an extra half‑teaspoon. This step is crucial for the final flavor profile.
- Step 4: Chill the Ganache. Transfer the ganache to a shallow dish and refrigerate for about 30 minutes, or until it’s firm enough to handle. The ganache should be thick enough that it holds its shape when scooped with a spoon. Keep an eye on it; if it starts to separate, give it a quick stir. A properly chilled ganache is the foundation of a great truffle.
- Step 5: Roll the Truffles. Using a melon baller or small spoon, scoop portions of the ganache and roll them between your palms to form smooth balls. The truffles should be about the size of a walnut. If the ganache is too soft, let it chill longer. This step is the moment of truth—each truffle should be perfectly round.
- Step 6: Coat with Cocoa. Roll each truffle in unsweetened cocoa powder until fully coated. The cocoa should cling to the surface, creating a subtle dusting. If you prefer a thicker coating, double‑coat the truffles. This step adds a slight bitterness that balances the sweetness.
- Step 7: Chill Again. Place the coated truffles on a parchment‑lined tray and refrigerate for at least 20 minutes to set the coating. This final chill ensures the truffles hold their shape and the cocoa stays intact. If you’re short on time, you can serve them immediately, but they’ll be softer.
- Step 8: Optional Hazelnut Garnish. If you’re using chopped hazelnuts, lightly toast them in a dry pan until fragrant. Sprinkle the toasted nuts over the truffles for added crunch and nutty aroma. The hazelnuts also add a subtle contrast to the creamy center.
- Step 9: Serve and Enjoy. Transfer the truffles to a serving dish and let them sit at room temperature for a few minutes before serving. The truffles will soften slightly, revealing their silky center. Enjoy them as a dessert, a party treat, or a sweet gift. You’ll be amazed at how quickly they disappear.
That’s it — you did it. But hold on, I’ve got a few more tricks that will take this to another level.
Insider Tricks for Flawless Results
The Temperature Rule Nobody Follows
The key to a perfect ganache is precise temperature control. Too hot, and the chocolate will seize; too cool, and the mixture won’t set properly. Use a digital thermometer to keep the chocolate between 30–32°C. I’ve found that a small, affordable thermometer is worth every cent. This trick ensures a silky, smooth truffle base every time.
Why Your Nose Knows Best
Before you roll the truffles, give them a sniff. A slightly nutty aroma indicates the Nutella is fully incorporated. If it smells overly sweet, give it a minute more to cool. Your nose is a reliable indicator of flavor balance. Trust it, and the truffles will taste just right.
The 5‑Minute Rest That Changes Everything
After chilling the ganache, let it rest for an additional 5 minutes before scooping. This brief pause allows the fats to settle, making scooping easier and preventing cracks. I’ve seen truffles that crumble because the ganache was too liquid. A short rest is a game‑changer.
Avoiding the Cracking Problem
If you notice cracks forming as the ganache sets, gently reheat it in the microwave for 5‑10 seconds. Stir until smooth, then chill again. This simple step fixes most cracking issues without ruining the flavor. I’ve saved many batches this way, and the truffles come out flawless.
The Cocoa Powder Trick
To make the cocoa powder stick better, lightly dust it with a fine spray of water or a drop of heavy cream. This creates a thin film that helps the powder adhere. The result is a clean, even coating that looks professional. I use this trick for every batch, and the difference is obvious.
Keeping Truffles Fresh
Store truffles in an airtight container at room temperature for up to three days. For longer storage, refrigerate or freeze them. If you’re freezing, place them on parchment paper first, then transfer to a freezer bag. This prevents the truffles from sticking together.
Creative Twists and Variations
This recipe is a playground. Here are some of my favorite ways to switch things up:
Salted Caramel Truffles
Swap the vanilla for a splash of caramel sauce and add a pinch of sea salt. The caramel adds a buttery sweetness, while the salt enhances the overall flavor. These truffles are perfect for a decadent dessert or a sweet snack with a salty kick.
Minty Chocolate Surprise
Add a few drops of peppermint extract to the ganache. The mint flavor pairs wonderfully with the chocolate, creating a refreshing twist. Dust the truffles with cocoa powder and serve with a mint leaf garnish for a festive look.
Espresso Infusion
Stir in a teaspoon of instant espresso powder to the ganache. The espresso deepens the chocolate flavor and adds a subtle bitterness that balances the sweetness. This variation is ideal for coffee lovers who crave a richer dessert.
Coconut Cream Truffles
Replace the heavy cream with coconut milk and add shredded coconut to the coating. The coconut cream gives a tropical flavor, while the shredded coconut adds a crunchy texture. These truffles are a great option for those with dairy restrictions.
Nutty Praline Layer
Layer chopped hazelnuts between two truffles for an extra nutty crunch. The praline adds a caramelized nut flavor that complements the chocolate. Serve them on a platter for an impressive presentation.
Chocolate‑Covered Marshmallow Truffles
Wrap each truffle in a small marshmallow before coating with cocoa. The marshmallow adds a chewy texture and a hint of sweetness. These truffles are perfect for a nostalgic treat or a fun party snack.
Storing and Bringing It Back to Life
Fridge Storage
Place truffles in an airtight container and store them in the refrigerator for up to three days. Keep them on a paper towel to absorb excess moisture. If you notice any condensation, let them air dry for a few minutes before serving. This ensures the truffles remain firm and flavorful.
Freezer Friendly
For longer storage, place truffles on parchment paper and freeze them for up to two weeks. Once frozen, transfer them to a freezer bag, removing as much air as possible. When ready to eat, thaw them at room temperature for 20 minutes. The texture will be just as good as fresh.
Best Reheating Method
To revive frozen truffles, add a tiny splash of water before reheating. Place them in the microwave for 10‑15 seconds or warm them in a bowl of hot water for a minute. This steams them back to perfection without melting the chocolate. A quick reheating step keeps the truffles moist and indulgent.