I was standing in my kitchen, half‑asleep, staring at a half‑finished batch of cookie dough that had somehow turned into a sticky, un‑identifiable mess. My roommate had dared me to create something that would make even the most skeptical sweet‑tooth swear off desserts forever. I laughed, grabbed a jar of peanut butter, and whispered to myself, “If this doesn’t work, at least I’ll have a good story.” Little did I know, the universe was about to hand me the most indulgent, no‑bake masterpiece I’ve ever tasted. The moment the creamy mixture hit the cool graham‑cracker crust, a buttery aroma rose like a warm hug from a grandma’s kitchen, and the whole apartment filled with a scent that could convince a vegan to reconsider their life choices.
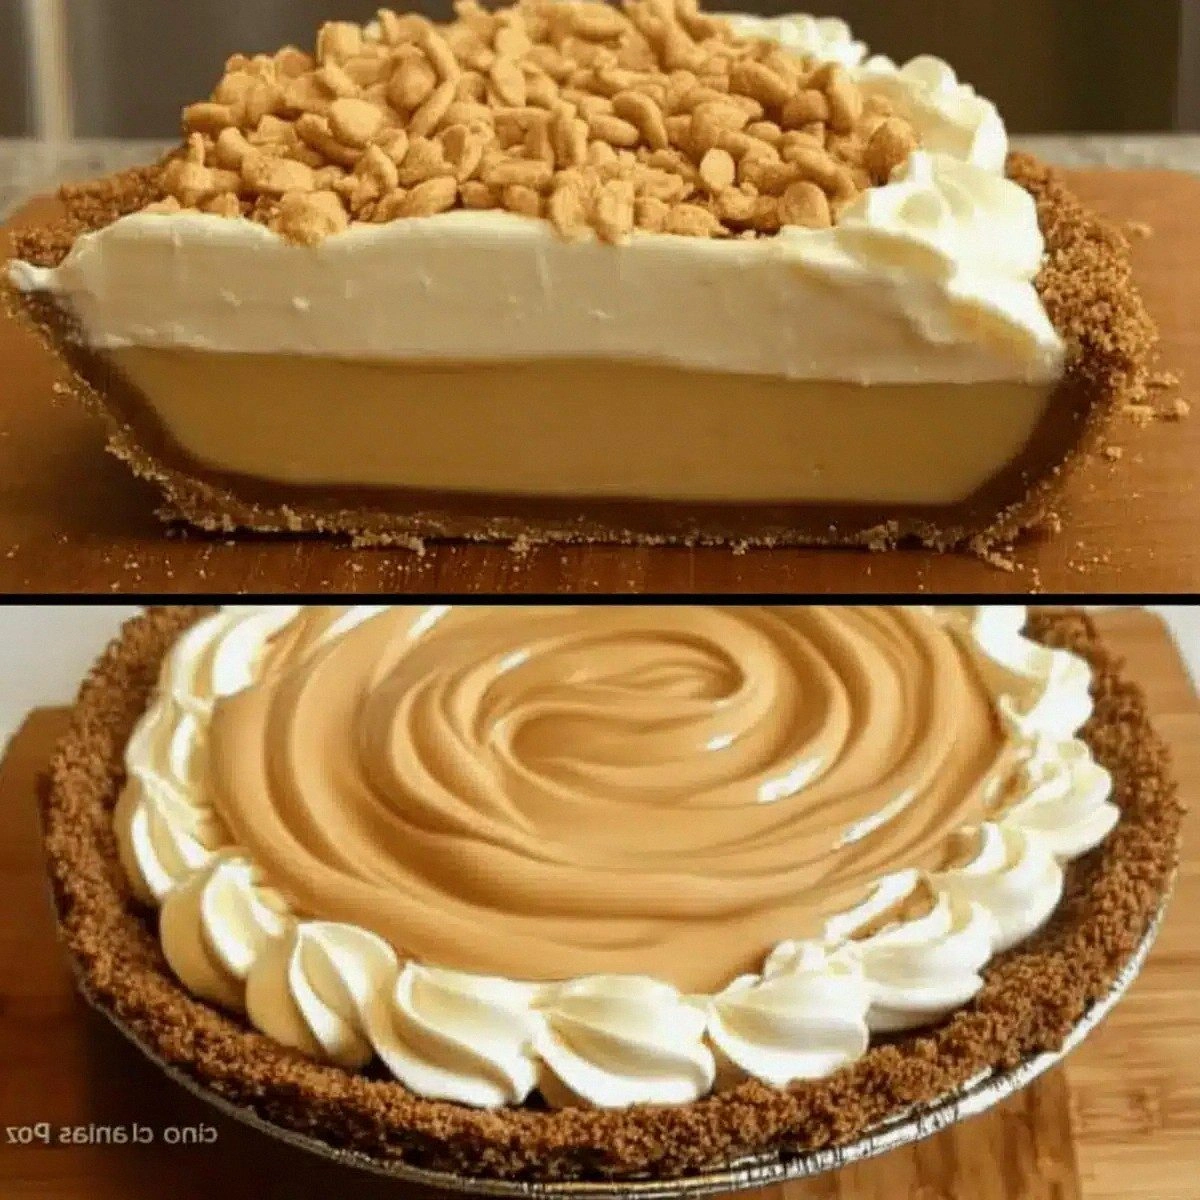
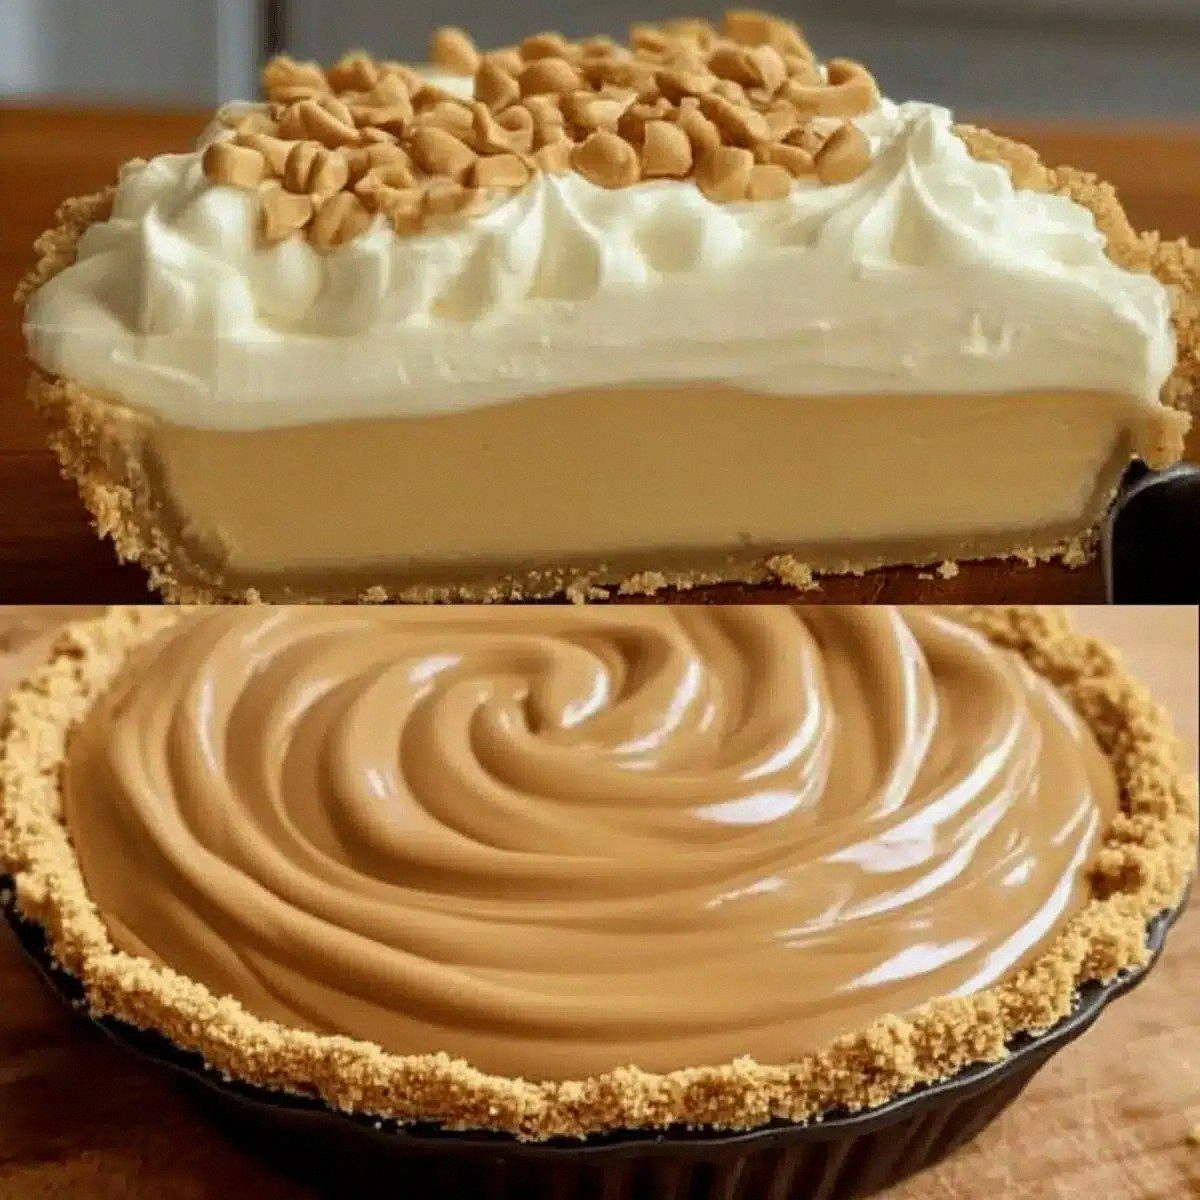
Picture this: a glossy, golden‑brown top that glistens under the kitchen light, the faint crackle of the crust as you press your fork into it, and a velvety interior that spreads across your palate like silk on a summer breeze. You hear the faint sigh of the whipped cream as it settles, the subtle whisper of sugar crystals dissolving, and the soft clink of the spoon against the bowl as you stir. Your fingertips feel the cool, firm edge of the crust while the middle stays buttery‑soft, a perfect contrast that makes every bite a tiny celebration. The flavor? A bold peanut butter punch that’s balanced by the tang of cream cheese and the sweet kiss of vanilla pudding—nothing short of a symphony in a single slice.
What makes this version truly stand out is the daring decision to skip the oven entirely. Most “no‑bake” pies either rely on gelatin or a mountain of processed ingredients that leave you wondering if you’ve just assembled a dessert or a science experiment. Here, the magic comes from a simple, honest combination of pantry staples that you probably already have on hand. The secret? A humble vanilla pudding mix that thickens the filling without any gelatin, and a splash of heavy cream that lifts the texture to cloud‑like perfection. I dare you to taste this and not go back for seconds—trust me, you’ll be the one handing out second servings.
I’ll be honest — I ate half the batch before anyone else got a chance to try it, and the guilt was quickly drowned out by the chorus of “Mmm” and “Wow” echoing around the table. Most recipes get this completely wrong. They either over‑sweeten, under‑season, or forget the crucial step of chilling the crust just enough to set the filling without turning it into an icy slab. Here’s what actually works: a perfectly timed chill, a precise balance of sweet and salty, and a finishing dusting of powdered sugar that adds just enough sparkle to make it look like a dessert you’d find in a high‑end bakery.
Okay, ready for the game‑changer? I’m about to walk you through every single step — by the end, you’ll wonder how you ever made it any other way. This next part? Pure magic.
What Makes This Version Stand Out
- Taste: The peanut butter is rich and nutty, but never overwhelming, thanks to the creamy counterbalance of cream cheese and vanilla pudding.
- Texture: A silky, mousse‑like filling that holds its shape yet melts in your mouth, contrasted with a buttery, crunchy crust.
- Simplicity: No oven, no gelatin, just mix, chill, and serve—perfect for lazy weekends or last‑minute gatherings.
- Uniqueness: The use of a store‑bought vanilla pudding mix as a thickener is a secret weapon that keeps the filling light.
- Crowd Reaction: Guests instantly ask for the recipe, and you’ll hear the “again?” chorus at least three times.
- Ingredient Quality: A good, natural‑taste peanut butter makes all the difference—no added sugars, no hydrogenated oils.
- Method: No‑bake means you can set it while the TV is on, the kids are doing homework, or you’re scrolling Instagram.
- Make‑Ahead Potential: This pie keeps beautifully for up to three days in the fridge, making it an ideal make‑ahead dessert for parties.
Inside the Ingredient List
The Flavor Base
Peanut butter is the heart of this pie. I recommend using a natural, unsweetened variety that lists peanuts as the first ingredient and contains no added sugars or hydrogenated oils. The robust, earthy notes of the nuts give the filling its signature depth. If you skip the peanut butter, you lose the whole personality of the dish—so don’t. A good swap is almond butter for a slightly different nutty profile, but remember that almond butter is sweeter, so you may need to trim the granulated sugar by a tablespoon.
The Texture Crew
Cream cheese adds that tangy, luscious creaminess that balances the richness of the peanut butter. Use full‑fat cream cheese for the best mouthfeel; low‑fat versions tend to get grainy after chilling. Heavy cream, when whipped to soft peaks, incorporates air that lightens the filling dramatically. If you’re out of heavy cream, a combination of half‑and‑half and a splash of milk can work, but the texture won’t be quite as airy.
The Unexpected Star
Vanilla pudding mix is the unsung hero. It dissolves in cold milk, thickening the filling without any gelatin, which keeps the pie safe for those who avoid gelatin for dietary reasons. The vanilla flavor lifts the entire dessert, making it feel more sophisticated. If you’re feeling adventurous, swap the vanilla pudding for chocolate pudding for a chocolate‑peanut butter hybrid.
The Final Flourish
A ready‑made graham cracker crust provides a buttery, slightly sweet base that doesn’t need any baking. Look for a crust that’s already pressed into a pie pan to save time. Powdered sugar dusted on top adds a delicate sparkle and a hint of sweetness that ties the whole thing together. If you want a deeper flavor, lightly toast the crust for two minutes before filling—it will add a caramelized note that’s downright addictive.
Everything's prepped? Good. Let's get into the real action…
The Method — Step by Step
Start by preparing your workspace. Gather a large mixing bowl, a hand mixer, a rubber spatula, and a 9‑inch pie pan with the graham cracker crust already in place. Lightly chill the crust in the freezer for about five minutes; this helps it stay firm when the warm filling meets it later. Feel the cold metal of the pan in your hands—that crisp snap is the first promise of texture you’ll experience later.
In a medium saucepan, combine the ½ cup of granulated sugar with 2 cups of cold milk and the vanilla pudding mix. Whisk vigorously until the mixture is smooth, then place the saucepan over medium heat. As the mixture begins to bubble, you’ll hear a gentle fizz—this is the pudding thickening. Keep whisking for another two minutes until it reaches a glossy, custard‑like consistency, then remove from heat and let it cool for five minutes.
While the pudding cools, soften the 8 ounces of cream cheese. Kitchen Hack: Cut the cream cheese into small cubes and microwave for 15 seconds; this makes it easier to blend without over‑mixing. Add the cream cheese to a large mixing bowl along with 1 cup of peanut butter and 1 teaspoon of vanilla extract. Beat on medium speed until the mixture is completely smooth and the peanut butter is fully incorporated. The aroma at this point should be intoxicating, a buttery‑nutty perfume that makes you want to lick the spoon.
Gradually pour the cooled pudding into the peanut‑butter‑cream‑cheese mixture, beating on low speed to avoid splattering. The mixture will begin to thicken, turning a light caramel color. At this stage, the texture should be thick enough to hold its shape when lifted with a spatula, yet still soft enough to fold in the whipped cream later.
In a separate chilled bowl, whip 1 cup of heavy cream until soft peaks form. Watch Out: Over‑whipping turns the cream into butter, which would make the filling gritty. The cream should be airy, glossy, and just barely hold its shape. Gently fold the whipped cream into the peanut‑butter‑pudding mixture using a spatula, moving from the bottom up to preserve the air you just created.
Now, pour the final filling into the chilled graham cracker crust, spreading it evenly with the back of a spoon. The filling should glide smoothly, creating a glossy surface that reflects the light. Tap the pan lightly on the counter three times; this helps any air bubbles rise to the surface and pop, ensuring a uniform texture.
Cover the pie with plastic wrap and refrigerate for at least two hours, though overnight is ideal. During this chill, the flavors meld, and the filling sets into a firm, sliceable consistency. If you’re impatient, set a timer for 90 minutes and trust the process—this is the part where patience truly pays off.
Just before serving, sift ½ cup of powdered sugar over the top for a snow‑like finish. For an extra touch, drizzle a thin ribbon of melted chocolate or a drizzle of caramel sauce. The contrast of the white sugar with the deep brown chocolate creates a visual pop that’s as satisfying as the taste.
That's it — you did it. But hold on, I've got a few more tricks that'll take this to another level…
Insider Tricks for Flawless Results
The Temperature Rule Nobody Follows
Never pour a hot or warm filling onto a cold crust. The sudden temperature shock can cause the crust to soften and become soggy. Always let the pudding cool to room temperature before mixing it with the peanut butter and cream cheese. I once tried to speed things up by using a microwave, and the crust turned into a mushy mess—lesson learned.
Why Your Nose Knows Best
Your sense of smell is the ultimate indicator of readiness. When the pudding thickens, you’ll notice a faint caramel scent that tells you the starches have fully gelatinized. If you can’t detect that sweet, buttery aroma, keep cooking for another minute. Trust your nose more than the timer.
The 5‑Minute Rest That Changes Everything
After folding in the whipped cream, let the mixture sit for five minutes before pouring it into the crust. This short rest lets any remaining air bubbles rise, resulting in a smoother final texture. One of my friends skipped this step and ended up with tiny pockets of air that made the pie feel “spongy” rather than silky.
The Secret of the Powdered Sugar Snow
When dusting powdered sugar, use a fine-mesh sieve and a gentle tapping motion. This prevents clumps and creates an even, delicate veil. If you’re aiming for a dramatic presentation, add a pinch of cocoa powder to the sugar for a subtle mocha twist.
The Chill‑Before‑Serve Trick
Even after the recommended chilling time, give the pie a final 10‑minute stint in the freezer before slicing. This firms up the edges, making clean cuts without the filling sliding out. The result is a slice that holds its shape like a perfect little mountain of peanut butter heaven.
Creative Twists and Variations
This recipe is a playground. Here are some of my favorite ways to switch things up:
Chocolate Peanut Butter Fusion
Swap half of the peanut butter for a smooth chocolate spread, and replace the vanilla pudding mix with chocolate pudding. The result is a decadent chocolate‑peanut butter swirl that will make any chocolate lover swoon.
Salted Caramel Drizzle
After chilling, drizzle a homemade salted caramel sauce over the top and sprinkle flaky sea salt. The salty‑sweet contrast adds a sophisticated layer that pairs beautifully with the nutty base.
Banana Boost
Fold in thinly sliced bananas just before chilling. The fruit adds a subtle tropical note and a slight moisture that keeps the filling extra creamy.
Spicy Kick
Add a pinch of cayenne pepper or a dash of hot sauce to the peanut butter mixture for a surprising heat that cuts through the richness. It’s perfect for those who love a sweet‑heat combo.
Nut‑Free Alternative
If you have a peanut allergy, substitute sunflower seed butter or tahini. The flavor changes, but the creamy texture remains, and you’ll still get that satisfying nutty undertone.
Storing and Bringing It Back to Life
Fridge Storage
Cover the pie tightly with plastic wrap and store it in the refrigerator for up to three days. The filling stays firm, and the crust remains crisp as long as it isn’t exposed to excess moisture.
Freezer Friendly
Wrap the entire pie (or individual slices) in a layer of foil followed by a freezer‑safe bag. It will keep for up to two months. When you’re ready to enjoy, move it to the fridge to thaw overnight.
Best Reheating Method
Before serving a chilled slice, let it sit at room temperature for 15 minutes. If the texture feels a bit dense, drizzle a tiny splash of milk (about a teaspoon) over the top and let it sit for a minute; the steam will revive the creamy mouthfeel without melting the crust.