Picture this: I was scrambling to rescue a last‑minute dessert for a family gathering when my kitchen turned into a banana‑pudding disaster zone. The batter was as runny as a river, the layers were flat as a pancake, and the vanilla wafers had turned into a soggy mess. I stared at the counter, heart racing, and thought, “There has to be a better way.” That night, armed with a stubborn craving for the classic banana pudding and a dash of culinary curiosity, I set out to craft a cake that would not only save the evening but also rewrite the rules of this beloved dessert.
The aroma that eventually filled the room was unmistakable: sweet banana, creamy vanilla, and the faintest hint of toasted sugar. I could hear the faint pop of batter sizzling as I poured it into the pan, and the soft, buttery crackle as the first layer baked to a golden perfection. The texture was a delightful contrast—moist, fluffy cake, velvety pudding, and a crisp wafer crunch that danced on the tongue. I tasted it, and it was like a tropical sunrise in a bite—warm, comforting, yet with a bright, fresh finish that lingered. The moment I took that first bite, I knew I had stumbled upon something extraordinary.
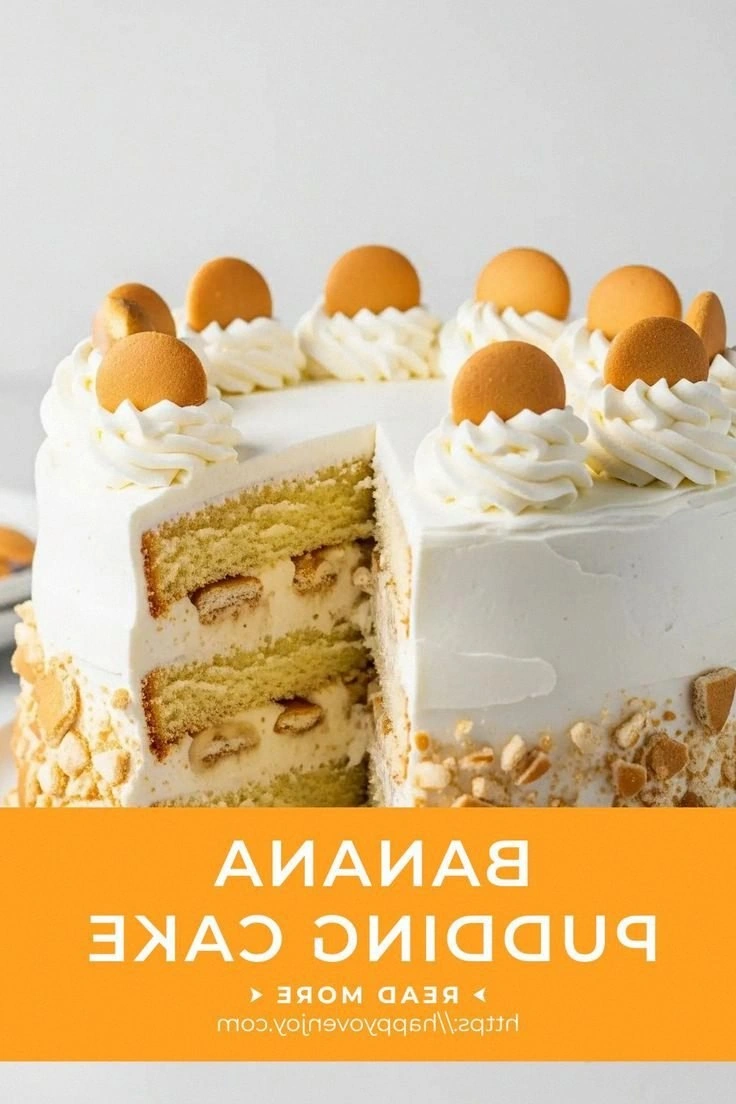
Why does this version stand out from every other banana pudding cake you've tried? Because I dared to break the mold: I swapped the standard pudding mix for a homemade vanilla custard base, I layered the cake with a thin, silky banana‑cream swirl, and I introduced a crunchy wafer crust that adds a satisfying snap. The result is a dessert that feels both indulgent and light, with layers that separate like a well‑orchestrated symphony. It’s the kind of cake that makes you question why you’ve ever settled for anything less. I dare you to taste this and not go back for seconds.
Let me walk you through every single step—by the end, you'll wonder how you ever made it any other way. From the first whisk to the final drizzle, each moment is designed to elevate the humble banana pudding into a show‑stopping centerpiece. Ready? Let’s dive in.
What Makes This Version Stand Out
- Flavor Fusion: The homemade vanilla custard brings a depth that instant mix can’t match, creating a rich, velvety base that carries the banana’s natural sweetness.
- Texture Tiers: The cake layers are airy and moist, the pudding is silky, and the wafer crust provides a crunchy contrast that keeps every bite exciting.
- Simple Prep: Despite its layers, the process is straightforward—no fancy equipment, no time‑consuming techniques.
- Make‑Ahead Friendly: Assemble the cake a day ahead; the flavors meld beautifully, and the wafer crust stays crisp.
- Crowd‑Pleaser: This cake is the talk of the table—guests ask for seconds, and you get compliments on both taste and presentation.
- Ingredient Quality: Using ripe bananas, high‑quality vanilla extract, and fresh butter elevates every bite to gourmet level.
- Versatile: Add a splash of rum or a hint of almond extract, and you can transform the cake for any occasion.
- Effortless Assembly: Layering is a breeze; each component has a clear place, so you can focus on the flavor rather than the logistics.
Inside the Ingredient List
The Flavor Base
The foundation of this cake starts with a homemade vanilla custard, made from instant pudding mix, whole milk, and a splash of vanilla extract. It’s the heart that keeps the layers moist and gives the pudding its silky texture. If you skip this step and rely solely on store‑bought pudding, the result will feel thin and lack depth. Swapping the instant mix for a homemade custard is a small tweak that pays huge dividends.
The Texture Crew
Flour, baking powder, baking soda, and salt work together to give the cake a light, airy crumb. Butter and eggs add richness, while the milk balances the batter’s thickness. If you omit the baking soda, the cake won’t rise as much, resulting in a denser, less forgiving texture. For a gluten‑free version, replace the all‑purpose flour with a blend that includes xanthan gum to maintain structure.
The Unexpected Star
Ripe bananas are the secret weapon that bring natural sweetness and a subtle fruitiness. The bananas should be at peak ripeness—brown spots and a faint aroma. Overripe bananas add more flavor but can make the cake too sweet; underripe bananas will leave a raw, grassy note. If you can’t find ripe bananas, frozen banana slices thawed in a bowl will work as a temporary stand‑in.
The Final Flourish
Crushed vanilla wafers provide the crunch that contrasts with the creamy layers. They’re sprinkled on top of the pudding and also folded into the batter for a subtle bite. If you’re avoiding sugar, you can substitute the wafers with a low‑calorie wafer alternative or a handful of chopped nuts for a nutty crunch. Remember, the wafer layer should be thin enough to stay crisp after baking.
Everything’s prepped? Good. Let’s get into the real action.
The Method — Step by Step
- Preheat your oven to 350°F (175°C). Grease and flour a 9×13 inch pan, then line the bottom with parchment for easy release. This step ensures your cake will lift cleanly and the batter won’t stick.
- In a medium bowl, whisk together the flour, baking powder, baking soda, and salt. Sifting is optional but recommended for a lighter crumb. A fine‑sifted dry mix feels like a cloud, which translates to a fluffier cake.
- Cream the butter and sugar in a large bowl until light and fluffy—about 3 minutes with an electric mixer on medium speed. This creates air pockets that help the cake rise. The batter should look like a pale, cloud‑like batter.
- Add the eggs one at a time, beating well after each addition. The batter will thicken slightly, but it should remain smooth. This step locks in moisture and gives the cake structure.
- Whisk the milk, vanilla extract, and instant pudding mix together until the pudding is smooth. Pour this custard into the batter and fold gently with a spatula until just combined. The batter will look a bit lumpy—don’t overmix.
- Fold in the sliced bananas and crushed vanilla wafers. The bananas should be distributed evenly, and the wafers should be lightly coated. This ensures each bite has a banana burst and a wafer crunch.
- Pour the batter into the prepared pan and smooth the top with a spatula. Tap the pan on the counter to release any large air pockets. The batter should be even, not lumpy.
- Bake for 30 minutes, or until a toothpick inserted into the center comes out clean. The top should be a golden amber, and the cake should feel firm but still slightly springy.
- Let the cake cool in the pan for 10 minutes, then transfer it to a wire rack to cool completely. This prevents condensation from turning the top into a soggy mess.
- Slice the cooled cake into sections, then spread a thin layer of the remaining custard between each slice. Reassemble the cake, and top with the remaining custard, sliced bananas, and a final sprinkle of crushed wafers. Chill for at least 2 hours to allow the flavors to meld.
- Serve chilled or at room temperature, topped with a dollop of whipped cream if desired. The whipped cream adds a luxurious finish that complements the banana and wafer notes.
That’s it—you did it. But hold on, I’ve got a few more tricks that will take this to another level.
Insider Tricks for Flawless Results
The Temperature Rule Nobody Follows
Many bakers bake banana cakes at 375°F, but that high heat can cause the batter to rise too quickly and then collapse. I always bake at 350°F to allow a gentle rise, ensuring the cake stays moist and the wafer crust stays crisp. If you’re in a hot climate, reduce the oven temperature by 25°F to compensate.
Why Your Nose Knows Best
Before you lift the cake out of the oven, pause and inhale the aroma. A warm, caramelized scent means the batter has hit the sweet spot. If it smells raw or overly sweet, give it another minute or two. Your nose is a reliable guide that saves you from a dry cake.
The 5-Minute Rest That Changes Everything
After baking, let the cake rest in the pan for exactly five minutes before transferring it to a wire rack. This short rest allows the steam to escape gradually, preventing the bottom from becoming soggy. It’s a tiny step that has a big impact on texture.
Layering Like a Pro
When assembling the cake, use a thin, even spread of custard between layers. A thick layer will drown the cake, while a thin layer will be invisible. A good rule of thumb is to spread a layer that’s about 1/8 inch thick—enough to taste but not overpower.
The Final Crunch
For the top wafer layer, press the crushed wafers gently into the custard with a flat spatula. This compacts the wafers, ensuring they stay crisp even after the cake has cooled. If you prefer a lighter crunch, sprinkle the wafers on top after chilling.
Creative Twists and Variations
This recipe is a playground. Here are some of my favorite ways to switch things up:
Almond Bliss
Swap vanilla extract for almond extract and add chopped toasted almonds between layers. The nutty aroma complements the banana, creating a sophisticated flavor profile that’s perfect for holiday gatherings.
Chocolate Banana Burst
Fold in a handful of dark chocolate chips into the batter and top the assembled cake with a drizzle of melted chocolate. The bittersweet chocolate pairs beautifully with the natural sweetness of bananas.
Coconut Coconut
Replace half of the vanilla wafers with shredded coconut, and use coconut milk instead of whole milk in the custard. This tropical twist turns the dessert into a beachy escape.
Rum‑Infused Delight
Add a tablespoon of dark rum to the custard for an adult‑friendly version. The warm, caramel notes of rum deepen the banana flavor and add a subtle kick.
Berry Banana Surprise
Layer sliced strawberries or blueberries between the cake layers. The fresh fruit adds a juicy burst that balances the richness of the custard and butter.
Storing and Bringing It Back to Life
Fridge Storage
Store the assembled cake in an airtight container in the refrigerator for up to 3 days. The custard will firm up slightly, so let it sit at room temperature for 15 minutes before serving to restore its silky texture.
Freezer Friendly
Wrap the cake tightly in plastic wrap, then in aluminum foil before freezing. It will keep for up to 2 months. Thaw overnight in the refrigerator, then let sit at room temperature for 20 minutes before serving.
Best Reheating Method
If you need to warm the cake, place a slice in the microwave for 20–30 seconds on medium power. Add a tiny splash of water to the slice before reheating; it steams back to perfection and prevents dryness.