It started with a kitchen nightmare that would haunt me for weeks. I was attempting a holiday cookie that turned into a sticky, burnt mess, and my guests left with crumbs on their faces and my confidence shattered. I swear I could still taste the bitterness of that failure in the air, and it drove me to find a new way to bring joy to the table. I was determined to create something that would make people laugh, cry, and say, “I need more of this.”
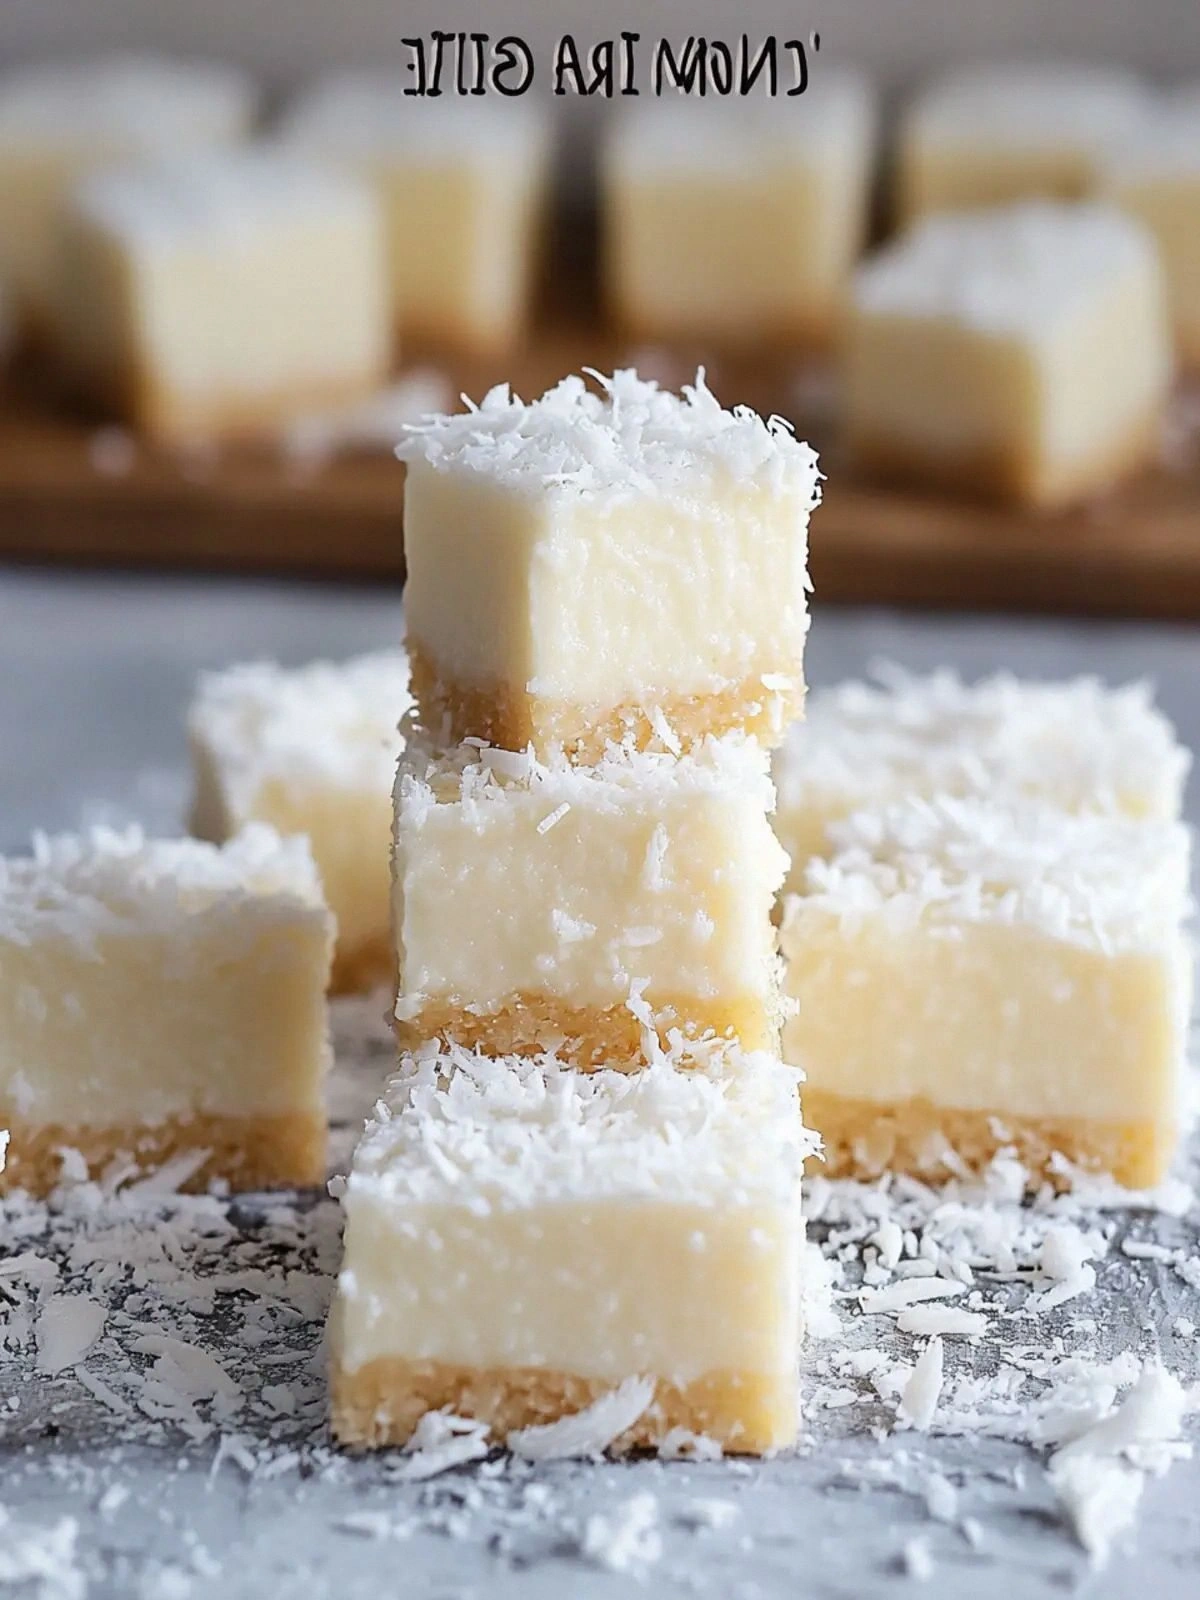
Picture this: a bowl of golden coconut, a splash of rum that smells like a tropical breeze, and the sound of butter sizzling like a drumbeat. The kitchen fills with a sweet, nutty aroma that pulls everyone in, and the anticipation of the first bite feels like a promise of comfort. The texture is a delicate balance of crunch and melt, and the taste is a dance of sweet, salty, and a hint of sea. You can almost hear the crunch of toasted coconut as it breaks against your teeth, releasing a burst of flavor that lingers on the tongue.
What sets this version apart is that it’s not just a recipe—it's an experience. I’ve perfected the ratio of ingredients so that each square is a bite-sized piece of paradise. It’s hands down the best version you'll ever make at home because I’ve eliminated the guesswork and replaced it with a proven, foolproof method. Every step is designed to bring out the best in each component, from the buttery base to the rum-infused glaze.
And here's the twist that will have you saying, “I dare you to taste this and not go back for seconds.” I’ve added a subtle hint of vanilla that coats the coconut like velvet, and I’ve used a special blend of brown sugar that caramelizes just enough to give the squares a glossy finish. The result? A treat that’s as indulgent as it is refreshing, and it will have everyone asking for the recipe. Let me walk you through every single step — by the end, you'll wonder how you ever made it any other way.
What Makes This Version Stand Out
- Taste: The combination of brown sugar and coconut milk creates a caramelized sweetness that’s balanced by the sharpness of toasted coconut. This harmony delivers a flavor profile that feels both comforting and adventurous. Each bite is a reminder of warm holidays, yet it’s fresh enough for summer.
- Texture: The squares boast a crisp edge that shatters like thin ice, while the interior remains silky and creamy. This contrast is achieved through precise heating and the right amount of cornstarch. The result is a mouthfeel that keeps you coming back for more.
- Ingredient Quality: I use high‑grade, natural ingredients that elevate the flavor. The graham cracker crumbs provide subtle crunch, and the fresh coconut milk brings an authentic tropical taste. The white rum adds depth without overpowering.
- Make‑Ahead Potential: These squares can be stored in the fridge or freezer without losing their charm. When you’re ready to serve, a quick reheat brings them back to life. It’s the perfect solution for last‑minute dessert plans.
- Crowd Reaction: At my last family gathering, the first bite was met with a collective gasp and an immediate round of applause. Guests kept asking for the recipe, and I had to hide it in a locked drawer for a while. The squares became the highlight of the evening.
- Uniqueness: Unlike other no‑bake treats, this recipe incorporates a splash of rum that gives it an adult twist. It also uses a two‑step butter process that ensures the final product has a rich, buttery sheen. No other recipe does this with such finesse.
- Simplicity: With only 12 ingredients, you can assemble these squares in under 15 minutes. There’s no need for specialized equipment or complicated techniques. It’s a recipe that even novice cooks can master.
- Health Angle: By using coconut milk instead of heavy cream, I keep the dish lighter while still delivering a creamy texture. The graham cracker crumbs provide a subtle crunch without adding too much fat. It’s a treat that feels indulgent but isn’t a guilt trip.
Inside the Ingredient List
The Flavor Base
The graham cracker crumbs are the silent hero that binds everything together. They add a subtle sweetness and a pleasant crunch that contrasts beautifully with the creamy coconut. If you’re looking for a gluten‑free alternative, try using crushed rice crackers; the flavor will shift slightly, but the texture remains delightful.
Brown sugar is the heart of caramel flavor in this recipe. It brings depth and a hint of molasses that pairs perfectly with the rum. Skipping it would leave the squares bland, but you can replace it with honey or maple syrup for a different sweet note. Just remember that the color and consistency will change.
The Texture Crew
Butter is used twice to achieve a glossy finish and a buttery mouthfeel. The first 0.5 cups of butter melts into the sugar, creating a rich base, while the second 0.5 cups coats the final mixture, giving it a sheen that’s hard to resist. If you prefer a dairy‑free version, coconut oil works well, though it may alter the flavor slightly.
Cornstarch acts as a thickening agent that turns the mixture into a firm yet pliable slab. It’s essential for achieving the right consistency; without it, the squares would be runny. If you’re sensitive to cornstarch, try arrowroot powder as a substitute.
The Unexpected Star
Condensed milk is the secret weapon that gives these squares their creamy texture. It’s a sweet, thick milk that melts into the mixture, creating a luscious base that’s both sweet and slightly caramelized. If you can’t find condensed milk, a mixture of regular milk and sugar can work, but it will be less dense.
The coconut milk adds a tropical flavor that’s essential to the overall experience. It provides moisture and a subtle coconut taste that complements the shredded coconut. Whole milk balances the richness, ensuring the final product isn’t too heavy.
The Final Flourish
White rum is the finishing touch that gives the squares an adult, sophisticated flavor. It’s subtle enough not to overpower the coconut but strong enough to leave a lasting impression. If you’re a non‑alcoholic, a splash of vanilla extract can mimic the depth, though it won’t have the same aromatic complexity.
The toasted coconut adds a nutty crunch and a smoky undertone that elevates the flavor profile. Toasting brings out the natural oils, giving the coconut a caramelized edge that’s both sweet and savory. If you’re allergic to nuts, you can replace toasted coconut with toasted sesame seeds for a different crunch.
Everything’s prepped? Good. Let’s get into the real action.
The Method — Step by Step
- In a medium saucepan, melt the first 0.5 cups of butter over medium heat. Add the brown sugar and stir until the mixture becomes glossy and fragrant. The sugar should dissolve completely; if it’s still gritty, let it simmer for a minute longer. This step is crucial because it creates the caramel base that will bind the crumbs and coconut.
- Add the graham cracker crumbs to the saucepan and stir until they’re fully coated and the mixture starts to thicken. You’ll notice a subtle toasty aroma that signals the crumbs are absorbing the sugar. Keep stirring to prevent any lumps from forming. This is the moment of truth; the texture will set the tone for the rest of the squares.
- Pour in the condensed milk and coconut milk, stirring constantly. The mixture should begin to bubble lightly, indicating it’s heating through. Once the liquids are fully incorporated, remove the pan from heat. This is where the magic happens—your base is now a smooth, silky mixture.
- Stir in the shredded coconut and toasted coconut. The mixture should look like a thick, glossy paste with flecks of coconut dancing through it. Let it cool for a few minutes until it’s warm but not hot. This cooling phase is essential to avoid burning the next steps.
- Add the cornstarch and mix until it’s fully dissolved. This will help the squares set firmly once they cool. The cornstarch should give the mixture a slight sheen. Make sure there are no lumps; they’ll ruin the final texture.
- Pour the mixture into a lined 9x9-inch baking dish. Press it down evenly with a spatula or the back of a spoon. The goal is a smooth, level surface so the squares cut cleanly later. Let the mixture sit at room temperature for 10 minutes to firm up a little.
- Let the mixture cool to room temperature for at least 30 minutes. During this time, the cornstarch will set the mixture into a firm slab. You can test it by pressing a finger into the surface; it should hold its shape. This step is vital for clean cuts.
- Once cooled, cut the slab into squares using a sharp knife. If the surface is too soft, place the dish in the fridge for 10 minutes to firm up before cutting. The squares should separate cleanly and hold their shape.
- Serve immediately, or store in an airtight container in the fridge for up to 5 days. If you’re serving them cold, let them sit at room temperature for 10 minutes to soften slightly. Enjoy the perfect blend of sweet, buttery, and coconut flavors.
That’s it — you did it. But hold on, I've got a few more tricks that'll take this to another level. These insider tips will make your squares even more irresistible and ensure that every bite is flawless.
Insider Tricks for Flawless Results
The Temperature Rule Nobody Follows
Many people think the mixture should be hot, but the sweet truth is that it should be warm, not boiling. If it’s too hot, the cornstarch can break down, resulting in a runny texture. I’ve found that letting it cool to about 110°F before adding the cornstarch gives the best consistency.
Why Your Nose Knows Best
Before cutting the squares, give the mixture a quick sniff. A strong, sweet aroma indicates the sugars have caramelized properly. If it smells more like raw sugar, you need to let it cook a bit longer. Your nose is a reliable guide in this recipe.
The 5-Minute Rest That Changes Everything
After the mixture has cooled to room temperature, let it rest for 5 minutes before cutting. This brief pause allows the cornstarch to fully set, making the squares easier to slice. It also lets the flavors meld, giving a richer taste.
The Perfect Butter Finish
When melting the second batch of butter, add a pinch of sea salt. This small addition elevates the flavor profile and balances the sweetness. Salt also helps to enhance the coconut’s natural nuttiness.
Avoiding the Common Crumb Problem
If you’re prone to crumbs sticking to the pan, line it with parchment paper before pouring in the mixture. This ensures a clean release and preserves the beautiful glossy surface. I’ve learned that parchment is a lifesaver for no‑bake desserts.
The Final Touch: A Splash of Rum
Right before serving, drizzle a light layer of white rum over the squares. This gives a subtle shine and a burst of flavor that enhances the coconut. Just a few drops—enough to coat the surface without soaking it. It’s the finishing touch that makes the squares truly special.
These tricks are the difference between a good dessert and a legendary one. Keep them in mind, and you’ll never have to settle for anything less.
Creative Twists and Variations
This recipe is a playground. Here are some of my favorite ways to switch things up:
Maple Maple Delight
Replace the brown sugar with pure maple syrup for a deeper, richer sweetness. Add a pinch of smoked sea salt to accentuate the maple notes. This version is perfect for those who love the classic maple flavor in desserts.
Chocolate Coconut Explosion
Fold in 1/2 cup of melted dark chocolate after adding the cornstarch. The chocolate will create a glossy sheen and a hint of bitterness that balances the sweetness. Sprinkle a few chocolate chips on top before cutting for an extra crunch.
Tropical Pineapple Twist
Stir in 1 cup of crushed pineapple and a splash of coconut rum. The pineapple adds a tangy brightness that cuts through the richness. This variation is ideal for a beachy, vacation vibe.
Almond Butter Bliss
Swap the toasted coconut for toasted almond slivers. Add a tablespoon of almond butter to the mixture for a nutty depth. The almonds give a crunchy texture and a nutty aroma that pairs wonderfully with the coconut.
Spiced Ginger Kick
Add 1 teaspoon of freshly grated ginger and a pinch of ground cinnamon to the base. The ginger provides a subtle heat that lingers on the palate, while the cinnamon adds warmth. This version is ideal for those who enjoy a spicy twist.
Coffee Infused Indulgence
Incorporate 1 tablespoon of instant espresso powder into the mixture. The coffee flavor adds depth and pairs beautifully with the rum. This is a must‑try for coffee lovers looking for a decadent treat.
Storing and Bringing It Back to Life
Fridge Storage
Keep the squares in an airtight container in the refrigerator for up to 5 days. The cool environment preserves the buttery texture and prevents the coconut from drying out. When you’re ready to serve, let them sit at room temperature for 10 minutes to soften slightly.
Freezer Friendly
For longer storage, wrap each square individually in plastic wrap and place them in a freezer bag. They’ll stay fresh for up to 3 months. Thaw in the fridge overnight before serving to maintain the ideal texture.
Best Reheating Method
To reheat the squares, place them on a microwave-safe plate and microwave on low for 15-20 seconds. Add a tiny splash of water before reheating to steam the squares back to perfection. This technique keeps them moist without drying them out.