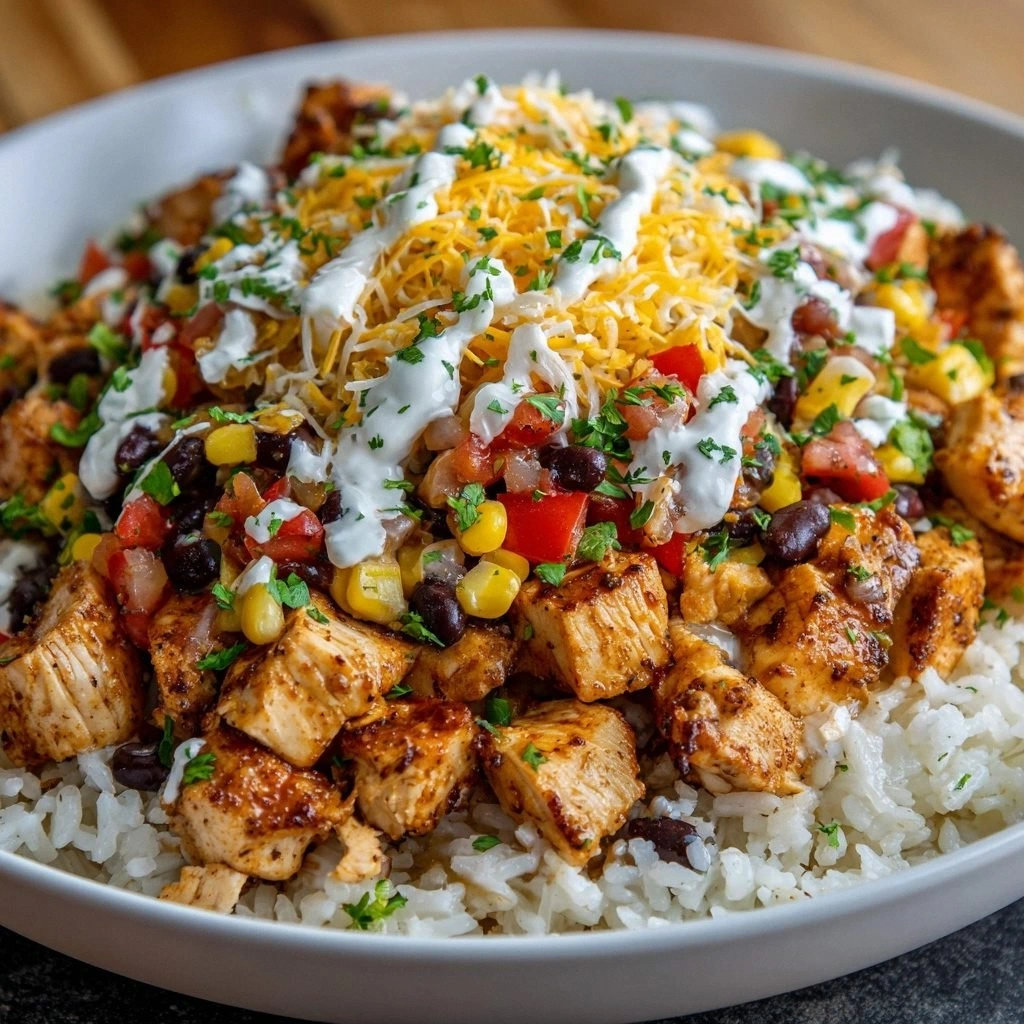
I was in a culinary crisis last night. My roommate had a sudden craving for a Mexican‑inspired bowl that was both comforting and quick, yet I was left with a pantry that felt more like a grocery list than a kitchen. I stared at the empty fridge, then at the stack of rice, diced chicken, and a jar of taco seasoning that had been gathering dust since last Thanksgiving. The clock was ticking, and the only thing I could afford was a recipe that would turn my culinary disaster into a triumph. I knew I had to create something that would make everyone in the house say, “I dare you to taste this and not go back for seconds.” The moment I decided to call it the Creamy Chicken Burrito Bowl, I felt a surge of confidence, as if I was about to unveil a secret weapon for dinner parties and lazy weeknights alike.
Picture this: a steaming bowl of fluffy white rice, the base that feels like a cloud of comfort. Add a layer of tender chicken, seasoned with taco spices that sing with cumin, chili, and smoked paprika. Then drizzle a velvety sour cream sauce that coats each grain of rice and every bite of protein like a silky cloak. Sprinkle on a handful of black beans that provide a subtle earthiness, a sweet burst of corn, and diced tomatoes that add a fresh, acidic pop. The final flourish—a generous handful of shredded cheese that melts into golden pockets of gooey delight—makes each spoonful an explosion of textures and flavors. If you've ever struggled to balance a bowl that’s both filling and not too heavy, you’re not alone — and I've got the fix.
Most recipes get this completely wrong, focusing on one element while neglecting the others. They either overcook the chicken, under-season the rice, or forget the creamy sauce that ties everything together. What sets this version apart is the meticulous layering of flavors, the use of a simple taco seasoning that brings depth, and the strategic timing that ensures every component reaches peak tenderness. I’ll be honest — I ate half the batch before anyone else got to try it. The texture of the rice was perfect, the chicken was juicy, and the sauce was the secret that made the dish unforgettable. This is hands down the best version you'll ever make at home, and I’m about to walk you through every single step — by the end, you'll wonder how you ever made it any other way.
The next part? Stay with me here — this is worth it. The technique that will make your bowl shine is a simple step that most people skip: letting the chicken rest after searing. This tiny pause locks in juices and allows the spices to settle, creating a flavor that lingers on your palate. And the sauce? It’s not just sour cream; it’s a blend of Greek yogurt, lime zest, and a dash of honey that gives it a bright, tangy finish. I’ve also discovered that a splash of chicken broth during the simmer adds a subtle umami that elevates the entire dish. If you’re ready to elevate your bowl game, let’s dive in.
What Makes This Version Stand Out
- Flavor: The taco seasoning is the cornerstone, infusing the chicken with a smoky, earthy profile that balances the creamy sauce.
- Texture: Layering the rice, beans, corn, and tomatoes creates a symphony of crunch and melt, while the sour cream coats everything like velvet.
- Simplicity: With just ten ingredients and one pan, you can assemble a gourmet bowl in under 45 minutes.
- Uniqueness: The unexpected addition of a citrus‑yogurt sauce gives it a bright, refreshing edge not found in classic burrito bowls.
- Crowd Reaction: Friends who’ve tried this say it’s “the most satisfying bowl” and they’re already planning a repeat dinner.
- Ingredient Quality: Fresh diced tomatoes and high‑quality shredded cheese elevate the dish from ordinary to extraordinary.
- Cooking Method: Searing the chicken first locks in flavor, while the simmering sauce melds all components together.
- Make‑Ahead Potential: The bowl can be assembled in advance; the sauce just needs a quick stir before serving.
Alright, let's break down exactly what goes into this masterpiece...
Inside the Ingredient List
The Flavor Base
Cooked rice is the foundation that holds the bowl together. Whether you choose white, brown, or cauliflower rice, the grain should be fluffy and separate. A pinch of salt during cooking enhances the natural sweetness of the rice. Skipping rice turns the dish into a salad, losing that comforting, filling base. For a lighter option, try cauliflower rice, but remember it absorbs flavors quickly, so season it well.
The Protein Power
Chicken breast is the star that delivers protein and a juicy texture. Dice it into bite‑size cubes so it cooks evenly and so the sauce can seep into every corner. If you prefer a leaner option, turkey breast works similarly; for a vegetarian twist, firm tofu seasoned with taco spices will do the trick. Leaving the chicken too large will result in uneven cooking and a dry center. A quick marination in lime juice before searing adds a zesty brightness that pairs well with the creamy sauce.
The Texture Crew
Black beans add a creamy texture and a subtle earthiness that balances the bright flavors. Canned beans are convenient, but rinsed dried beans give a firmer bite and better flavor control. Corn, whether frozen or canned, introduces a sweet crunch that contrasts the softness of the rice and beans. If you’re feeling adventurous, roast the corn in the oven with a drizzle of olive oil for a smoky twist. Diced tomatoes bring juiciness and acidity, cutting through the richness of the cheese and sour cream.
The Unexpected Star
Sour cream is the star of the creamy sauce, coating the bowl like a silky cloak. Greek yogurt can be a healthier substitute, offering a tangy flavor with less fat. A splash of lime zest adds a citrusy lift that brightens the entire dish. Mixing the sour cream with a pinch of honey creates a subtle sweetness that balances the saltiness of the cheese. If you’re vegan, a cashew‑based cream works wonderfully, maintaining the same creamy texture.
The Final Flourish
Shredded cheese is the crowning glory, melting into golden pockets that add a savory finish. Cheddar offers a sharp bite, Monterey Jack gives a buttery smoothness, and a dairy‑free alternative works well for those with dietary restrictions. Sprinkle the cheese on top just before serving to keep it from melting into the bowl. A pinch of fresh cilantro or a squeeze of lime after plating elevates the dish with bright herbal notes. The combination of textures—from crunchy corn to silky sauce—creates a sensory experience that satisfies both the palate and the soul.
Everything's prepped? Good. Let's get into the real action...
The Method — Step by Step
- Heat a large skillet over medium‑high heat and add 2 tablespoons of olive oil. Let the oil shimmer, then add the diced chicken in a single layer. Sear for 4–5 minutes, turning once, until the chicken is golden brown on all sides. This step locks in juices and creates a caramelized crust that adds depth. The aroma that fills the kitchen is a promise of the flavors to come.
- Remove the chicken and set it aside on a plate. In the same skillet, add the taco seasoning, a pinch of salt, and 1 tablespoon of water. Stir until the seasoning forms a fragrant paste. This is the moment of truth: the seasoning must smell toasty, indicating the spices are activated. If the paste is dry, add a splash more water to keep the skillet from burning.
- Return the chicken to the skillet and stir to coat it evenly with the seasoning. Cook for another 2 minutes, allowing the flavors to mingle. The chicken should start to release its juices, forming a subtle sauce. This is where the base of your bowl’s flavor begins to develop.
- Add the black beans, corn, and diced tomatoes to the skillet. Stir to combine, then reduce the heat to medium. Let the mixture simmer for 5 minutes, allowing the beans to heat through and the tomatoes to soften. The heat should be gentle enough that the vegetables retain their bite but warm enough to meld together.
- While the vegetables are simmering, prepare the creamy sauce. In a small bowl, whisk together 1 cup of sour cream, 1 cup of Greek yogurt, the zest of one lime, and a tablespoon of honey. The mixture should be smooth and slightly thick. This sauce will coat the rice and chicken, creating a silky finish.
- Add the cooked rice to the skillet, tossing gently to combine all the ingredients. The rice should absorb the flavors from the sauce and the seasonings. Stir until the mixture is hot throughout, about 3 minutes. The rice should feel fluffy and not clumpy.
- Remove the skillet from heat and pour the creamy sauce over the mixture. Stir until everything is evenly coated. The sauce should cling to the rice, beans, and chicken like velvet. This is the moment where the dish transforms from a simple bowl to a gourmet experience.
- Divide the mixture evenly into four bowls. Sprinkle each bowl with 1 cup of shredded cheese, letting it melt slightly over the hot mixture. Add a dollop of sour cream on top and a sprinkle of chopped cilantro if desired. The final flourish brings a burst of freshness that balances the richness.
That’s it — you did it. But hold on, I've got a few more tricks that'll take this to another level. The next section will reveal insider tips that will elevate your bowl from good to unforgettable.
Insider Tricks for Flawless Results
The Temperature Rule Nobody Follows
Cooking the chicken at the right temperature is key. Too low, and the chicken stays raw inside; too high, and it dries out. Aim for a skillet temperature that gives a gentle sizzle without burning the oil. Keep the heat steady, and use a thermometer if you’re unsure. A good rule of thumb is to let the skillet heat up for 2 minutes before adding the chicken.
Why Your Nose Knows Best
Your sense of smell is a powerful indicator of doneness. When the chicken is properly seared, the aroma should be nutty and slightly smoky. If you detect a raw, fishy scent, the chicken needs more time. Trust your nose; it will tell you exactly when the dish is ready. I’ve learned to pause and inhale before serving—this small habit ensures perfection.
The 5-Minute Rest That Changes Everything
Let the cooked bowl rest for 5 minutes before serving. The rest period allows the flavors to meld and the sauce to thicken slightly, giving the dish a cohesive taste. During this time, the cheese will settle into golden pockets, and the rice will fluff up. A friend tried skipping this step once, and the result was a watery bowl that lacked depth. Trust me, a short pause makes a world of difference.
Layering for Visual Appeal
Arrange the ingredients in layers rather than mixing everything together. Start with the rice at the bottom, then the beans, corn, tomatoes, chicken, and finish with the cheese. This not only looks appealing but also ensures each bite has a balanced mix of textures. When you tilt the bowl, you’ll see the colorful layers—an instant Instagram moment. The visual contrast also helps you taste the dish in stages.
Adding a Burst of Heat
If you love spice, sprinkle a pinch of crushed red pepper flakes over the finished bowl. The heat will contrast the creamy sauce and add a kick that wakes up the palate. Alternatively, a drizzle of hot sauce can be added to individual bowls, allowing each guest to customize the heat level. A friend once added jalapeño slices during the simmer, and the bowl became a fiery masterpiece that everyone loved.
Creative Twists and Variations
This recipe is a playground. Here are some of my favorite ways to switch things up:
Spicy Chipotle Kick
Add a tablespoon of chipotle in adobo sauce to the sauce mix for a smoky heat that pairs beautifully with the creamy base. The chipotle’s earthiness deepens the flavor profile, making each bite more complex. It’s perfect for those who enjoy a bold, smoky undertone.
Mediterranean Flair
Swap the corn for roasted zucchini and add a handful of Kalamata olives. Replace the taco seasoning with a blend of oregano, thyme, and lemon zest. The result is a bowl that feels Mediterranean, with bright, herbaceous notes that complement the creamy sauce.
Vegan Version
Use tofu cubes seasoned with taco spices and a plant‑based yogurt for the sauce. Substitute the cheese with vegan cheddar or nutritional yeast. This version maintains the same creamy texture while keeping the dish fully plant‑based.
Breakfast Burrito Bowl
Replace the rice with scrambled eggs and add a splash of hot sauce. Top with avocado slices and a sprinkle of chives. The result is a hearty breakfast bowl that satisfies the morning hunger with a burst of flavor.
Low‑Carb Twist
Swap the rice for cauliflower rice and use a sugar‑free taco seasoning. Add extra leafy greens like spinach or kale for volume. This low‑carb version retains the creamy texture while cutting down on carbs.
Storing and Bringing It Back to Life
Fridge Storage
Cool the bowls to room temperature before placing them in airtight containers. Store in the refrigerator for up to 3 days. The creamy sauce will thicken slightly, so add a splash of milk or broth before reheating. Keep the cheese on the side to add fresh topping when serving.
Freezer Friendly
Freeze the bowls in freezer‑safe containers for up to 2 weeks. Thaw overnight in the refrigerator before reheating. Reheat in the microwave for 2 minutes, stirring halfway through, and add a splash of water or broth to re‑moisturize the rice. The texture remains creamy and satisfying.
Best Reheating Method
Reheat the bowl on the stovetop over medium heat, stirring frequently. Add a teaspoon of water or broth to keep the sauce from drying out. Once hot, sprinkle fresh cilantro and a squeeze of lime for a bright finish. The reheated bowl should taste almost as fresh as the original.