I was standing in my kitchen, staring at a bag of frozen pretzel bites that tasted like cardboard, when my roommate dared me to make something that would actually make the whole block smile. I accepted the challenge, rolled up my sleeves, and set out to create the ultimate soft pretzel bite that could turn even the most stubborn snack skeptic into a pretzel devotee. The moment the dough hit the warm water, the kitchen filled with a faint yeasty perfume that reminded me of a German bakery on a crisp Saturday morning, and I knew we were onto something special. The scent was so intoxicating that I could almost hear the faint crackle of the boiling soda bath before it even happened. If you’ve ever tried a store‑bought pretzel and felt a pang of disappointment, this version will make you question every grocery aisle you’ve ever walked down.
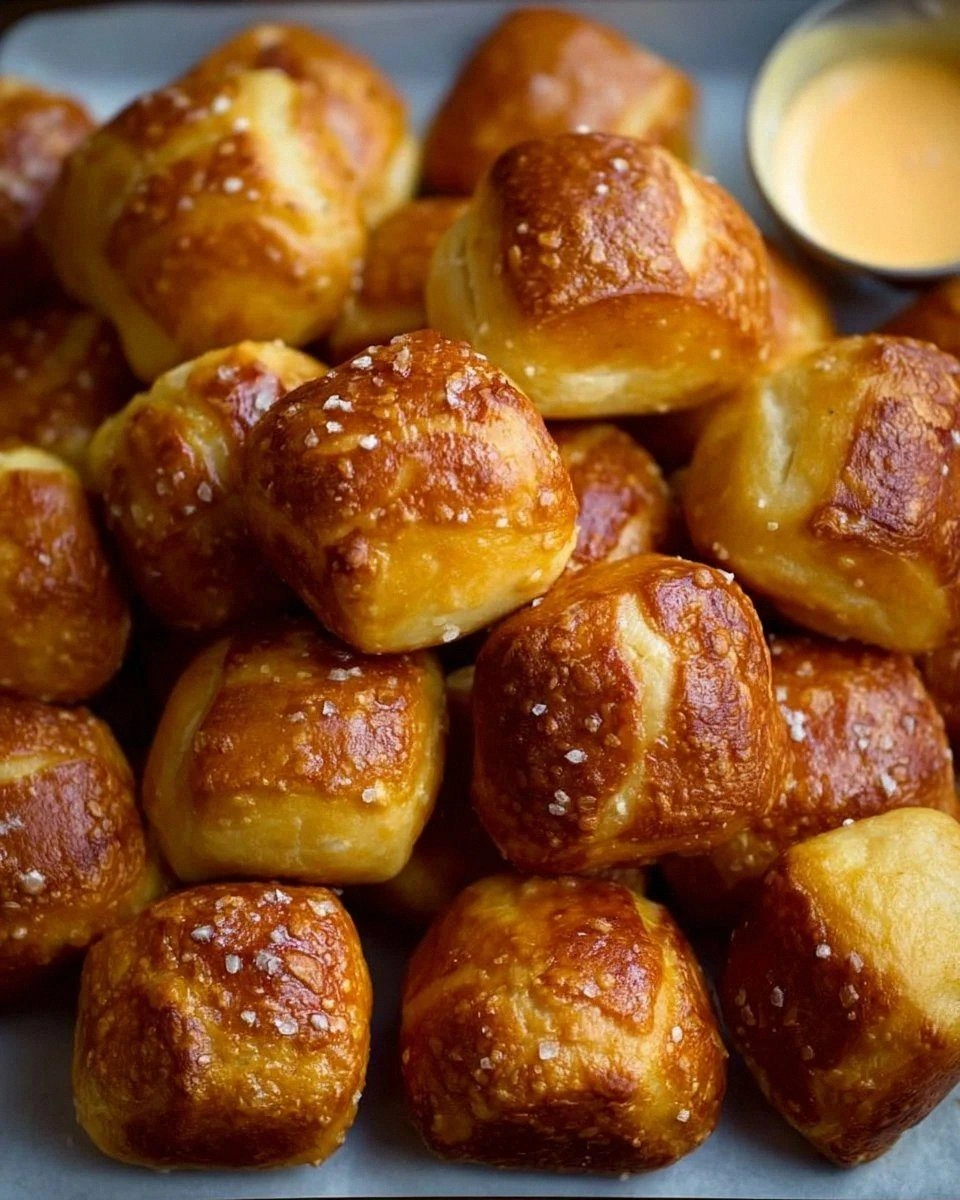
Picture this: a golden‑brown bite, brushed with a glossy butter sheen, dusted with coarse sea salt that glistens like tiny pearls, and a soft interior that yields like a cloud when you bite into it. The contrast between the slightly crisp exterior and the pillowy middle is the kind of texture drama that makes you shout, “I dare you to taste this and not go back for seconds.” Most recipes get this completely wrong, either over‑baking the crust or under‑cooking the center, but I’ve cracked the code with a simple boil‑then‑bake technique that guarantees that perfect chew every single time. The secret? A quick dip in a baking‑soda bath that gives each bite that signature pretzel flavor without the bitterness of traditional lye.
What truly sets this batch apart is the addition of a buttery brush just before the final bake, which creates a glossy finish that looks as good as it tastes. I’ll be honest — I ate half the batch before anyone else got a chance to try it, and that’s a confession I’m not ashamed to make because the flavor is that addictive. You’ll also notice a subtle sweetness from a teaspoon of sugar that balances the salt, a nuance most pretzel recipes completely overlook. And if you’ve ever struggled with dough that refuses to rise, you’re not alone — I’ve got the fix that will turn your flaky failures into fluffy triumphs.
Okay, ready for the game‑changer? I’m about to walk you through every single step — from the exact water temperature to the moment you pull those golden bites out of the oven, the whole kitchen smelling like a street‑side pretzel cart in Berlin. By the end, you’ll wonder how you ever made pretzels any other way, and you’ll be ready to brag about your new signature snack at every gathering. Let’s dive in and make the best soft pretzel bites you’ll ever taste.
What Makes This Version Stand Out
- Flavor Punch: The baking‑soda bath creates that authentic pretzel tang without the harshness of lye, while the butter brush adds a buttery richness that melts in your mouth.
- Texture Harmony: A quick boil locks in moisture, giving each bite a tender crumb, and the short bake creates a lightly crisp crust that snaps like thin ice.
- Simplicity: Only seven core ingredients, no fancy equipment, and a straightforward two‑step cooking process that even a rookie can master.
- Unique Twist: A dash of sugar in the dough balances the salty finish, a secret most commercial pretzel mixes skip entirely.
- Crowd Reaction: These bites disappear faster than you can say “extra salt,” making them the perfect party starter or game‑day snack.
- Ingredient Quality: Using all‑purpose flour with a moderate protein content ensures the dough is elastic enough to hold its shape without becoming tough.
- Cooking Method: The boil‑then‑bake technique guarantees consistent results, no matter if you’re using a convection oven or a conventional one.
- Make‑Ahead Potential: You can freeze the shaped bites before boiling, then pop them into the soda bath and bake whenever the craving hits.
Alright, let's break down exactly what goes into this masterpiece...
Inside the Ingredient List
The Flavor Base
Warm water (1.5 cups) is the liquid that awakens the yeast, and the temperature range of 110°F to 115°F is crucial. Too hot and you’ll kill the yeast; too cold and it will crawl, leaving you with a dense bite. If you don’t have a thermometer, a quick test is to dip your finger in – it should feel like a warm bath, not a scalding shower. You can substitute filtered water for a cleaner taste, but tap water works fine as long as it’s not heavily chlorinated.
The Sweet & Rise Crew
Sugar (2 teaspoons) feeds the yeast and adds a subtle sweetness that balances the coarse salt topping. Active dry yeast (2 teaspoons) is the star of the show, creating those airy pockets inside each bite. If you’re out of active dry, instant yeast works in a pinch, but you’ll need to skip the 5‑minute proofing step because instant yeast activates immediately.
The Texture Crew
All‑purpose flour (4 cups) provides the structure; the gluten network it forms is what lets the dough stretch without tearing. Salt (1 teaspoon) not only seasons the interior but also strengthens the gluten, giving the pretzel its characteristic chew. If you prefer a slightly softer bite, you can swap half the flour for cake flour, but expect a less robust crust.
The Unexpected Star
Baking soda (⅓ cup) is dissolved in the boiling water for the pretzel bath, creating an alkaline environment that gives pretzels their signature deep brown color and distinctive flavor. This is the magic that replaces traditional lye, which is hazardous for home cooks. If you’re allergic to soda, a small amount of baking powder won’t work; the alkalinity is essential.
The Final Flourish
A large egg, beaten, is brushed onto the dough before baking, providing a glossy finish that catches the eye and adds a hint of richness. Coarse salt is sprinkled just before the final bake, giving each bite a satisfying crunch and a burst of salty flavor. Optional melted butter can be brushed after baking for an extra layer of flavor and a soft sheen that makes the bites look restaurant‑ready.
Everything's prepped? Good. Let's get into the real action...
The Method — Step by Step
Start by mixing the warm water, sugar, and yeast in a large bowl. Let it sit for about five minutes until it becomes frothy, like a tiny cloud of bubbles that says, “I’m ready to rise.” If the mixture doesn’t foam, your water was probably too hot or the yeast is dead, and you’ll need to start over. This is the moment of truth for any baker, and the aroma that wafts up will already have you craving the final product.
Add the flour, salt, and the beaten egg to the yeast mixture. Stir with a wooden spoon until a shaggy dough forms, then turn it out onto a lightly floured surface. Knead for about eight minutes, feeling the dough become smooth and elastic—like a well‑trained athlete stretching before a race. If the dough feels sticky, sprinkle a little more flour, but be careful not to over‑flour, or you’ll end up with tough pretzel bites.
Place the dough in a lightly oiled bowl, cover it with plastic wrap, and let it rise in a warm spot for 45 minutes to an hour, or until it has doubled in size. I dare you to watch the dough rise without checking your phone—just trust the visual cue. The kitchen will fill with a sweet, yeasty scent that’s practically a perfume for bakers.
Kitchen Hack: Set your oven to the lowest temperature (around 150°F) and turn it off; the residual heat creates a perfect proofing environment.Once risen, punch down the dough gently and divide it into 12 equal pieces. Roll each piece into a long rope, about 12 inches long, then cut the rope into bite‑size pieces (about 1‑inch each). This is where the fun begins—shape each piece into a tiny pretzel knot by pressing the center into a shallow well of the dough and looping the ends around. If you’re short on time, you can simply roll the pieces into balls, but you’ll miss the iconic pretzel shape that makes these bites special.
In a large pot, bring 10 cups of water to a boil and add the ⅓ cup of baking soda. The water will bubble vigorously—watch out for the foam, it’s a sign the soda is doing its job. Using a slotted spoon, carefully drop 6‑8 pretzel bites at a time into the boiling bath. Boil for exactly 30 seconds; you’ll see the surface start to foam and a faint glossy sheen appear.
Watch Out: Do not over‑boil—30 seconds is enough. Over‑boiling will make the pretzels soggy and cause them to fall apart during baking.Using the slotted spoon, remove the bites and place them on a parchment‑lined baking sheet. Brush each bite generously with the beaten egg; this will give them a golden hue and a slight crispness. Sprinkle coarse sea salt over the tops while the egg wash is still wet. If you love extra flavor, drizzle a little melted butter now for an indulgent finish.
Preheat your oven to 425°F (220°C). Slide the baking sheet into the oven and bake for 12‑15 minutes, or until the pretzel bites turn a deep, appetizing gold and the edges start to pull away from the parchment. The scent at this point is pure magic—imagine a street market in Munich on a chilly evening.
When the timer dings, pull the tray out and let the bites cool for a few minutes on a wire rack. This short rest lets the interior steam settle, keeping the crumb tender. If you’re impatient (like me), you can dip them immediately into a warm cheese sauce, but I recommend a brief pause to let the crust set.
Serve warm, straight from the oven, with your favorite dipping sauce—cheddar cheese, mustard, or even a honey‑sriracha blend. Picture yourself pulling this out of the oven, the whole kitchen smelling incredible, and everyone reaching for another bite. This next part? Pure magic. And now the fun part: enjoy the fruits of your labor and bask in the applause of your delighted guests.
Insider Tricks for Flawless Results
The Temperature Rule Nobody Follows
Never underestimate the power of a precise water temperature. If your water is even a few degrees off, the yeast either slumbers or burns out. I once used water straight from the kettle, thinking “hot is good,” only to end up with a dense, rubbery batch. Keep a kitchen thermometer handy; it’s a small investment that pays off in consistency.
Why Your Nose Knows Best
Your sense of smell is a reliable indicator of dough readiness. When the dough has risen, you’ll detect a sweet, slightly alcoholic aroma—like a faint hint of bread dough left out for a night. If you can’t smell anything, give it a few more minutes. Trusting your nose can save you from under‑proofed pretzels that turn out flat.
The 5‑Minute Rest That Changes Everything
After boiling, let the pretzel bites rest on the parchment for five minutes before brushing with egg. This short pause allows the surface to dry just enough so the egg wash adheres evenly, preventing a soggy coating. A friend tried skipping this step once—let’s just say the bites looked like a swampy mess and the texture was all wrong.
Butter Brush Finale
Brushing melted butter on the pretzels right after they exit the oven adds a luxurious sheen and a buttery flavor that lingers on the palate. For an extra twist, mix a pinch of garlic powder into the butter for a subtle savory kick. This simple step elevates the bites from good to unforgettable.
Freezer‑Friendly Shaping
If you want to prep ahead, shape the bites and freeze them on a tray before boiling. Once frozen solid, transfer them to a zip‑top bag. When you’re ready to bake, drop the frozen pieces straight into the soda bath—no thawing needed. The result is just as fluffy, and you’ll have a snack stash ready for any impromptu gathering.
Creative Twists and Variations
This recipe is a playground. Here are some of my favorite ways to switch things up:
Cheesy Garlic Bombs
Mix shredded mozzarella and a pinch of garlic powder into the dough before shaping. The cheese melts inside, creating a gooey center that oozes with every bite. Perfect for cheese lovers who can’t get enough of that stretchy pull.
Cinnamon Sugar Sweeties
Swap the coarse salt for a blend of cinnamon and sugar after brushing with egg. The soda bath remains the same, but the final sprinkle turns the pretzel bites into a dessert‑style treat, ideal for brunch or a sweet snack.
Everything Bagel Pretzels
After the egg wash, sprinkle a mixture of sesame seeds, poppy seeds, dried onion flakes, and a dash of garlic powder. This variation captures the beloved everything bagel flavor in bite‑size form, and it’s a hit at breakfast tables.
Spicy Jalapeño Kick
Finely dice fresh jalapeños and fold them into the dough. Finish with a light dusting of smoked paprika after baking for a smoky heat that complements the salty crust. Great for those who enjoy a little fire.
Herb‑Infused Delight
Add chopped fresh rosemary or thyme to the dough for an aromatic twist. The herbs infuse the interior with a fragrant note that pairs beautifully with a simple olive oil dip.
Storing and Bringing It Back to Life
Fridge Storage
Place cooled pretzel bites in an airtight container lined with a paper towel to absorb excess moisture. They’ll stay fresh for up to three days. Reheat in a preheated 350°F oven for five minutes, and they’ll regain that just‑out‑of‑the‑oven softness.
Freezer Friendly
Arrange the fully baked and cooled bites on a baking sheet, freeze until solid, then transfer to a freezer bag. They’ll keep for up to two months. When you’re ready, bake straight from frozen at 425°F for 8‑10 minutes, or microwave for 30 seconds and finish under the broiler for crispness.
Best Reheating Method
Add a tiny splash of water to the reheating tray before popping the bites into the oven; the steam revives the interior crumb while the exterior stays crisp. This trick prevents the pretzels from drying out and keeps that coveted pillowy texture.