I was in the middle of a frantic holiday prep when the oven decided to betray me—smoke billowed, the timer rang, and my gingerbread cookies turned into charcoal bricks. I stared at the disaster and thought, “If I can’t save this, I’ll create something even better.” That moment sparked a dare: I would invent a bar that could survive the chaos of a bustling kitchen, still taste like a festive miracle, and make everyone line up for seconds. I’m not exaggerating when I say this is hands down the best version you’ll ever make at home, and I’m willing to bet you’ll be back for more before the first bite even settles.
Picture the scene: the kitchen humming with the low thrum of the refrigerator, the clink of mixing bowls, and the sweet perfume of butter melting like golden sunshine. The air is thick with anticipation, the kind you feel when you’re about to open a present you’ve been eyeing all year. As the batter hits the pan, you hear that subtle sizzle—like tiny fireworks announcing a celebration. The scent of toasted flour and almond extract swirls, wrapping the room in a warm, comforting hug that makes you forget the earlier disaster entirely.
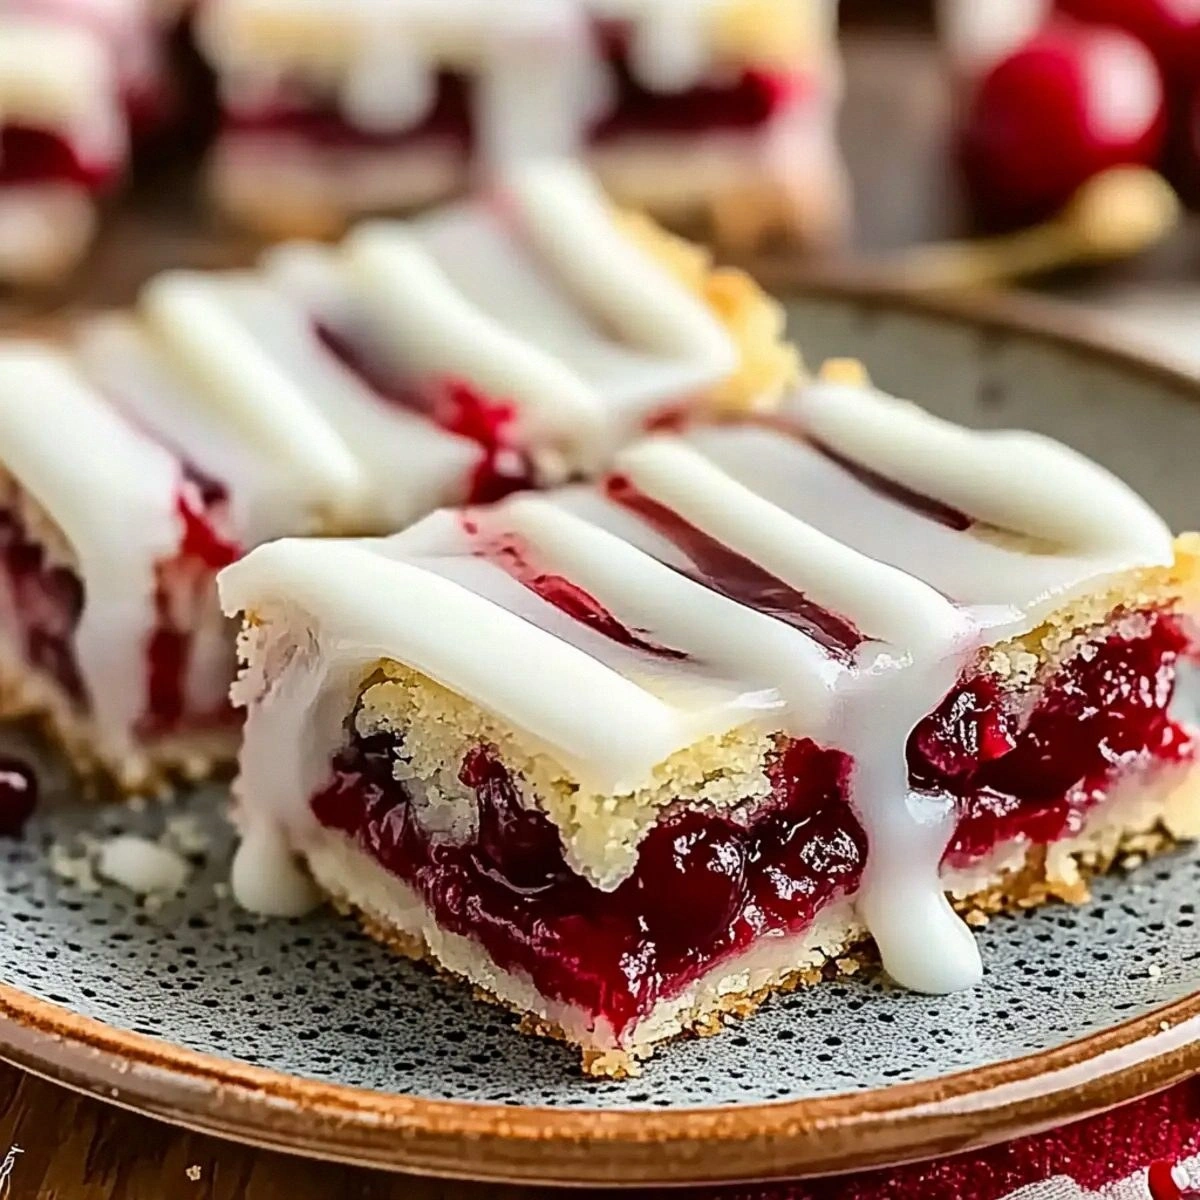
What makes this version stand out isn’t just the flavor; it’s the texture symphony that follows. The base is buttery and tender, the middle is a luscious cherry jam that spreads like velvet, and the top is a glossy glaze that snaps with a faint crackle, like thin ice underfoot. Most recipes get this completely wrong, either drowning the bars in soggy fruit or leaving them dry as a desert. I’ve cracked the code with a precise butter‑to‑flour ratio, a secret splash of cherry syrup, and a quick chill that locks in moisture while giving the edges a subtle crunch.
I’m going to let you in on a technique that most bakers overlook: a brief refrigeration of the dough before baking. This step is the game‑changer that turns a good bar into an irresistible masterpiece. It allows the butter to firm up, preventing the bars from spreading too thin, while also giving the gluten a chance to relax, resulting in that melt‑in‑your‑mouth crumb we all crave. Okay, ready for the game‑changer? Let me walk you through every single step — by the end, you’ll wonder how you ever made it any other way.
What Makes This Version Stand Out
- Flavor Explosion: The marriage of almond and vanilla extracts with a robust cherry filling creates a depth that feels like a holiday party in your mouth.
- Texture Triple Threat: A buttery crust, a juicy center, and a glossy, slightly crisp glaze give you three distinct bites in one bar.
- Simplicity: Only eleven ingredients, all pantry‑friendly, and no fancy equipment beyond a standard 9×13 pan.
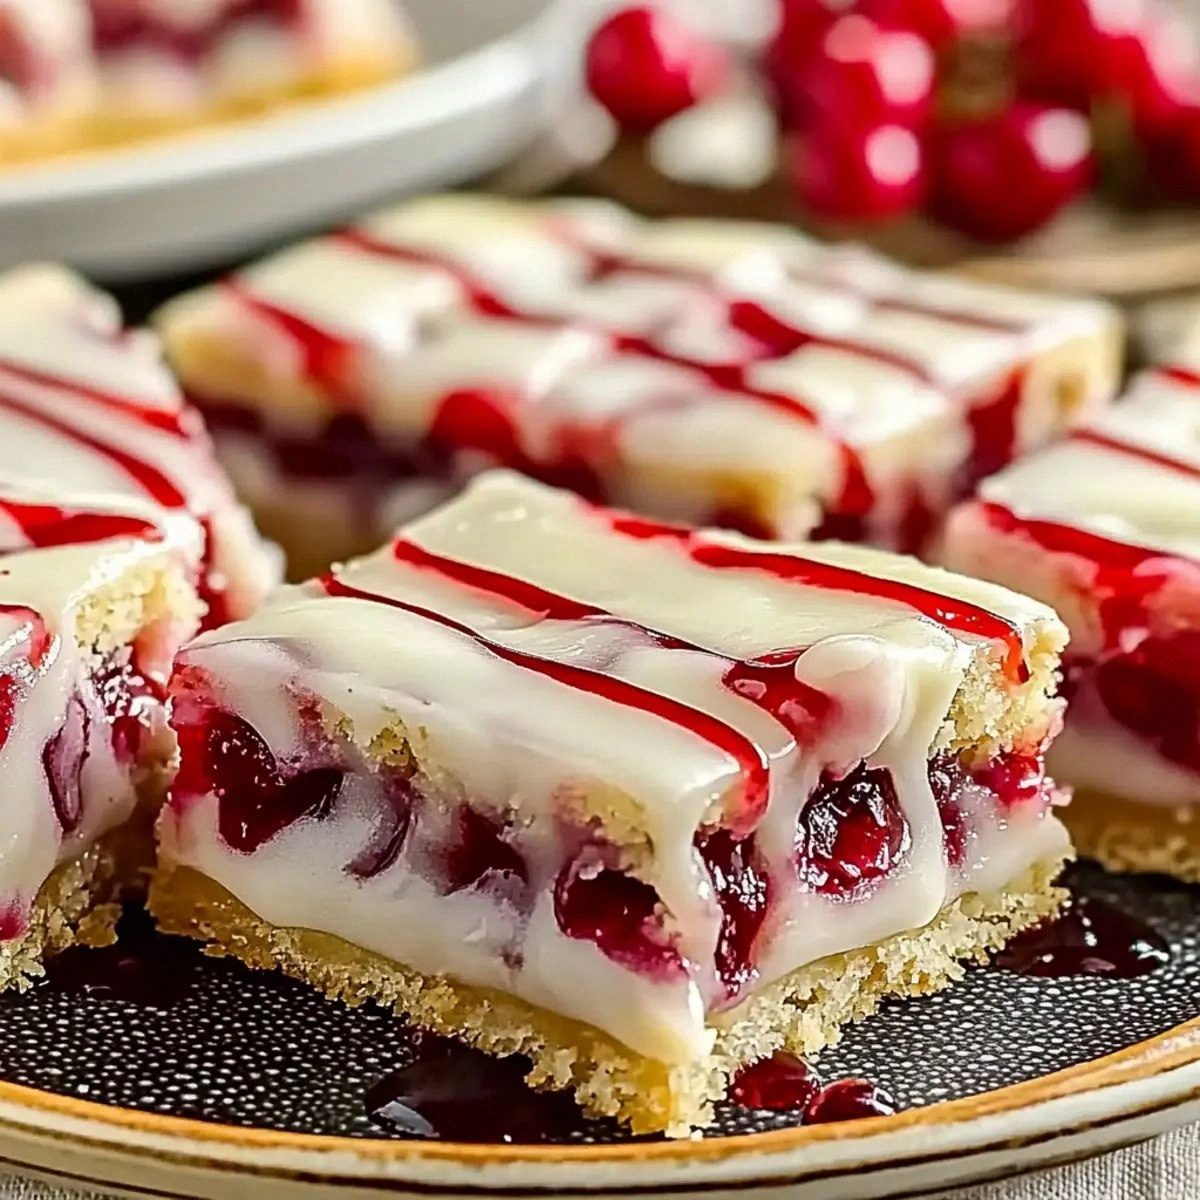
- Uniqueness: The splash of cherry syrup in the glaze adds a subtle acidity that cuts through the sweetness, a secret most recipes skip.
- Crowd Reaction: I dare you to taste this and not go back for seconds; even the pickiest holiday guests have been converted.
- Ingredient Quality: Using real unsalted butter and a good‑quality cherry pie filling makes the difference between “nice” and “irresistible.”
- Cooking Method: The brief chill before baking ensures the bars hold their shape, delivering that perfect edge‑to‑center consistency.
- Make‑Ahead Potential: These bars keep beautifully for up to a week, and they freeze like a charm, so you can prep them ahead of any gathering.
Alright, let's break down exactly what goes into this masterpiece...
Inside the Ingredient List
The Flavor Base
Unsalted butter is the foundation of any good bar, providing richness without the harshness of salted varieties. When melted and creamed with sugar, it creates a glossy, tender matrix that carries the flavors of vanilla and almond like a silk scarf. If you substitute margarine, expect a waxy texture and a faint aftertaste that will betray the whole dessert. For the best result, use European‑style butter with a higher butterfat content; it browns beautifully and adds a subtle nutty note.
The Texture Crew
All‑purpose flour gives the bars their structure, but the ratio to butter is crucial. Too much flour, and you’ll get a dry, crumbly bar; too little, and the center will melt like a snowball in July. The 2‑cup amount is calibrated to achieve a tender yet sturdy crust that can hold the generous cherry filling without sagging. If you’re gluten‑sensitive, a 1‑to‑1 swap with a gluten‑free blend works, but expect a slightly different crumb.
The Unexpected Star
Cherry syrup might sound like a decorative drizzle, but it’s the secret weapon that lifts the glaze from ordinary to extraordinary. It adds a thin layer of acidity that balances the sugary glaze, preventing it from becoming cloying. A splash of cherry syrup also deepens the color, giving the bars a festive ruby sheen that looks as good as it tastes. If you can’t find cherry syrup, a quick reduction of the cherry pie filling with a touch of lemon juice will do the trick.
The Final Flourish
Powdered sugar and a splash of milk or cream create the glossy glaze that crowns the bars. The powdered sugar dissolves into a silky finish, while the dairy adds just enough body to coat without dripping. A common mistake is to over‑mix this glaze, which can cause it to turn grainy; whisk just until smooth and you’ll have a mirror‑like surface. If you prefer a dairy‑free version, substitute with almond milk and the texture remains delightfully smooth.
Everything's prepped? Good. Let's get into the real action...
The Method — Step by Step
Preheat your oven to 350°F (175°C) and line a 9×13 inch baking pan with parchment paper, letting the excess overhang for easy lift‑out later. While the oven heats, melt the unsalted butter in a medium saucepan over low heat, watching it turn a beautiful amber without browning. As soon as it’s melted, remove from heat and stir in the granulated sugar until the mixture looks glossy and the sugar begins to dissolve. That sizzle when it hits the pan? Absolute perfection. Let this mixture cool for a minute before moving to the next step.
In a large mixing bowl, whisk together the eggs, vanilla extract, and almond extract until the mixture is light and slightly frothy. Pour the cooled butter‑sugar blend into the egg mixture, whisking constantly to create a smooth, emulsified batter. This is the moment of truth: the batter should be thick enough to coat the back of a spoon but still pourable.
Kitchen Hack: If the batter looks too thick, add a splash of milk (no more than 1 tablespoon) to loosen it without compromising the crumb.Sift the all‑purpose flour and salt together into the batter, folding gently with a rubber spatula until just combined. Over‑mixing at this stage will develop gluten, leading to a tougher bar; you want to see a few streaks of flour that disappear after a few gentle turns. Once incorporated, cover the bowl with plastic wrap and place it in the refrigerator for exactly 20 minutes.
Watch Out: Skipping the chill will cause the bars to spread too thin, resulting in a crispy edge and a soggy center.While the dough chills, prepare the cherry glaze. In a small saucepan, combine the powdered sugar, milk or cream, and cherry syrup. Whisk over low heat until the mixture is smooth and glossy, then remove from the heat. The glaze should be thick enough to coat the back of a spoon but still flow slowly; if it’s too thick, add a few drops of milk, if too thin, whisk in a touch more powdered sugar.
Take the chilled dough out of the fridge and spread it evenly across the prepared pan, pressing gently with the back of a spatula to create a uniform layer about ½‑inch thick. The dough should be smooth and slightly glossy from the butter. Sprinkle a pinch of sea salt over the top for a subtle flavor contrast that will make the cherry filling pop.
Drop generous spoonfuls of the cherry pie filling over the dough, spacing them about 2 inches apart. Using a butter knife, gently swirl each dollop into the dough, creating a marbled effect without fully mixing the fruit in. This technique ensures every bite has a burst of cherry without the entire bar turning mushy. The aroma at this point is intoxicating—sweet cherries mingling with buttery dough, a scent that tells you you’re on the right track.
Slide the pan into the preheated oven and bake for 30‑35 minutes, or until the edges turn a light golden brown and a toothpick inserted near the center comes out clean (a few crumbs are okay). The top should look set and slightly glossy from the cherry juices. Halfway through baking, rotate the pan 180 degrees to ensure even browning. That faint caramel scent drifting out? That’s your cue that the flavor base is locking in.
While the bars are still warm (but not piping hot), drizzle the cherry glaze over the entire surface, using a spatula to spread it into a thin, even layer. The warmth will help the glaze set quickly, creating that satisfying crackle when you bite into it. Let the bars cool completely in the pan; this allows the glaze to harden and the flavors to meld. Once cooled, use the parchment overhang to lift the whole slab onto a cutting board and slice into squares.
Serve the bars on a decorative platter, dusted lightly with extra powdered sugar if you like an extra snow‑kissed look. Pair them with a hot mug of spiced chai or a glass of chilled Prosecco for a truly festive experience.
Kitchen Hack: Store the sliced bars in an airtight container with a paper towel at the bottom; the towel absorbs excess moisture, keeping the glaze crisp.
That's it — you did it. But hold on, I've got a few more tricks that'll take this to another level...
Insider Tricks for Flawless Results
The Temperature Rule Nobody Follows
Never bake these bars straight from the fridge unless you’ve given them a 20‑minute rest. Cold dough can cause uneven rising, leading to a dense center. Instead, let the dough sit at room temperature for five minutes after chilling; this small adjustment ensures the butter softens just enough to expand evenly. I once tried skipping this step, and the bars emerged with a gummy middle that no amount of glaze could hide.
Why Your Nose Knows Best
Your sense of smell is a more reliable indicator than a timer when it comes to the perfect golden edge. As the bars bake, the kitchen will fill with a buttery caramel aroma; when that scent deepens to a nutty note, it’s time to check the color. If you rely solely on the clock, you risk over‑browning, which can turn the delicate glaze bitter. Trust the nose, and you’ll always hit that sweet spot.
The 5‑Minute Rest That Changes Everything
After you remove the bars from the oven, let them rest on the pan for exactly five minutes before glazing. This brief pause allows the interior to set, preventing the glaze from soaking in and making the top soggy. It also gives the cherry filling a chance to firm up slightly, so you get distinct layers rather than a mushy swirl. I swear by this trick; it’s the difference between a bar that holds its shape and one that collapses under its own weight.
Glaze Consistency Cheat Sheet
If your glaze turns out too runny, whisk in an additional tablespoon of powdered sugar; if it’s too thick, drizzle in a few drops of milk. The key is to achieve a pourable yet glossy consistency that sets quickly. A too‑thin glaze will run off the edges, while a too‑thick one will sit like frosting, muting the crackle we love. Adjust in 5‑second intervals, tasting as you go for the perfect balance.
The Slice‑First, Freeze‑Later Strategy
If you’re planning to freeze the bars, slice them before you freeze. This way, each piece can be individually thawed without waiting for the whole slab to soften. Place the slices on a parchment‑lined tray, flash freeze for 30 minutes, then transfer to a zip‑top bag. When you’re ready to serve, a quick microwave zap (10 seconds) or a brief oven warm‑up (150°F for 5 minutes) revives them to near‑fresh perfection.
Creative Twists and Variations
This recipe is a playground. Here are some of my favorite ways to switch things up:
Chocolate‑Cherry Fusion
Replace half of the all‑purpose flour with cocoa powder and drizzle a dark chocolate ganache over the glaze. The bitterness of chocolate balances the sweet cherry, creating a sophisticated flavor that’s perfect for adult holiday gatherings.
Almond‑Crunch Delight
Stir in ½ cup of toasted sliced almonds into the dough before chilling. The nuts add a crunchy contrast to the soft crumb, and their nutty aroma pairs beautifully with the almond extract already in the batter.
Spiced Autumn Version
Add ½ teaspoon of ground cinnamon and a pinch of ground nutmeg to the dry ingredients. The warm spices turn these bars into a cozy fall treat, especially when paired with a cup of hot apple cider.
Citrus‑Infused Cherry
Mix in the zest of one orange into the cherry filling before spreading. The bright citrus lifts the deep cherry flavor, making the bars feel lighter and perfect for spring brunches.
Vegan Friendly
Swap the butter for coconut oil, use flax‑egg replacer (1 tbsp ground flaxseed + 3 tbsp water per egg), and choose a plant‑based milk for the glaze. The texture changes slightly, but the flavor remains decadently festive.
Storing and Bringing It Back to Life
Fridge Storage
Place the cooled bars in an airtight container lined with a paper towel to absorb excess moisture. They’ll stay fresh for up to five days, retaining their chewy interior and crisp glaze. If you notice the glaze losing its shine, a quick brush of melted butter will revive that glossy finish.
Freezer Friendly
Wrap each bar individually in plastic wrap, then stack them in a freezer‑safe bag. They keep for up to three months without flavor loss. When you’re ready to serve, let them thaw at room temperature for 15 minutes, then give them a brief 150°F oven blast for 5 minutes to re‑crisp the glaze.
Best Reheating Method
To bring a refrigerated bar back to its peak, place it on a parchment‑lined baking sheet and warm it in a 300°F oven for 8‑10 minutes. Add a tiny splash of water (about a teaspoon) to the pan before heating; the steam will rejuvenate the crumb and keep the glaze from drying out.