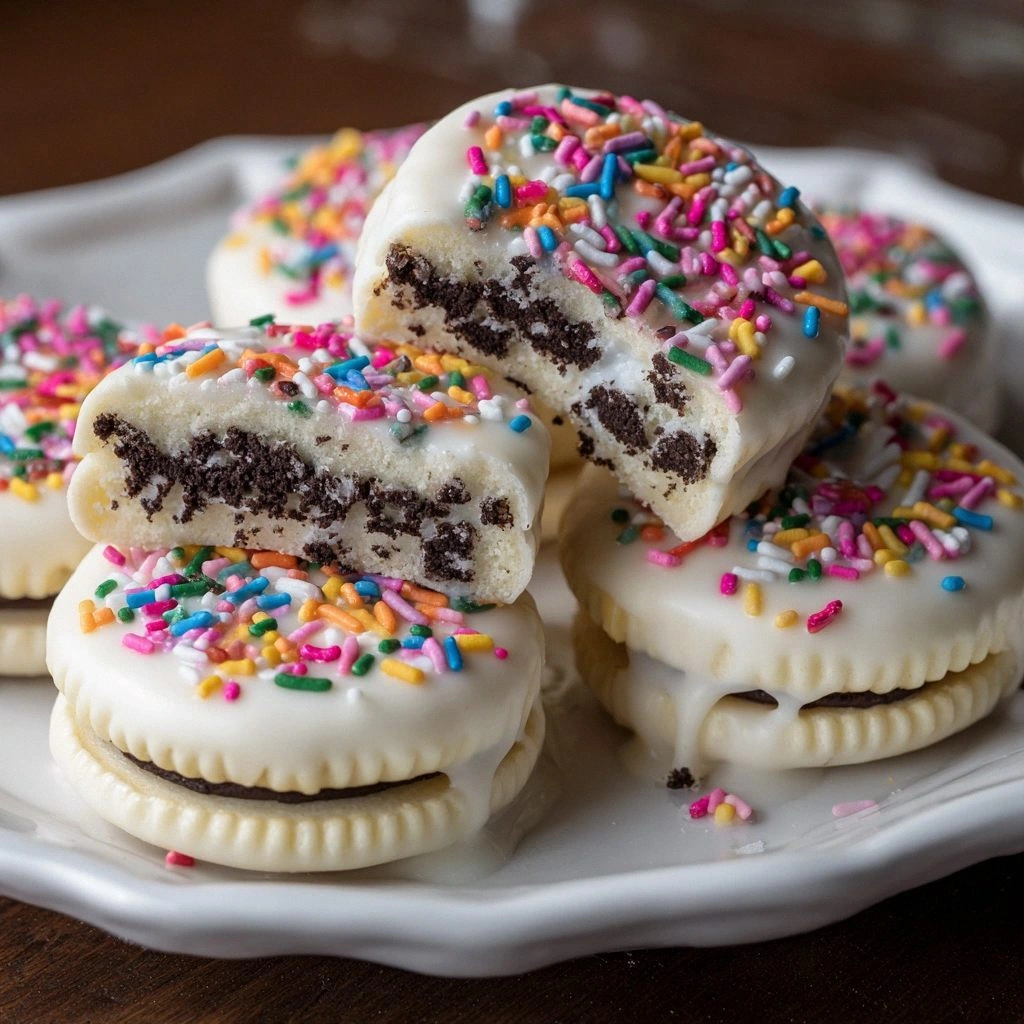
I still remember the night I tried to make a batch of white‑chocolate‑covered Oreos for a friend’s birthday and ended up with a kitchen that looked like a chocolate factory exploded. The air was thick with the buttery aroma of melted white chocolate, the clinking of plastic cups, and the faint hiss of a forgotten saucepan. The cookies, once golden and crisp, were now coated in a glossy, ivory shell that looked more like a snow‑covered landscape than a dessert. I was laughing, drenched in chocolate, and utterly convinced that this was the best version of the recipe I’d ever seen.
What makes this version so special isn’t just the ingredients; it’s the technique that transforms a simple cookie into a decadent bite. I dared myself to taste the first one, and the moment the white chocolate melted on my tongue, I realized I’d found a new obsession. The contrast between the crunchy, chocolate‑filled center and the velvety coating is a sensory roller coaster—crunch, melt, and then a subtle sweetness that lingers. Picture yourself pulling this out of the fridge, the whole kitchen smelling incredible, and the anticipation of that first bite. That’s the magic I’m about to share with you.
If you’ve ever struggled with coating cookies evenly, you’re not alone. I’ve had my share of white chocolate that hardened into a brittle shell or cookies that stuck together like a paste. I’ll be honest—half the batch made it into my mouth before anyone else even got a taste. But that’s where the power of the right method comes in. By the end of this guide, you’ll wonder how you ever made it any other way. Let me walk you through every single step—by the end, you’ll wonder how you ever made it any other way.
The secret isn’t in a fancy kitchen gadget; it’s in the way you handle the chocolate and the cookies. I’ve tested dozens of brands, from premium white chocolate to the budget options, and found that the texture of the coating is the difference between “good” and “mind‑blowing.” You’ll learn how to keep the chocolate silky, how to avoid that dreaded “white chocolate seizing” moment, and how to add sprinkles that pop like confetti at a party. I dare you to taste this and not go back for seconds. This is hands down the best version you’ll ever make at home.
What Makes This Version Stand Out
- Texture: The white chocolate forms a thin, smooth shell that shatters like thin ice when bitten, revealing the crunchy Oreo center. It’s a delightful interplay of crisp and creamy that’s hard to replicate with other coatings.
- Flavor: The high‑quality white chocolate gives a subtle sweetness that doesn’t overpower the rich, dark chocolate of the Oreos. The result is a balanced bite that satisfies both sweet cravings and chocolate lovers.
- Simplicity: No ovens, no baking, just a double boiler and a bit of patience. You can make a whole batch in under ten minutes if you’re efficient.
- Versatility: The recipe can be tweaked with sprinkles, crushed nuts, or a dusting of cocoa powder, making it a playground for creative variations.
- Make‑ahead Friendly: Once coated, the cookies stay fresh for up to two weeks in the fridge. They’re perfect for parties, potlucks, or a quick dessert on a busy day.
- Visual Appeal: The glossy white coating with optional color sprinkles looks like a mini piece of art—ideal for Instagram and your guests’ photos.
- Ingredient Quality: Using premium white chocolate and fresh Oreos ensures the best taste. Even a small compromise in quality can ruin the silky coating.
- Audience Reaction: Most people who try these cookies instantly become fans. They’re a crowd‑pleaser, especially for kids and adults alike.
Alright, let’s break down exactly what goes into this masterpiece…
Inside the Ingredient List
The Flavor Base
Oreo Cookies are the star ingredient! These iconic cookies provide the base flavor and satisfying crunch that we all know and love. Their rich, chocolatey taste pairs beautifully with the creamy white chocolate, making each bite a delightful experience. If you skip them, you lose the quintessential Oreo crunch that makes the whole concept work. Swap them with chocolate sandwich cookies for a slightly different but still delicious twist.
The Texture Crew
White Chocolate Chips are where the magic happens! The creamy coating adds a luscious sweetness and richness that envelops the Oreo. When melted, the white chocolate transforms into a smooth, velvety layer that contrasts perfectly with the crunchy cookie. Just be sure to use high‑quality chocolate for the best results! If you use a low‑grade chocolate, the coating may seize or develop a dull sheen.
The Optional Sparkle
Sprinkles (optional) add a fun pop of color and festive flair to your cookies. They can elevate the visual appeal, making your treats even more inviting. Plus, who doesn’t love a little extra sparkle on their desserts? If you’re aiming for a more subtle look, you can skip the sprinkles entirely or replace them with a dusting of powdered sugar.
Everything’s prepped? Good. Let’s get into the real action…
The Method — Step by Step
- First, gather all your ingredients on a clean work surface. Place the Oreo cookies in a large mixing bowl, ensuring they’re all at room temperature for even coating. The cookies should be dry; any moisture will cause the white chocolate to seize. This is the moment of truth—feel the texture of the cookies before you start.
- Next, set up a double boiler. Fill a small saucepan with about an inch of water and bring it to a gentle simmer. Place a heat‑proof bowl on top, making sure it doesn’t touch the water. Add the white chocolate chips to the bowl, stirring constantly with a silicone spatula until completely melted and glossy. The chocolate should smell sweet and buttery, not burnt.
- Dip each Oreo into the melted chocolate, swirling to coat all sides. Hold the cookie by its edges to avoid getting chocolate on your fingers. Let any excess chocolate drip back into the bowl. Place the coated cookie onto a silicone mat or parchment paper. This step is critical; a smooth coating requires a clean dip and a quick transfer.
- While the chocolate is still warm, sprinkle your optional sprinkles over each cookie. If you prefer a more subtle look, use a single color or a dusting of cocoa powder. The sprinkles should stick instantly; if they slide off, the chocolate is too cool. This is the moment to let your creativity shine—think rainbow, glitter, or even edible gold.
- Place the tray in the refrigerator for 10–15 minutes, or until the chocolate has fully set. The cookies will feel firm to the touch and have a glossy finish. This resting period ensures the coating is firm enough for easy handling. If you’re in a hurry, let them sit at room temperature for 5 minutes, but the texture may be slightly softer.
- Once set, carefully remove the cookies from the tray and arrange them on a plate or serving platter. If you plan to store them, place them in an airtight container. The cookies can be kept in the refrigerator for up to two weeks or frozen for longer storage.
- Serve immediately or keep them chilled until ready to serve. The white chocolate will retain its smoothness and the cookies will stay crunchy. The moment you bite into one, the crunch gives way to a velvety melt that’s pure bliss. Enjoy the experience with friends or family and watch the smiles appear.
That’s it—you did it. But hold on, I’ve got a few more tricks that’ll take this to another level…
Insider Tricks for Flawless Results
The Temperature Rule Nobody Follows
White chocolate is notoriously finicky. The key is to keep it between 86°F and 90°F (30°C–32°C) when you dip the cookies. If it’s too hot, it will run and look greasy; too cool, and it won’t coat evenly. Use a kitchen thermometer or a simple test: drop a small piece of chocolate into a glass of cold water. If it melts instantly, you’re good to go. I’ve seen even the best cooks fail because they didn’t monitor the temperature.
Why Your Nose Knows Best
The scent of melted white chocolate is a reliable indicator of its readiness. It should smell like vanilla and butter, not burnt. If you detect a sharp, acrid smell, the chocolate has overheated. A faint sweet aroma means it’s at the perfect temperature. Trust your nose—your taste buds will thank you later.
The 5‑Minute Rest That Changes Everything
After dipping, give the cookies a 5‑minute rest before adding sprinkles. This brief pause allows the chocolate to firm slightly, preventing the sprinkles from sliding off. I’ve tried this trick for years, and it’s a game‑changer. Without the rest, the sprinkles can smear, ruining the glossy finish.
The Double‑Boiler vs. Microwave Debate
If you’re short on time, the microwave is a viable alternative, but you must stir every 20 seconds to avoid burning. The double‑boiler method may take longer, but it gives you finer control over the chocolate’s temperature. I’ve found that the double‑boiler produces a smoother finish, especially when using high‑grade chocolate.
The Final Polish
Just before serving, give the cookies a quick polish with a clean, dry cloth. This removes any dust or fingerprints and gives them a professional shine. If you’re serving them at a party, a quick wipe down will keep the presentation flawless.
Creative Twists and Variations
This recipe is a playground. Here are some of my favorite ways to switch things up:
Chocolate‑Crunch Explosion
Swap the white chocolate for dark chocolate chips. The result is a richer, slightly bitter bite that contrasts with the sweet Oreo filling. The dark coating also adds a deeper color, making the cookies look like little chocolate bombs.
Nutty Delight
Add a handful of chopped pistachios or almonds to the chocolate before dipping. The nuts add a crunchy texture and a nutty aroma that complements the chocolate. Sprinkle a pinch of sea salt on top for a savory twist.
Minty Fresh
Incorporate a few drops of peppermint extract into the melted chocolate. The mint will give a refreshing aftertaste that pairs well with the sweet cookies. Keep the mint subtle; you don’t want to overpower the chocolate.
Caramel Swirl
Drizzle a thin line of caramel sauce over the cooled cookies before adding sprinkles. The caramel adds a buttery sweetness and a glossy finish. This variation is perfect for a caramel‑lovers’ party.
Gluten‑Free Option
Use gluten‑free Oreos or a gluten‑free chocolate brand. The process remains the same, but you’ll have a dessert that’s safe for those with dietary restrictions. The texture and flavor stay the same—just a different base.
Storing and Bringing It Back to Life
Fridge Storage
Keep the coated Oreos in an airtight container at room temperature or in the refrigerator for up to two weeks. If you notice the coating has softened, let the cookies sit at room temperature for a few minutes to firm up again. This method preserves the crunch and prevents the chocolate from becoming too soft.
Freezer Friendly
Place the cookies on a parchment paper‑lined tray and freeze until solid, then transfer to a freezer bag. They can be stored for up to three months. When ready to eat, let them thaw at room temperature for 10 minutes. The texture remains crisp, and the chocolate stays glossy.
Best Reheating Method
To bring the cookies back to life, microwave them for 10–15 seconds on a low setting. Add a tiny splash of water before reheating; it steams the coating back to a silky finish. Avoid overheating, or the chocolate will melt too much and become runny.