I was standing in my kitchen on a cold December night, the kind of night where the snow outside makes the oven feel like a portal to a warm, sugary wonderland. My roommate had dared me to create a dessert that could out‑shine the glittering lights on our living‑room tree, and I laughed, because honestly, who hasn’t tried a “quick” sugar‑cookie cheesecake that turned out flat, soggy, and frankly, a little sad? The first batch I made that year was a disaster – the crust was as crumbly as stale paper, the filling wobbled like Jell‑O, and the whole thing tasted like a sweet‑tooth’s nightmare. I swear I heard the fridge sigh in disappointment. But that failure sparked an obsession: I was determined to crack the code and deliver a version that would make even the most skeptical grandma gasp, “Now that’s a show‑stopper!”
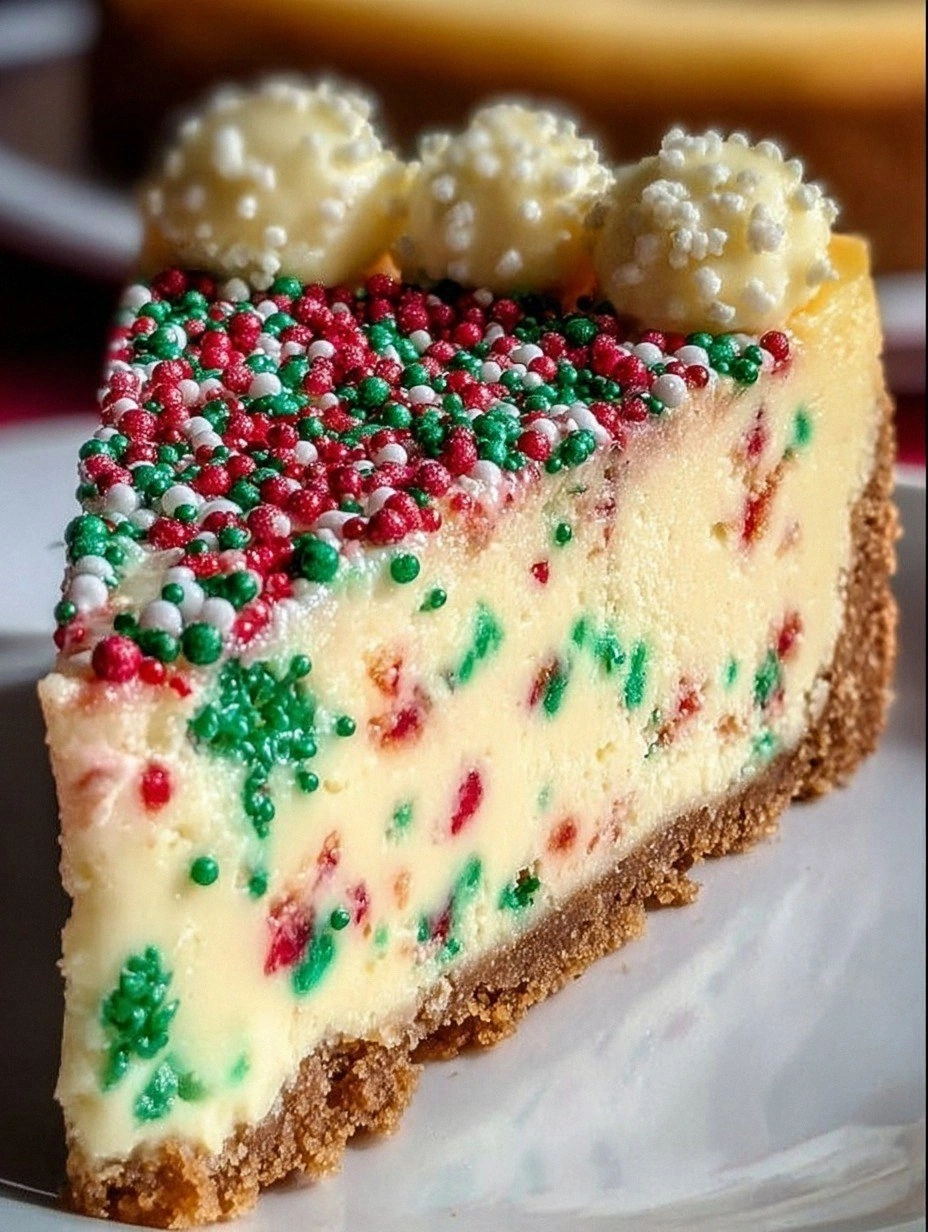
Fast forward a few weeks of trial, error, and a few secret midnight snack sessions, and I finally nailed it. Picture this: a buttery, melt‑in‑your‑mouth sugar‑cookie crust that’s crisp enough to give a satisfying snap, yet soft enough to cradle a velvety cheesecake filling that’s infused with peppermint, vanilla, and a whisper of holiday spice. When you cut into it, the layers glide apart like a perfectly choreographed dance, and the aroma that wafts from the pan is a head‑on collision of sugar‑cookie nostalgia and creamy, festive decadence. The top is crowned with a cloud of lightly sweetened whipped cream and a sprinkle of crushed candy‑cane confetti that crackles like tiny fireworks on your tongue.
What really sets this version apart is the little technique I discovered while watching a pastry chef on YouTube – a quick “freeze‑the‑crust” trick that locks in the buttery flavor and prevents sogginess, plus a secret addition of sour cream that gives the filling a subtle tang and a silk‑smooth texture that most recipes completely miss. Most recipes get the crust wrong, ending up soggy or overly sweet, and the filling often ends up dense like a brick. I’ve solved both problems with a few simple steps that sound like kitchen wizardry but are actually super‑accessible. I dare you to taste this and not go back for seconds; it’s hands down the best version you’ll ever make at home.
Okay, ready for the game‑changer? I’m about to walk you through every single step – from selecting the perfect sugar cookies to mastering the art of the perfect swirl of red and green. By the end, you’ll wonder how you ever settled for any other cheesecake. Stay with me here — this is worth it.
What Makes This Version Stand Out
- Flavor Explosion: The combination of peppermint extract and a dash of vanilla creates a festive flavor profile that dances on the palate, while the crushed candy‑cane topping adds a refreshing, minty crunch that feels like a winter wonderland in every bite.
- Texture Harmony: A crisp, buttery sugar‑cookie crust meets a silky, slightly tangy cheesecake filling, delivering that perfect contrast you crave – think of a soft snow blanket over a crunchy gingerbread base.
- Simplicity Meets Sophistication: Despite the impressive presentation, the ingredient list is straightforward, and the steps are broken down into bite‑size actions that even a kitchen novice can follow without breaking a sweat.
- Unique Visual Appeal: Swirls of red and green food coloring inside the filling create a festive marble effect that looks as good on Instagram as it tastes, turning your dessert into a centerpiece that steals the spotlight.
- Crowd‑Pleaser Factor: Whether it’s a family gathering, a holiday office party, or a cozy night in, this cheesecake consistently earns rave reviews; guests often ask for the recipe before the first slice even disappears.
- Ingredient Quality: Using real butter, high‑fat cream cheese, and a splash of sour cream elevates the richness, while the optional crushed candy‑cane adds a premium touch without breaking the bank.
- Make‑Ahead Magic: The cheesecake can be assembled a day ahead, frozen for up to a month, and reheated with a splash of water to bring back that fresh‑baked texture – perfect for busy holiday schedules.
- Cooking Method Mastery: The freeze‑the‑crust technique and gentle baking in a water bath (bain‑marie) ensure even cooking, preventing cracks and guaranteeing a flawless finish every single time.
Inside the Ingredient List
The Flavor Base
First up, the sugar‑cookie crust. We use 2 cups of all‑purpose flour, which provides the structural backbone, and ½ cup of powdered sugar to lend a delicate sweetness that doesn’t overpower the cheesecake. The ½ tsp of salt is a silent hero – it amplifies the flavors and balances the sugar, preventing the crust from tasting one‑dimensional. 1 cup of melted unsalted butter is what gives the crust its melt‑in‑your‑mouth richness; make sure the butter is just warm, not hot, so it mixes smoothly without cooking the flour. A splash of 1 tsp vanilla extract adds a warm, fragrant note that ties the crust to the filling.
The Texture Crew
Now, the filling. The star is 24 oz (3 packages) of cream cheese, softened. This high‑fat dairy product is the reason the cheesecake is so silky; if you use low‑fat, you’ll end up with a rubbery texture that no one wants. 1 cup granulated sugar sweetens the mixture without making it gritty, while 3 large eggs act as the binder, giving the cheesecake its lift and structure. The secret weapon is ½ cup sour cream, which adds a subtle tang and keeps the filling from becoming too dense – think of it as the culinary equivalent of adding a dash of espresso to chocolate for depth. Finally, 1 tsp peppermint extract and ½ tsp vanilla extract create that holiday‑centric aroma that makes your kitchen smell like a festive bakery.
The Unexpected Star
A tiny but mighty addition is the food coloring. A few drops of red and green swirl together to create a marbled effect that’s both playful and elegant. You’ll be amazed at how a splash of color can transform a plain cheesecake into a holiday masterpiece that looks like it was crafted by a professional pastry chef. If you’re not a fan of artificial colors, you can swap in natural beet juice for red and matcha powder for green – the flavor impact is negligible, but the visual payoff remains.
The Final Flourish
For the topping, we keep it light and airy with 1 cup heavy whipping cream and 2 tbsp powdered sugar, whisked until soft peaks form. This cloud‑like layer balances the richness of the cheesecake and adds a silky finish. A final dusting of crushed candy cane not only adds a festive crunch but also introduces a subtle peppermint burst that echoes the filling’s flavor, creating a harmonious loop of taste from first bite to last.
Everything's prepped? Good. Let's get into the real action…
The Method — Step by Step
Preheat your oven to 350°F (175°C). While the oven warms up, combine the flour, powdered sugar, and salt in a large mixing bowl. Toss in the crushed sugar cookies if you’re using them for extra texture, then drizzle the melted butter and vanilla over the dry ingredients. Use a rubber spatula to blend everything until the mixture looks like coarse sand with glossy butter clumps. This is the moment where the crust starts to feel like a cohesive dough, and you’ll notice a faint nutty aroma as the butter coats the flour.
Kitchen Hack: Press the crust into a 9‑inch springform pan using the bottom of a measuring cup; this ensures an even thickness without over‑pressing, which can cause cracks later.Transfer the crust mixture into the springform pan and press it firmly into an even layer, making sure the edges are slightly higher than the center. Place the pan on a parchment‑lined baking sheet and pop it into the freezer for at least 15 minutes. This chilling step is crucial – it solidifies the butter, creating a barrier that prevents the crust from soaking up moisture from the filling later on. While you wait, you can start prepping the filling, which keeps the workflow smooth and prevents any idle time.
In a stand mixer fitted with the paddle attachment, beat the softened cream cheese on medium speed until it’s completely smooth, about 2 minutes. Add the granulated sugar and continue beating until the mixture is light and fluffy, resembling a cloud that’s just about to burst. Scrape down the sides of the bowl regularly; this ensures an even texture and prevents any pockets of unmixed cheese that could cause cracks during baking.
Add the eggs one at a time, beating on low speed after each addition. This slow incorporation prevents the batter from becoming too airy, which could cause the cheesecake to rise and then collapse. Once the eggs are fully incorporated, fold in the sour cream, peppermint extract, and vanilla extract. The batter should now have a glossy sheen and a faint minty scent that makes you want to inhale deeply.
Watch Out: Over‑mixing after adding the eggs can incorporate too much air, leading to cracks. Stop mixing as soon as the batter looks smooth and glossy.Now for the festive swirl: divide the batter into two equal parts in separate bowls. Add a few drops of red food coloring to one half and green to the other, stirring just enough to create a uniform hue without turning the batter completely pink or teal. Pour the red batter into the center of the chilled crust, then gently spoon the green batter around it, creating a marbled pattern with a toothpick or the tip of a knife. The visual contrast is as striking as a Christmas tree against a night sky, and the flavors will mingle beautifully as they bake.
Kitchen Hack: Use a small squeeze bottle for the colored batters; this gives you precise control over where the color goes, resulting in cleaner swirls.Place the springform pan in a larger roasting pan and pour hot water into the outer pan until it reaches halfway up the sides of the springform. This bain‑marie method creates a gentle, even heat that prevents the cheesecake from cracking and ensures a creamy, custard‑like interior. Carefully slide the whole assembly into the preheated oven and bake for 45‑50 minutes, or until the edges are set and the center still has a slight wobble when you gently shake the pan. That wobble is the sign of a perfectly baked cheesecake – it will firm up as it cools.
Once the baking time is up, turn off the oven, crack the door open a few inches, and let the cheesecake sit inside for another 30 minutes. This gradual cooling prevents a sudden temperature drop, which is another common cause of cracks. After the oven soak, remove the cheesecake from the water bath, run a thin knife around the edge to release it from the pan, and let it cool completely on a wire rack.
While the cheesecake cools, whip the heavy cream with the powdered sugar and vanilla until soft peaks form. Be careful not to over‑whip; you want a light, airy topping that will melt into the cheesecake’s surface without becoming buttery. Once the cheesecake is at room temperature, spread the whipped cream evenly over the top, then sprinkle the crushed candy cane over the surface. The candy cane adds a festive crunch and a burst of peppermint that echoes the filling’s flavor.
Refrigerate the assembled cheesecake for at least 4 hours, preferably overnight. This chilling step sets the filling, allows the flavors to meld, and gives the crust a chance to firm up completely. When you’re ready to serve, run a hot, damp towel around the base of the springform pan for a few seconds, then gently release the latch. Slide the cheesecake onto a serving platter, slice with a hot, wet knife for clean cuts, and watch your guests’ faces light up as they take that first bite.
That's it — you did it. But hold on, I've got a few more tricks that'll take this to another level…
Insider Tricks for Flawless Results
The Temperature Rule Nobody Follows
Never bake a cheesecake straight from the fridge. Let the filling sit at room temperature for 20‑30 minutes before you whisk in the eggs. This prevents the batter from curdling and ensures a smooth, homogeneous mixture. I once tried to skip this step, and the result was a lumpy, uneven texture that resembled a cheese soufflé gone wrong. Trust me, the extra 20 minutes are worth the silky finish you’ll achieve.
Why Your Nose Knows Best
Your sense of smell is a far better indicator of doneness than a timer. When the edges of the cheesecake start to turn a light golden brown and you can smell a faint buttery nuttiness, you’re close. If you open the oven and catch a whiff of raw egg, the cheesecake needs a few more minutes. This sensory checkpoint saves you from over‑baking, which can cause a dry, crumbly texture.
The 5‑Minute Rest That Changes Everything
After you pull the cheesecake from the oven, let it rest inside the turned‑off oven for exactly 5 minutes with the door ajar. This short “rest” allows the residual heat to finish the cooking process gently, preventing a sudden collapse and ensuring the center stays creamy. Skipping this step often leads to a center that’s too firm, which defeats the whole purpose of a cheesecake’s luscious melt‑in‑your‑mouth feel.
The Water‑Bath Whisper
If you’re short on time, you can still achieve a water‑bath effect without a roasting pan. Simply place the springform pan on a sturdy baking sheet, then carefully pour hot water onto the sheet until it reaches halfway up the sides of the pan. The water’s gentle steam creates a uniform heat envelope, mimicking a true bain‑marie. This hack is a lifesaver for small kitchens where a large roasting pan isn’t available.
Whip It Like a Pro
When whipping the topping, start on low speed and gradually increase to medium‑high. This prevents splatter and gives you more control over the texture. If you notice the cream turning grainy, stop immediately – you’ve crossed the line into butter. A pro tip is to chill the mixing bowl and beaters for 10 minutes before you start; the cold environment keeps the fat from separating too quickly.
Creative Twists and Variations
This recipe is a playground. Here are some of my favorite ways to switch things up:
Chocolate Peppermint Dream
Replace half of the flour in the crust with cocoa powder and add ¼ cup of finely chopped dark chocolate to the filling. The result is a rich chocolate base that pairs beautifully with the peppermint, creating a flavor reminiscent of a holiday hot chocolate.
Cranberry Orange Burst
Swap the peppermint extract for 1 tsp of orange zest and fold in ½ cup of dried cranberries into the filling. The citrusy orange brightens the palate while the cranberries add a tart pop, making the cheesecake feel fresh and festive.
Nutty Caramel Crunch
Stir ¼ cup of toasted pecans and ¼ cup of caramel sauce into the batter before baking. The nuts provide a buttery crunch, and the caramel weaves through the cheesecake like a golden ribbon, perfect for those who love a sweet‑and‑nutty combo.
White Chocolate Raspberry Swirl
Melt ½ cup of white chocolate and fold it into the filling, then swirl in a raspberry puree. The white chocolate adds silky sweetness, while the raspberry introduces a subtle tartness that cuts through the richness.
Vegan Holiday Version
Use a plant‑based cream cheese alternative, coconut oil instead of butter, and a flax‑egg mixture (1 tbsp ground flaxseed + 3 tbsp water per egg). The flavor profile stays festive, and the texture remains creamy – proof that you don’t need dairy to create a show‑stopping dessert.
Storing and Bringing It Back to Life
Fridge Storage
Cover the cheesecake loosely with plastic wrap or a cake dome and store it in the refrigerator for up to 5 days. The cool environment keeps the filling firm while allowing the flavors to meld. If you notice the surface drying out, lightly brush the whipped topping with a tiny drizzle of milk to keep it moist.
Freezer Friendly
Wrap the entire springform pan in a double layer of aluminum foil, then place it inside a freezer‑safe zip‑top bag. The cheesecake freezes beautifully for up to 3 months. When you’re ready to serve, transfer it to the fridge to thaw overnight – no need to rush, as a slow thaw preserves the texture.
Best Reheating Method
To revive a refrigerated slice, place it on a microwave‑safe plate, add a tiny splash (about a teaspoon) of water around the edges, and microwave on low power (30% power) for 15‑20 seconds. The steam generated re‑hydrates the crust and makes the filling melt‑in‑your‑mouth again. For a larger portion, reheat in a 300°F oven for 10 minutes, covering the top loosely with foil to prevent over‑browning.